This is the multi-page printable view of this section. .
Documentation
Last updated:
- 1: Getting started
- 2: AGW features
- 2.1: Custom agents
- 2.2: Agentflow
- 2.3: Shared context across agents
- 2.4: Image input
- 2.5: Memory: preferences and project knowledge
- 2.6: Plan and Execute modes
- 2.7: Structured responses with JSON Schema
- 2.8: Tool approval
- 2.9: File browsing and Git change review
- 2.10: Multiple clients
- 2.11: Third-party account sign-in
- 3: User guide
- 3.1: Model providers
- 3.2: Create a custom agent
- 3.3: Connect external agents
- 3.4: Chat and execution history
- 3.5: Projects, files, and workspaces
- 3.6: Agentflow
- 3.7: Scheduled jobs
- 3.8: Tools and Skills
- 3.9: MCP servers
- 3.10: Configure integrations
- 3.11: Web, Desktop, and Mobile
- 4: Operations
- 5: Development
Choose the path that matches your task. Start with Getting started for a new installation, or open the User guide for an existing server.
- Getting started: concepts, installation choices, and your first conversation.
- AGW features: explore custom agents, Agentflow, agent handoffs, image input, memory, working modes, structured responses, tool approval, file and Git change review, multiple clients, and third-party sign-in.
- User guide: agents, projects, workflows, and scheduled jobs.
- Operations: hosting, authentication, backups, and troubleshooting.
- Development: source setup, module boundaries, and extensions.
These docs describe the current repository implementation. AGW is in active development before 1.0; read the target release notes before upgrading.
1 - Getting started
Last updated:
Follow this path for your first installation and conversation. Read “What is AGW?” to understand its uses, or go straight to your first conversation if Server is already connected.
- What is AGW?: learn what it does and where tasks run.
- Install and configure Server: choose a package, initialize, and connect a client.
- Start your first conversation: configure a model and agent, then test a continuing conversation.
Use Core concepts to look up unfamiliar terms.
1.1 - What is AGW?
Last updated:
AGW is a self-hosted agent workspace for individuals and small engineering teams. It can also serve as an agent gateway. A shared interface brings together custom agents and external agents such as Claude Code, Codex, and Pi, with conversations and execution records organized around projects.
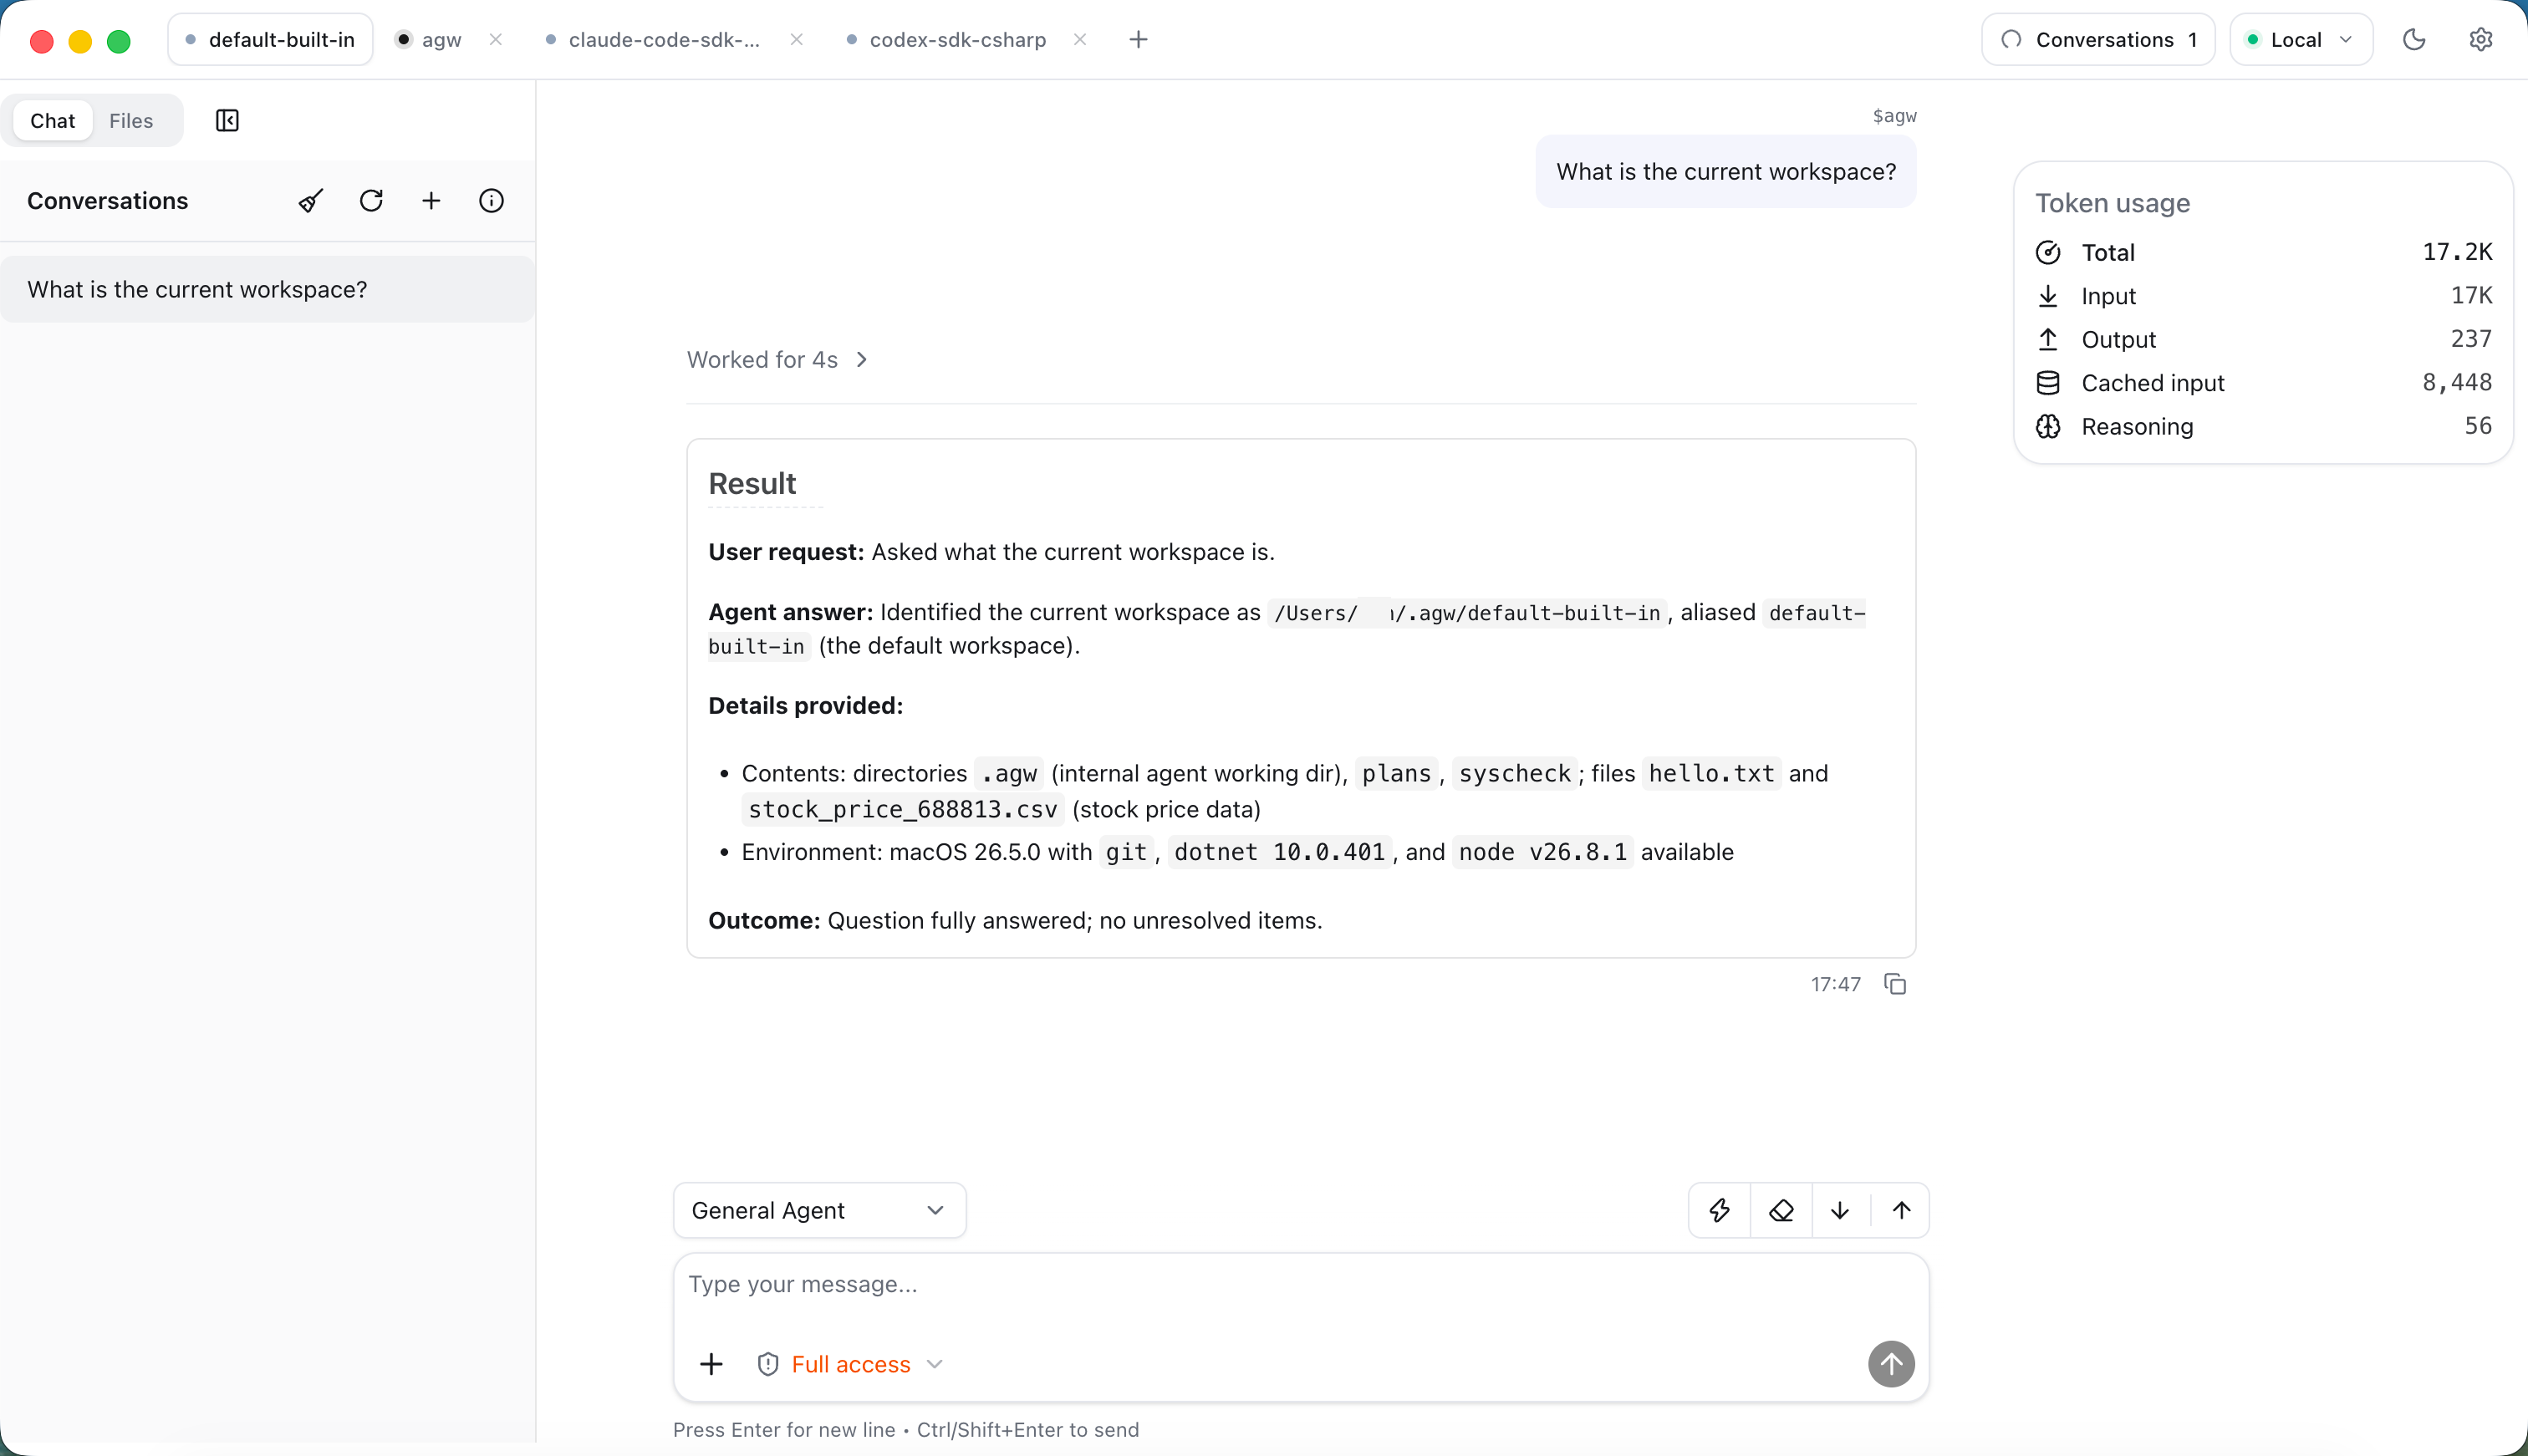
Core concepts
| Concept | Purpose |
|---|---|
| Model Provider | Connect a provider and model into a usable model configuration |
| Agent | Configure instructions, a model, and capabilities, or connect an external agent |
| Project | A task space containing working directories, context, and conversations |
| Chat | Start interactive execution, inspect messages and tool activity, and answer human input requests |
| Agentflow | Connect nodes into an executable workflow |
| Job | Trigger an agent or agentflow once, at an interval, or on a Cron schedule |
See Core concepts for the distinctions and how they work together.
What you can do with AGW
For a code project, ask one agent to explain unfamiliar code, then ask another to review a change. The Project’s conversations retain the discussion and results. Once a task works manually, schedule recurring work such as a weekly progress summary.
| Need | Where to start |
|---|---|
| Ask a question or edit a passage | Create an agent and send the task in Chat |
| Read or change project files | Set a Project workspace and configure the necessary tools |
| Continue with a different agent | Switch agents in the same conversation and describe the next task |
| Follow a repeatable sequence | Connect steps in an Agentflow, adding human confirmation where needed |
| Repeat work on a schedule | Create a Job and inspect the outcome of each run |
Where tasks run
Server is the program that runs AGW. Web, Desktop, and Mobile are clients used to operate it. When connected to a remote Server, agents use files, commands, and tools on that host. Opening a conversation on a phone does not move execution to the phone.
For a first local installation, Desktop Full includes Server. For browser access, deploy Docker or Portable Server. Configure a model service separately; using a remote model sends model input outside the AGW host.
Choose a deployment
Standalone runs management, conversations, and scheduled jobs in one Server. It uses SQLite by default and suits local use or a single host.
Split Control/Data Plane deployment assigns management and scheduling to Control Plane and execution to Data Plane. It supports separate service deployment and additional execution nodes, but requires shared PostgreSQL, keys, workspaces, and request routing.
Start with Standalone for a simple setup. See Installation for packages, or Split deployment for deployment and routing details.
Start with a small task
- Install and configure Server and initialize the server.
- Configure one working model and create an agent.
- Send a simple question in Chat to verify the model and execution path.
- Add a Project for files, an Agentflow for fixed steps, and a Job for recurring work when needed.
Execution records live in your server database. Self-hosting does not mean inference always stays on your computer: selecting a remote model provider sends requests to that provider.
Current boundaries
AGW is pre-1.0. It suits clearly defined tasks and human-agent collaboration. Complex work still needs clear inputs, completion criteria, and human review. Authentication uses an administrator login, third-party account sign-in, and API Keys; roles and per-key permission scopes are not available.
Implementation and references
1.2 - Core concepts
Last updated:
In AGW, models provide reasoning, agents organize instructions and capabilities, and Projects provide a workspace. Use Chat to interact with an agent, Agentflows to orchestrate steps, and Jobs to schedule execution.
Models and Model Providers
Model configuration has three layers:
| Concept | What it describes |
|---|---|
| Provider | The model service protocol, endpoint, and authentication |
| Model | The model identifier, context window, maximum output, and other specifications |
| Model Provider | A link between a model and the service providing it, selectable by an agent |
For example, you can link the same model to different Providers, then choose the actual connection for an agent. See Model providers for configuration.
Agent: the role that performs work
An agent defines who performs a task, which instructions to follow, and which capabilities are available.
- Custom agent: configure a model, instructions, tools, and Skills in AGW, which runs the agent.
- External agent: connect a CLI such as Claude Code, Codex, or Pi using an environment installed and configured on the execution node.
An agent definition can serve many tasks; an execution is the process of handling a particular input. For example, “Code explainer” is an agent, while “Explain this function” is an input. See Create a custom agent and Connect external agents.
Project: the workspace
A Project organizes directories, context, and conversations around a piece of work. For example, a code repository can have a Project with separate conversations for code exploration and troubleshooting.
The primary Workspace is the agent’s default working directory. Additional directories provide access to other server-side paths. Switching directories in the file browser does not change the agent’s default working directory.
These paths must be visible to Server or the execution node. See Projects, files, and workspaces.
Chat, conversations, and execution
Chat is the interaction surface. A conversation holds the context and records of an ongoing exchange. An execution is an agent or agentflow processing input.
You can send multiple messages within a conversation. During execution, inspect replies and tool activity, approve actions, or provide requested information. Losing the page connection does not mean execution has stopped; check its actual state after reconnecting. The icon beside each conversation in the list shows Running, Last turn failed, or Last turn interrupted.
See Chat and execution history.
Agent Capability
A capability is something an agent can use to complete a task. The following concepts describe individual operations, tool groups, task instructions, and ways to connect external services.
Tools
A Tool is one callable operation, such as reading a file or querying a job. An agent calls tools as needed and uses their results to continue working on the task.
ToolBlocks
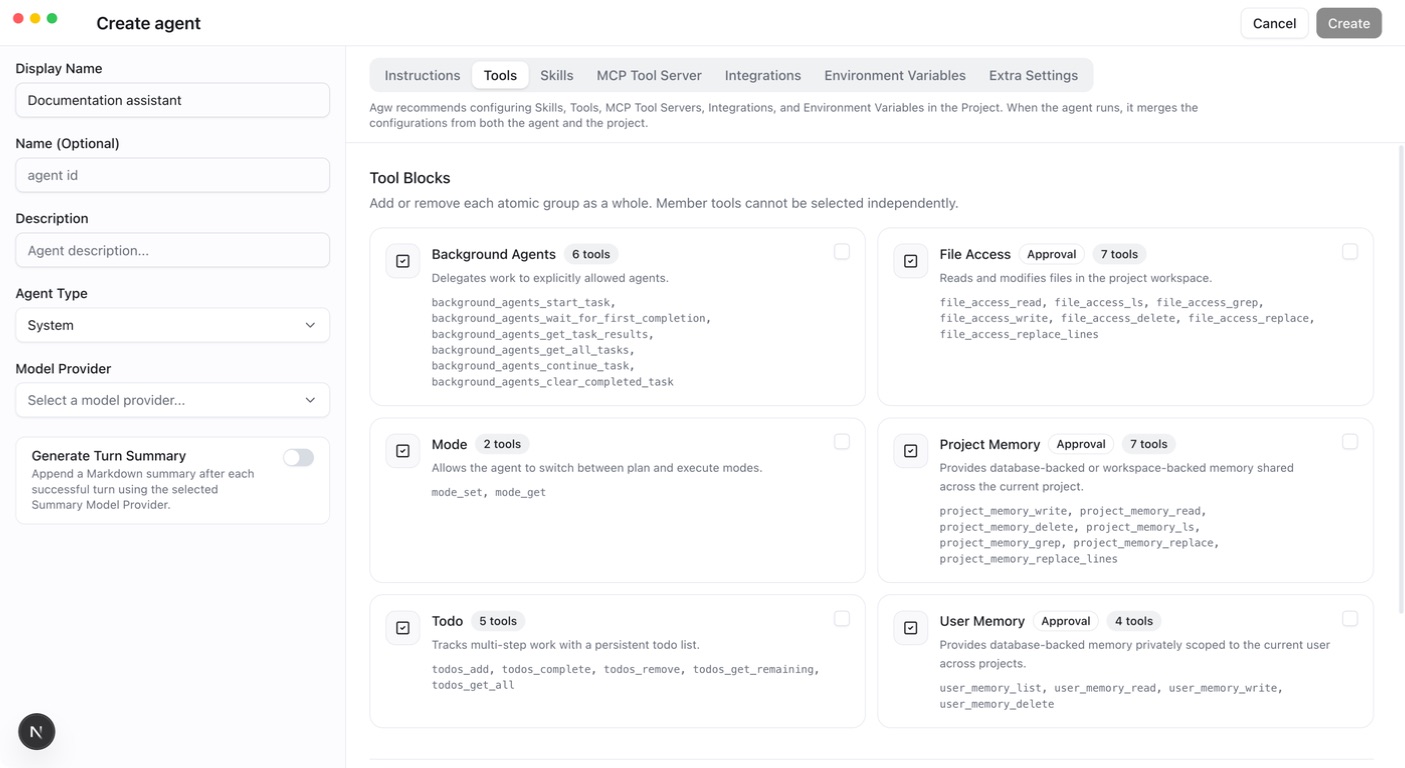
A ToolBlock groups related tools that must be selected and managed together to keep behavior and state consistent. The block is selected as a whole, while the model invokes its individual tools.
For example, todo groups tools for adding, listing, and completing to-do items. Selecting it makes members such as todos_add, todos_get_all, and todos_complete available. These members cannot be selected or removed as standalone tools.
Skills
A Skill provides task-oriented instructions, resources, and optional tools to guide how an agent performs work. For example, agw-job supplies job-management instructions and tools.
Skills come in three kinds: Built-in, Local, and Remote. Built-in Skills are provided by AGW modules, such as agw-job above. You can add Local or Remote Skills: Local uploads a package to AGW Server; Remote reads it from a URL. Choose based on who maintains the content and whether packaged resources are needed. See Tools and Skills for formats and update rules.
MCP
MCP is a protocol for connecting tool servers. After an MCP Server is configured, AGW can discover and invoke its tools, giving agents access to the capabilities it provides. See MCP servers for setup.
Plugins
A Plugin defines an integration’s capabilities and how to connect to its service, including connection methods, authentication, tool sources, and bundled Skills. For example, the GitHub Plugin defines GitHub authentication and tool capabilities.
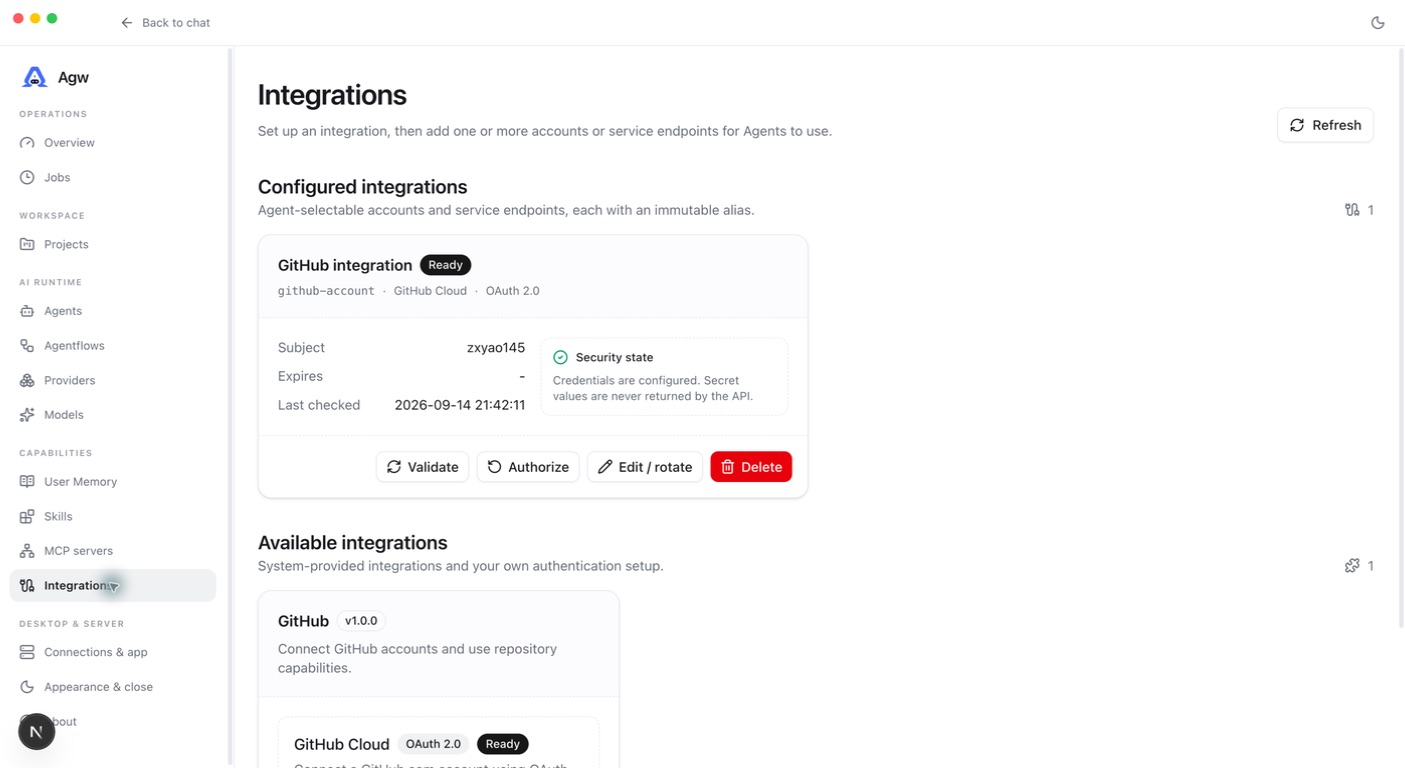
Integrations
Integrations is where users select and configure external services. It has two parts:
- Available integrations: the catalog of integrations users can select and configure, such as GitHub. It presents the capabilities defined by Plugins.
- Configured integrations: specific accounts or endpoints configured by the user. The same integration can have multiple accounts, such as personal and work GitHub accounts.
Agents select specific configured integrations. Only owner-matched, Ready accounts or endpoints supply capabilities. In code, a configured integration is represented by the Connection type.
See Integrations for setup.
Agentflows and Jobs
An Agentflow determines how steps work together. It can combine agents with branching, parallel execution, and human approval nodes. For example, one agent collects material, another summarizes it, and a person approves the output.
A Job determines when to run. It triggers an agent or agentflow once, at an interval, or on a Cron schedule, recording the outcome of each attempt. A simple scheduled question can target an agent directly; select an agentflow when multiple steps are needed.
They also work independently: run an agentflow manually in Chat, or schedule a single agent with a Job. See Agentflows and Jobs.
Putting the concepts together
For a recurring project progress summary:
- Create a Project and set its working directory.
- Configure a Model Provider and create an agent to summarize progress.
- Bind the tools or configured integrations needed to read the source material.
- Run it once in Chat and confirm the result meets your needs.
- Use an Agentflow for collaboration or approval steps, and a Job for recurring execution.
For your first use, complete a simple conversation before adding more capabilities.
1.3 - Install and configure Server
Last updated:
AGW needs a running Server and a client to operate it. For a first local installation, choose Desktop Full. If Server already exists, use Desktop Client or a browser. After installation, configure a model service or external agent to start a conversation.
Installation paths
| Method | Best for | Key differences |
|---|---|---|
| Desktop Full | A local graphical workspace | Installs both the desktop client and Server; Server runs as a current-user background service |
| Desktop Client | Connecting to an existing Server | Installs only the desktop client, without Server; connects to a local or remote Server |
| Docker | Containerized self-hosting | Runs Server in a container with Web included; mounts provide persistent data and workspace access |
| Portable Server | Hosting directly on a machine | Runs the Server executable directly with Web included; no Docker or desktop client required |
| Source | Development and debugging | Build and run the backend and required clients yourself to modify code and debug modules |
Desktop
- Open GitHub Releases.
- Select Full or Client for your platform. Windows and Ubuntu currently support x64; macOS supports x64 and arm64.
- Complete initialization on the first Full launch, or connect Client to an existing Server.
Full and Client share an application identity and are mutually exclusive variants. Full installs a current-user Server daemon; closing Desktop does not stop it. Packages are currently unsigned and not notarized.
Docker and Portable Server
Docker images are published to ghcr.io/zxyao145/agw with each release. Portable Server is not attached to Releases; build it from the repository root, for example with PUBLISH_MODE=portable APP_VERSION=0.1.0 RIDS=linux-x64 ./publish.sh, then start agw-server serve as described in the standalone guide.
Choose a deployment approach for your needs:
- Standalone and Docker deployment: run the complete service in one Server for local trials or single-server self-hosting.
- Split Control/Data Plane deployment: run management and scheduling separately from task execution when you need independent deployment or more execution nodes. The guide covers the shared database, directories, and Nginx routing.
Configure a domain, HTTPS, and a reverse proxy for shared or remote access.
The Docker image does not include any external agents, such as Claude Code, Codex, or Pi. Install and configure them in the container yourself if needed.
Source
Follow Development setup, starting the Standalone Host before Web. The backend defaults to port 30816; Web development uses 3001.
Configure Server
Prerequisites: Server is running, database configuration is valid, and its data directory is writable. Standalone defaults to SQLite with InProcess execution.
First-run initialization
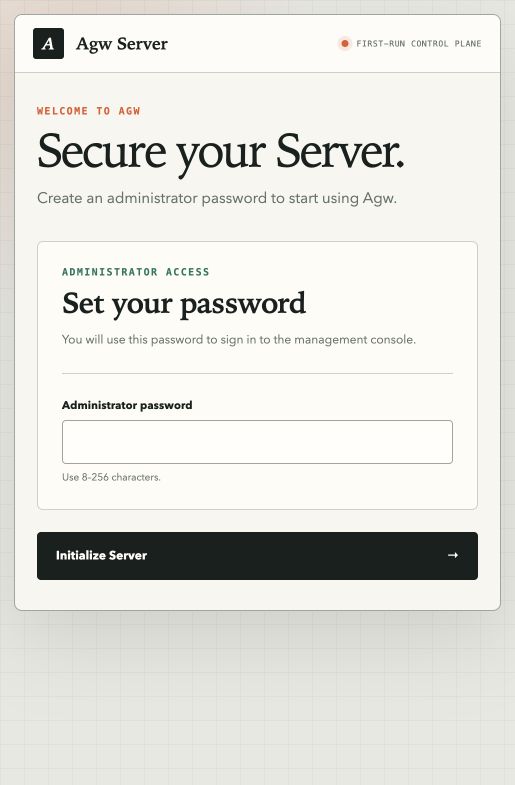
- Open the Server’s
/setuppage, such ashttp://localhost:30816/setupon the local machine. Docker and Portable Server include Web; source users can initialize the server before starting Web. - Set the administrator password. Only direct access on the Server host through
localhostor a loopback address skips the Setup Code. Access through a domain, reverse proxy, another host, or a port mapped from a Docker container also requires the one-time Setup Code from the startup log. - Submit and wait for database initialization. The application opens without another restart.
After initialization, authentication settings are saved in the database, so later starts do not repeat setup. Preserve the database and encryption keys when moving or backing up the service; see Backup and upgrades.
Connect clients
- Remote Web signs in with the administrator password and receives a session Cookie. With identity providers configured, the Web sign-in page also shows third-party account buttons. Desktop shows Sign in with … buttons below each Server in Settings → Connections & app; they sign in through the system browser and obtain an API Key automatically. See Configuration and authentication.
- Desktop, Mobile, and automation use API Keys, sent in the
Authorization: Bearer agw_...header. Plaintext is shown only once when a key is created. - Desktop Full uses the Server-owned setup page, then provisions its own API Key and protects it with the operating system credential store.
An API Key is the client’s access key to Server. To connect Desktop Client or Mobile remotely, sign in to Web, open Settings → Server access, enter a Token name under API tokens, and create an API Key. Then enter the Server URL and full key in the client. In Desktop Client, open Settings → Connections & app, click + (Add remote Server), and fill in Name, Server URL, and API token. On a phone, localhost refers to the phone, not your computer.
Unattended initialization
Inject the initial password through Setup__AdminPassword. In split deployments, initialize Control Plane only; Data Plane has no Setup page. Keep real passwords out of code and documentation.
Setup parameters cannot overwrite an initialized server. Select the database and execution mode through standard configuration before startup, not through the Setup form.
Continue with Your first conversation. If login fails, first verify that the client connects to the intended Server.
Implementation and references
1.4 - Start your first conversation
Last updated:
Prerequisites: initialization is complete, the management UI is accessible, and you have model provider credentials. This path creates a custom agent and does not require an external CLI.
1. Set up a model connection
Open model management and configure the three items below. The form layout may vary by client, but the information is the same.
| Setting | What to prepare | Purpose |
|---|---|---|
| Provider | The service’s protocol, API endpoint, and API key | Where AGW sends requests and how it authenticates |
| Model | The exact model ID, context window, and maximum output length | Which model to use and its content limits |
| Model Provider | A link between the model and provider | The working connection an agent selects |
Use the model ID supplied by the service. Model discovery may suggest 256,000 / 64,000 for context and output limits; replace these defaults with the model’s actual specifications. See Model providers for field details.
2. Create a simple agent
In Agents, click Create. Keep the default Agent Type System (a custom agent), enter “Question helper” as the Display Name, choose your connection in Model Provider, and enter these Instructions:
Click Create to save, then confirm that the Enabled switch is on in the Agents list. New agents are enabled by default. Start with text chat; add tools, Skills, and workflows after the connection works.
3. Send your first message
Open Chat, confirm the Server, and choose an available Project: in Desktop, use the project tabs at the top of the window; in Web, use the dropdown at the top of the left sidebar. Then choose “Question helper” in the selector at the top-left of the message box and send:
The reply should appear progressively and the execution should finish. Follow up with “Make that explanation simpler” to check that the agent can continue the discussion. This verifies both the model connection and a continuing conversation.
Next steps
Verify plain text chat before adding tools and Skills. File-based work needs a Project workspace. An existing Codex or Claude Code installation can use an external agent.
No response
Check the selected Model Provider, model ID, credentials, and endpoint, then inspect Server logs. The icon beside each conversation in the list shows its status: Running means it is still running, Last turn failed means the previous turn failed, and Last turn interrupted means the previous turn was interrupted. A conversation may also be waiting for approval or user input; handle that state in Chat. Avoid adding many tools or complex workflows before the model connection works.
Implementation and references
2 - AGW features
Last updated:
Explore eleven ways AGW supports everyday work. Each page explains a use case, where to start, and the limits to keep in mind.
2.1 - Custom agents
Last updated:
Define an agent for your task
In AGW, you can combine a model, instructions, and tools into a reusable agent. It assesses the task and context, selects available tools to act, and uses the results to continue its work.
For example, create a documentation reviewer that reads material, identifies unclear passages, and suggests revisions. Add the appropriate tools and permissions when it needs to edit files directly.
What you can customize
| Setting | What it determines |
|---|---|
| Model Provider | The model used to understand tasks and generate replies |
| Instructions | Role, scope, processing requirements, and output format |
| Tools and Skills | Available operations, task guidance, and capabilities |
| Configured integration connections | External services or accounts the agent can access |
| Response Schema | Whether replies return structured data that follows a JSON Schema; see Structured responses with JSON Schema |
Create agents for organizing material, explaining code, and reviewing results. Select them in Chat for individual tasks, or use them as execution steps in an Agentflow.
Get started
- Prepare a working Model Provider and create a custom agent in Agents.
- Select the model and define its role and output, such as “Review documentation and list the original text, issue, and suggested revision.”
- Add the required tools, Skills, or configured integration connections. Check the Project workspace for file operations.
- Save and enable the agent, try a short passage in Chat, and inspect its reply, tool calls, and actual results.
From one agent to a defined process
An individual agent can decide how to complete a task within its role. When every run must follow explicit steps, such as organizing material, reviewing it, and requesting human confirmation, use Agentflow to arrange those steps.
An agent’s access depends on its configured tools and permissions. Instructions do not grant access to files or external services. Model judgments and execution results still need verification.
2.2 - Agentflow
Last updated:
Arrange defined steps into a workflow
Agentflow means Agent Workflow. Agents reason and act; Agentflow routes work and executes predefined steps. Connect nodes on the canvas to define what happens first, who receives each result, and where human confirmation is required.
For example, an organizing agent decides which information to retain, and a reviewing agent checks for omissions and unclear wording. Agentflow sets the sequence: organize, review, then request human confirmation.
flowchart LR
    I["Input: source material"] --> A["Agent: organize material"]
    A --> B["Agent: review results"]
    B --> H["Human Gate: confirmation"]
    H --> O["Output: deliver results"]
Route work between steps
| Task requirement | How Agentflow arranges it |
|---|---|
| Follow a fixed sequence | Direct passes results to the next step |
| Select a path by condition | If / Else If checks conditions in order and sends the message only to the first matching branch; Else runs when none match |
| Run independent tasks together | Fan Out distributes work across branches; a Concurrent block calls its members in parallel |
| Wait for branch results | Fan-in Barrier waits for all sources in the same group before continuing |
| Request confirmation or more information | Human Gate pauses the workflow for a human response |
Agents interpret content, generate text, and call tools. Agentflow defines the connections and branching rules between steps, making it possible to inspect whether required reviews and confirmations are included.
Example 1: Coding, review, and commit
Coding tasks often follow a defined sequence: implement, review, revise if needed, then commit after confirmation. Agentflow lets different agents work in the same Project workspace while a person decides whether to proceed.
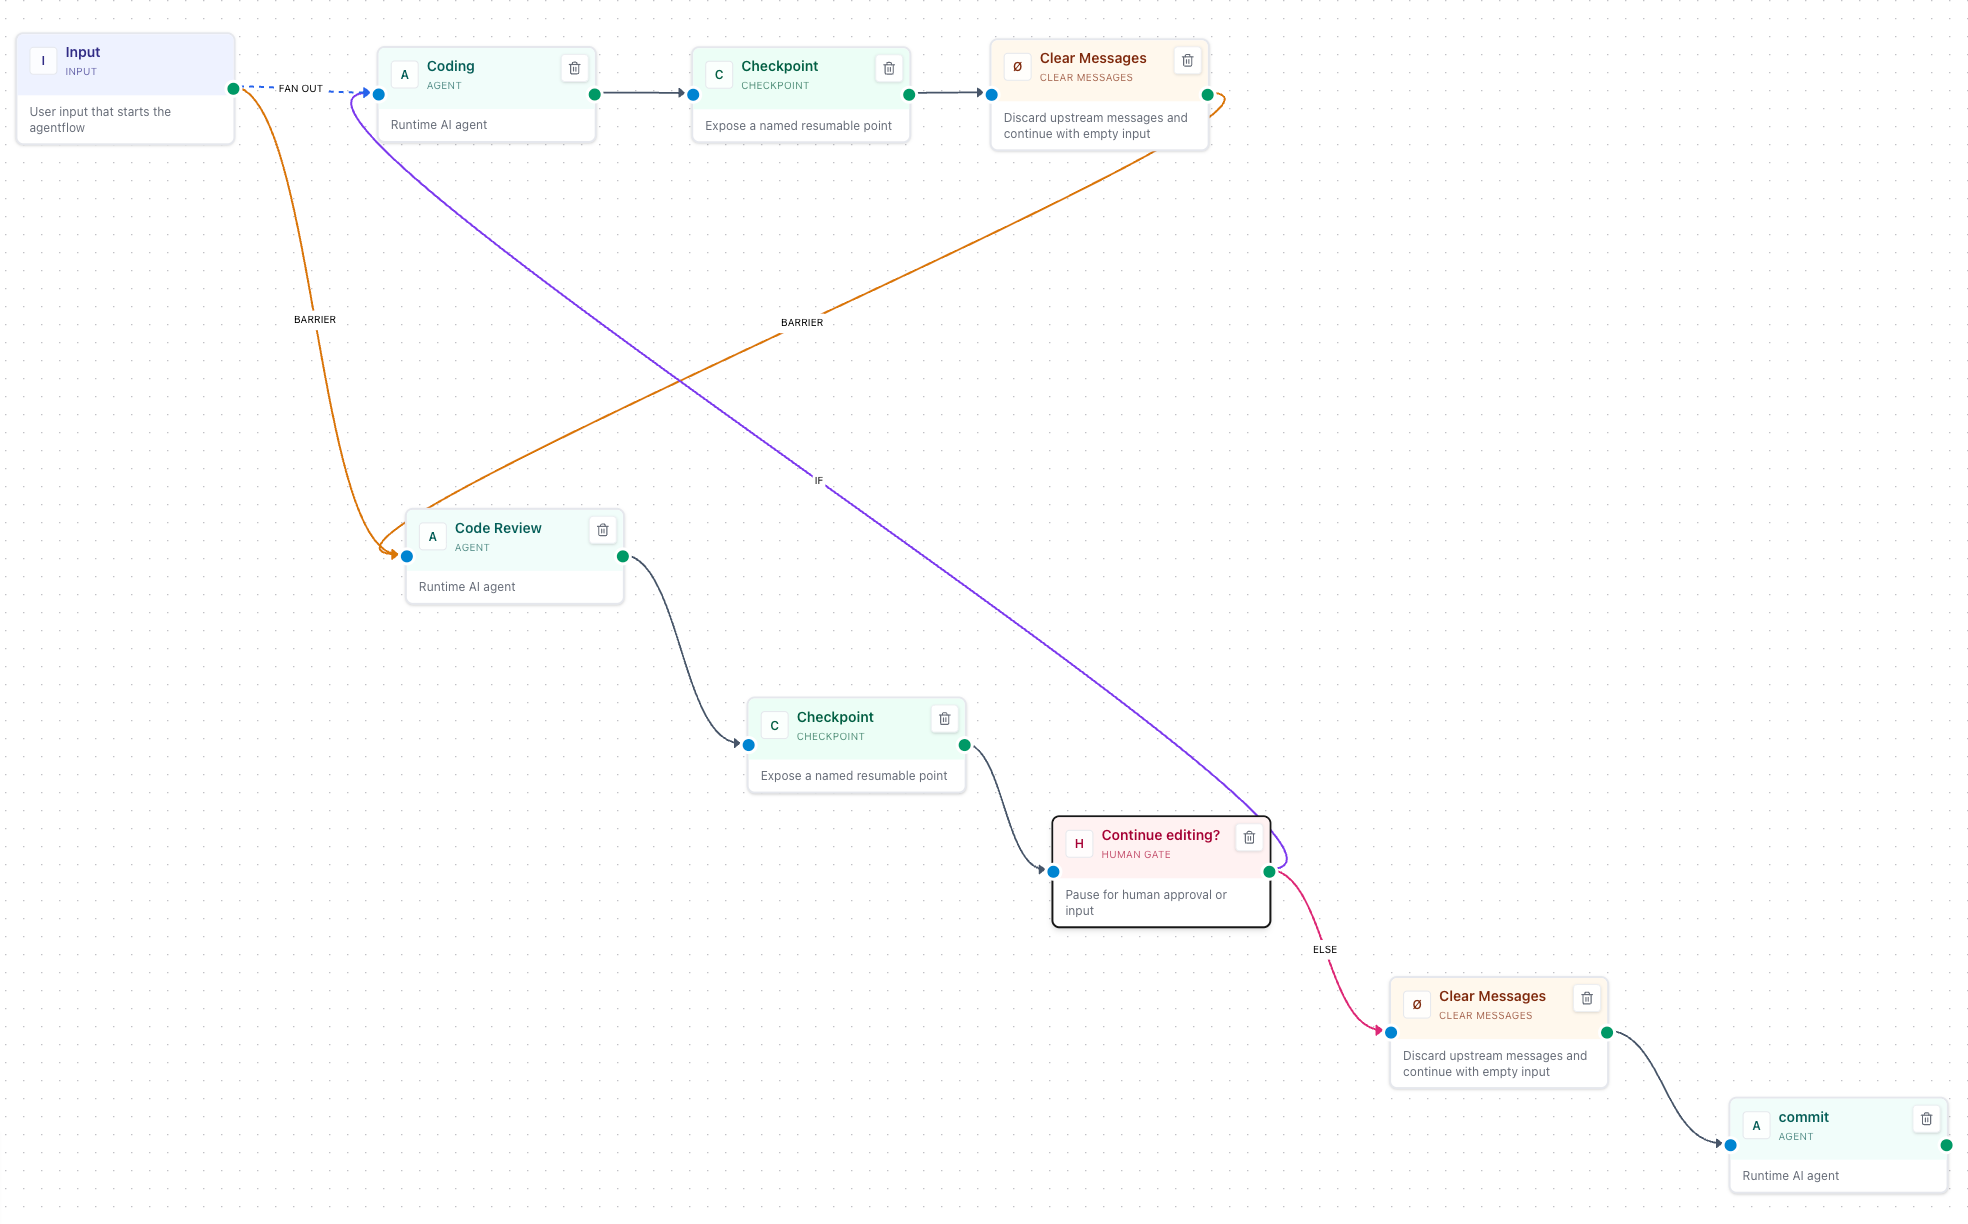
The workflow assigns these responsibilities:
- Coding uses Codex to implement changes in the current workspace.
- Checkpoint and Clear Messages mark a recovery boundary and discard upstream messages passed downstream, allowing the reviewer to inspect the workspace diff under its own instructions.
- Code Review uses Claude Code to review changes and report issues, followed by another Checkpoint.
- Human Gate asks a person whether further changes are needed. Revisions return to Coding; completed work proceeds to the Commit Agent.
- Commit Agent creates a Git commit according to the confirmed requirements.
Configure Codex, Claude Code, and Git in the execution environment, and confirm that each node accesses the same Project workspace. Give implementation, review, and commit nodes distinct instructions. Verify the complete path with a small change, then test the revision path.
Express revisions through human feedback and If / Else If conditions. Set the Human Step Mode to Input so a person replies in Response: for example, “revise” returns to Coding and “done” proceeds to the commit. Approval mode offers only Reject and Approve and collects no text, so conditions cannot read human feedback. Interrupt in Input mode and Reject in Approval mode both stop the workflow; neither takes the revision branch. The loop must have an explicit exit path.
Agentflow fixes responsibilities, order, and human decision points. You still need to check tests, resolved review findings, and the final diff. See the Agentflow guide for checkpoint recovery conditions.
Example 2: Extract locations from Xiaohongshu notes
A travel planning application can split “import a note and show its places on a map” into three data processing steps. Agentflow connects those steps and returns location data to the business system; the frontend handles the map display.
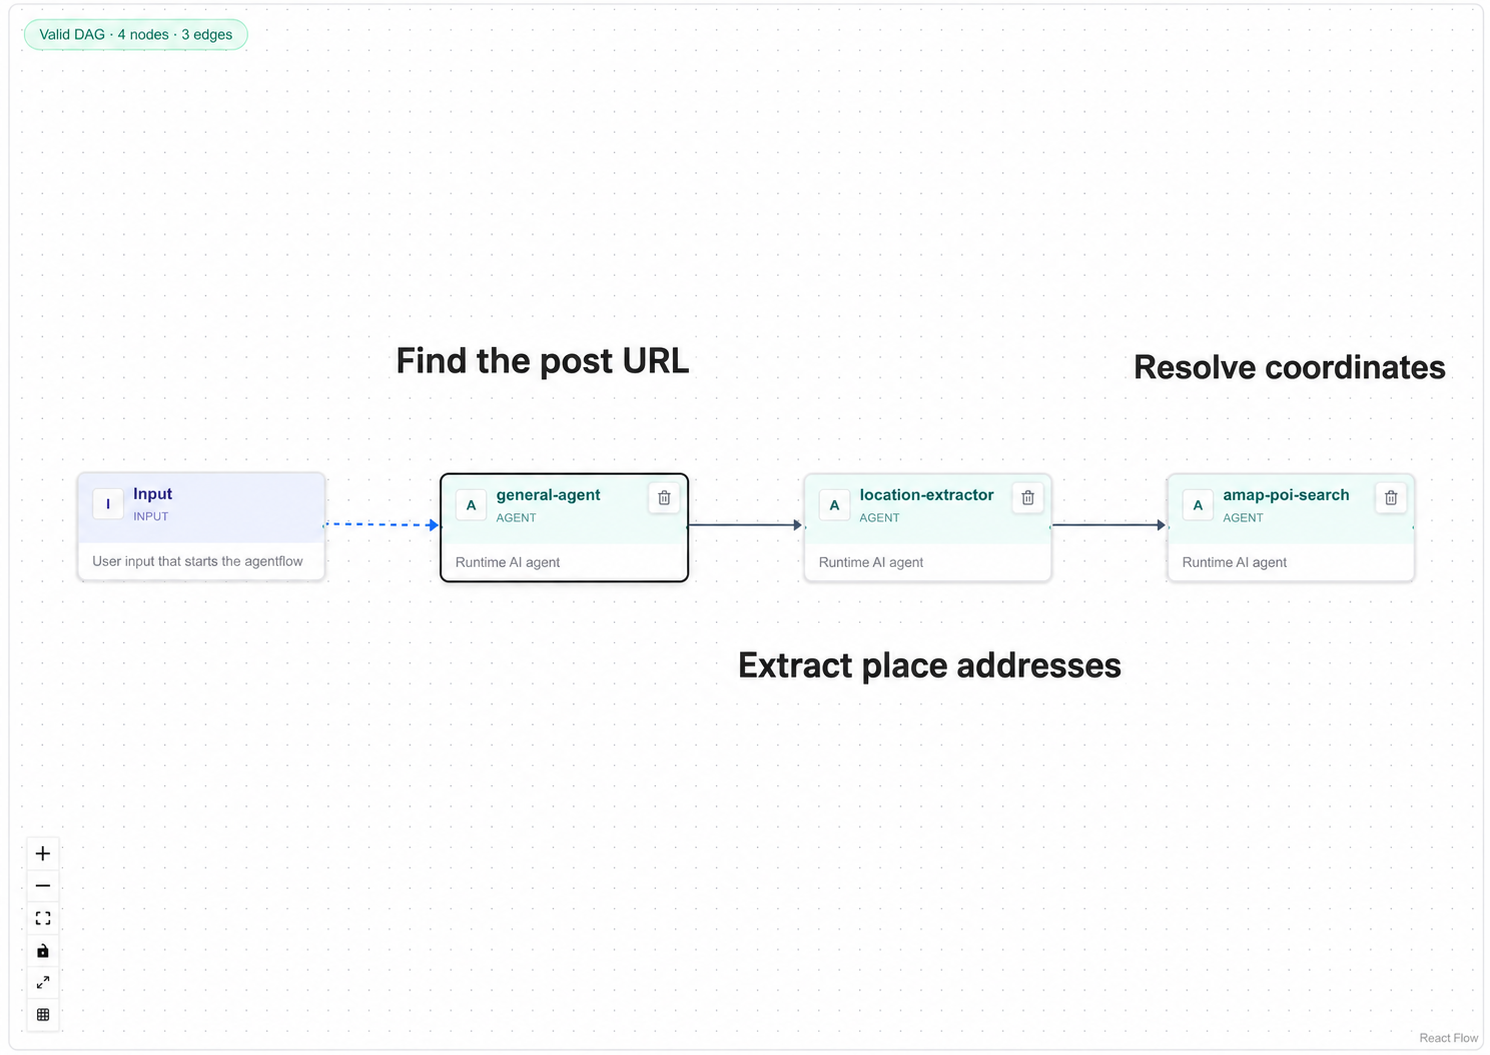
| Step | Processing | Result passed onward |
|---|---|---|
| Retrieve note details | An agent uses xhs-explore from xiaohongshu-skills to read a Xiaohongshu URL | Note content |
| Extract candidate places | The model interprets the content and extracts place names and addresses | Candidate places and addresses |
| Match locations | An agent calls the Amap MCP service to search for POIs (points of interest, such as attractions or restaurants) | Places and coordinates for the business system |
Prepare and configure the example’s Skill, Amap MCP service, and required accounts or credentials. Verify that the execution nodes can call them. These are dependencies of the example; creating an Agentflow alone does not provide those service capabilities.
Start with a note containing clearly identified places. Check that the content was retrieved, the extracted places came from the note, and each POI matches the correct city and address. Duplicate place names, incomplete addresses, and missing search results require more information or human review before treating candidate coordinates as confirmed locations.
Tools retrieve notes and query locations, the model interprets text and extracts places, and Agentflow passes results between steps in order. The business UI remains responsible for displaying the map.
Get started
- Prepare and individually verify the agents you need, such as an organizer and a documentation reviewer.
- Open the Agentflows editor and connect Input, two Agent nodes, Human Gate, and Output.
- Define each Agent node’s task. Set the Human Gate’s Human Step Mode to Approval and write the confirmation prompt.
- Save, select the Agentflow in Chat, and submit a short passage. Chat shows the input each node receives in the current turn as it runs; use it to check execution order, human confirmation, and the final output.
- Add conditional branches or parallel work after the basic path succeeds, then verify each path.
The workflow rules are predefined
Predefined steps do not mean the model returns identical answers on every run. Agents still assess their inputs, and conditional branches select paths from runtime results. Choosing Reject or Interrupt at a Human Gate stops the workflow.
Agentflow also supports dynamic collaboration through blocks such as Handoff and Magentic. Use explicit sequential edges when every step must execute; choose dynamic orchestration when the task calls for handoffs or planning.
2.3 - Shared context across agents
Last updated:
Let agents build on each other’s work
Use different agents to analyze requirements, write code, and review results. When you switch targets within the same conversation in a Project, AGW supplies the receiving agent with new public text from the other targets, reducing the need to copy background information and progress updates.
For example, let Coding make a change, switch to Review to assess it using the discussion so far, then switch back to Coding to address the feedback.
flowchart LR
    A["Coding: make changes and explain results"] --> B["Public text in the same conversation"]
    B --> C["Review: assess with context"]
    C --> D["Back to Coding: address feedback"]
Get started
- Prepare two working agents, such as Coding and Review.
- Select a Project in Chat and start a conversation with Coding.
- Wait for the current turn to finish, switch to Review in the same conversation, and explain the next task.
- Check that its reply follows the discussion; repeat important constraints in your new message if needed.
State the next task
After switching, try: “Review the changes described above for omissions and list only issues that need correction.” The receiving agent gets reusable public text, but still needs a clear request for its next step.
Briefly repeat important paths, acceptance criteria, and conclusions. To retain project conventions across conversations, use Project Memory.
What carries over
Handoff carries public conversation text, not private reasoning, tool-call protocols, or an external tool’s entire internal state. Unfinished messages from interrupted or failed turns are not handed off either. It is limited to 32,000 characters, so older content may be left out. Files must still be accessible in the receiving agent’s environment. A new conversation does not automatically inherit another conversation’s discussion.
Read the Chat guide · Configure external agents for different purposes
2.4 - Image input
Last updated:
Add visual context
Attach images when asking about a UI problem, design, or chart. For example, send an error screenshot with the steps that led to it, or ask a vision-capable model to inspect a page layout.
Ask a specific question
For example: “The Save button is obscured in this screenshot. Identify possible layout problems and tell me what else you need to know.” When comparing images, label the expected design and the current page so the agent can focus on the difference.
To change code, also provide the Project and file access. A screenshot supplies visual information alone.
Get started
- Choose a model and execution target that support image understanding.
- Add images in Chat: paste them into the message box in Web and Desktop, or choose them from the photo library on Mobile. Then explain what the agent should focus on.
- Check the attachments, send the message, and verify that the reply interprets the image correctly.
| Item | Supported range |
|---|---|
| Formats | JPEG, PNG, GIF, WebP |
| Images per message | Up to 5 |
| Size per image | Up to 5 MB |
| Total attachments | Up to 10 MB per message |
flowchart LR
    A["Images + question"] --> B["Chat message"]
    B --> C["Image-capable model / external runtime"]
    C --> D["Reply using the image"]
Image understanding depends on the selected model and external runtime. Adding an attachment does not mean every model can interpret it. If screenshot text is small or unclear, include the key text and a specific question in your message.
2.5 - Memory: preferences and project knowledge
Last updated:
Keep information worth reusing
A conversation may end while working preferences and project knowledge remain useful. AGW provides two kinds of Memory for later work.
| Memory | Good for | Scope |
|---|---|---|
| User Memory | Personal preferences, writing conventions, lasting background | The current user, across Projects |
| Project Memory | Project conventions, decisions, working notes | The project’s working context |
Configure the appropriate Memory capability on an Agent or Project, then ask the agent to save information and check or update it in later conversations. Memory needs deliberate maintenance; it does not automatically retain and inject every chat message forever. User Memory is isolated by user. Project Memory scope also depends on the project and storage choice; filesystem memory is shared when workspaces are shared. External agents (Claude Code, Codex, Pi) only receive existing User Memory entries (up to 50) as read-only context. They get no memory tools, so they cannot save or update memory, and Project Memory configured on the Agent or Project does not apply to them.
Two storage modes for Project Memory
Project Memory offers Database and Project Workspace (Primary directory: .agw/memory) storage; Project Workspace is the default. Both expose the same tools for saving, finding, reading, and updating project knowledge. They differ in where content lives, how it is shared, and how you back it up.
| Comparison | Database | Project Workspace (filesystem, default) |
|---|---|---|
| Location | The database used by AGW | .agw/memory/ under the primary workspace |
| Scope | Project ID | The actual workspace directory |
| Agents / conversations in one Project | Share memory when using Database mode | Share memory when using the same workspace and filesystem mode |
| Two Projects with one workspace | Keep separate database memories | Read and write the same memory directory |
| Backup | Part of the AGW database backup | Part of the project files, including the hidden .agw/memory/ directory |
| Useful for | Central management without memory files in the workspace | Direct file inspection or moving memory with the workspace |
Database: managed centrally by AGW
With Database, memory content is stored in AGW’s configured database. Content is still organized by file name, but no corresponding memory files are created in the workspace. Agents read these records through Project Memory tools.
Memory is scoped by Project ID. Agents using Database mode in the same Project can reuse it. Another Project pointing to the same workspace retains its own database memory. Changing the primary workspace does not change which Project owns the database memory.
This mode suits deployments that manage and back up data centrally. Follow AGW’s backup procedure to retain the database and required encryption keys; copying the code directory alone does not include database memory. In a multi-node deployment, the shared database lets execution nodes access the same project memory, subject to project access checks.
Project Workspace: files in the project directory
With Project Workspace (Primary directory: .agw/memory), memory lives in the primary workspace on the execution host. For example, a Workspace of /work/demo produces this memory directory:
Here, coding-conventions.md is the content, coding-conventions_description.md is the optional description supplied when saving, and memories.md is the index maintained by AGW. This directory stays under the primary workspace; selecting an additional directory in Files does not change it.
This mode makes files easy to inspect. You can decide whether to include them in Git or project backups; AGW does not commit them automatically. Make sure backups and transfers include the hidden directory. Writes and deletions through memory tools maintain the index. Direct file edits may leave it out of date, so prefer memory tools for routine maintenance.
Two Projects pointing to the same actual workspace share its .agw/memory/, even with different Project IDs. Changing Workspace makes the agent use memory at the new location; existing files are not moved automatically. Persist the workspace with a mount in Docker. Across execution nodes, the directory contents must be shared; identical path strings alone are not enough.
flowchart TD
    A["Project Memory tools"] --> B{"Storage"}
    B -->|"Database"| C["AGW database: scoped by Project ID"]
    B -->|"Project Workspace"| D["Primary workspace/.agw/memory"]
Configure and verify
Prerequisites: a working custom Agent and Project. Filesystem mode also requires the execution host to be able to read and write the primary workspace.
- Open Tools on the Agent or Project and select the Project Memory ToolBlock.
- In the expanded card’s Storage selector, choose Database or Project Workspace (Primary directory: .agw/memory) and save. Prefer configuring it on the Project when you want a consistent project-wide choice.
- In a new turn in that Project, ask the agent to save a concrete convention, such as: “Save our project convention to use UTC in
time-conventions.md, with a short description.” Writes remain subject to mode and approval settings. - Open a new conversation in the same Project with an agent that has the memory capability and matching storage mode. Ask it to list and read the entry. It should retrieve the saved content.
- In filesystem mode, you can also inspect the files in
.agw/memory/. Database mode creates no files there; verify through memory tools instead.
The modes are separate data sources. Changing Storage does not automatically copy, merge, or delete memory in the other mode. To migrate, back up the source, read the content and descriptions you want to keep, switch modes, and write them through memory tools before verifying the results. Test configuration changes in a new turn; active turns retain their starting configuration.
How agents use saved memory
Project Memory supplies an index to the model, and the agent reads relevant content as needed. The generated index currently contains up to 50 entries; additional memories remain discoverable through list and search tools. Full memory contents are not sent with every request.
Keep each entry focused on one topic, with a clear filename and short description. Update existing entries when conventions change and remove obsolete information to avoid contradictory guidance. User Memory is always stored in the database and isolated by user; this Storage setting does not affect it.
Implementation and references
2.6 - Plan and Execute modes
Last updated:
Plan before taking action
Before changing code or starting a complex task, ask an agent to assess the situation and propose an approach. Configure the Mode ToolBlock on a custom agent or a Project to give custom agents Plan and Execute modes; on a Project, every custom agent running in that Project receives it.
| Mode | Useful for | Tool behavior |
|---|---|---|
| Plan | Inspecting the situation, analyzing problems, proposing an approach | Only tools explicitly allowed in Plan are available |
| Execute | Carrying out an agreed approach | Configured tools remain subject to permissions and approval rules |
Example: revising documentation
In Plan, ask: “Read the documentation and identify unclear terms and missing examples. Propose changes first.” Review the scope, then switch to Execute and ask the agent to apply the agreed changes. Inspect the diff to confirm that facts and limits were preserved.
Reading and editing still require the configured tools. Switching modes does not add missing file capabilities.
Get started
- Configure the Mode ToolBlock and required tools in the Tools tab of a custom agent or Project.
- New turns start in Execute. In the Chat input, click + and choose Plan mode. When the Plan chip appears in the input, ask the agent to analyze the problem.
- The proposal appears as a Plan card that you can copy. After agreeing on the approach, click × on the Plan chip to return to Execute. Respond in the UI when the agent requests a mode change.
- Review the changes and results; return to Plan for further discussion if needed.
flowchart LR
    A["Plan: analysis and proposal"] --> B["User confirms mode change"]
    B --> C["Execute: do the work"]
    C --> D["Review results"]
    D --> A
Plan restrictions depend on tool declarations and execution checks, not a prompt alone. Execute does not automatically approve every operation: working mode determines which tools can run, while approval settings determine whether a call needs confirmation. External agents have their own supported modes and permissions, which may differ from custom agents.
2.7 - Structured responses with JSON Schema
Last updated:
Make replies readable by programs
Agents return Markdown text by default, which reads well but is awkward to parse. Configure a Response Schema on an agent and its final reply becomes a JSON object matching the JSON Schema you supply, so Jobs, Agentflows, and API callers can read named fields directly.
For example, a documentation reviewer can return an issues array whose entries contain original, problem, and suggestion. A scheduled run can then file each entry as a ticket instead of searching through prose.
What you configure
Response Schema is a tab in the agent create and edit dialog. Its content is a JSON Schema object:
Validation on save:
| Input | Result |
|---|---|
| Empty | Structured output is off; replies stay plain text |
| A valid JSON object | Saved and applied on the next turn |
| Invalid JSON, an array, or a scalar | Inline error; the save button stays disabled |
JSON Schema draft-07 is recommended. Anthropic models require type set to object, properties as an object, and required as an array; use "required": [] when every field is optional. A custom agent using an Anthropic Provider fails before sending the model request when any of these is missing.
Supported targets
| Execution target | How the schema is passed |
|---|---|
| Custom agent (System) | Response format of the model request |
| Claude Code | The CLI’s --json-schema argument |
| Codex | The turn’s output schema |
| Pi | Not supported |
AGW passes the schema to the model or CLI, which generates the result; AGW itself does not validate each field against the schema. For a custom agent with Generate Turn Summary enabled, AGW requires exactly one valid JSON object or array in the turn’s last complete reply; otherwise the turn fails and keeps its execution record. When a Result marked as JSON cannot be parsed, Chat shows “Invalid structured result: expected one JSON object or array.”
Get started
- Open Agents, edit an agent, and switch to Response Schema.
- Paste a JSON Schema object, confirm no validation error appears, and save.
- Run a small task in Chat and check that the final result is the JSON you expect.
- Once the structure is stable, use that agent in a Job or an Agentflow step.
flowchart LR
    A["Agent with a Response Schema"] --> B["Turn runs"]
    B --> C["Model or CLI produces a conforming result"]
    C --> D["Chat shows the Result as JSON"]
    C --> E["Jobs, Agentflows, and APIs read the fields"]
When a custom agent also has “Generate Turn Summary” enabled, AGW extracts that JSON from the turn’s last complete reply as the turn’s Result and does not call the Summary Model Provider. Chat shows this Result as literal JSON without Markdown rendering. Without that switch, the model still returns JSON text that follows the schema, but it is an ordinary reply rendered as Markdown and produces no Result, so Only Stream Turn Result in Conversation Settings has no effect on it. Claude Code and Codex produce a Result on every turn. The selected Summary Model Provider is preserved and applies again once the schema is cleared.
A schema describes the result structure only. It is never executed as code, and remote $ref targets are not fetched. Whether fields are filled correctly still depends on the selected model and the instructions, so review the content even when the JSON is well-formed.
2.8 - Tool approval
Last updated:
Confirm before an operation
When an agent calls a tool, AGW can ask for confirmation according to your permission settings. Inspect the tool name and arguments before deciding whether it should proceed, particularly for file changes or command execution.
| Permission mode | Ordinary write and execution tools |
|---|---|
| Always ask | Ask for confirmation on every call |
| Allow same arguments | After approval, reuse a matching argument grant within the current session |
| Full access | Automatically approve ordinary tool calls |
Ordinary read-only tools generally need no execution approval. Approval requirements come from the tool’s declared permission, not whether its name or command looks harmless.
Choose a permission mode
Use Always ask to inspect the arguments when first trying a write tool. For repeated operations in one session, Allow same arguments reuses approval only when the arguments match; changed arguments do not reuse that grant.
Before choosing Full access, check the agent’s tools and workspace. It reduces ordinary approval prompts, but results still need review.
Get started
- Select an agent that supports approval and choose a suitable permission mode in Chat.
- Start a task. When an approval request appears, inspect the tool, arguments, and target paths.
- Approve to continue, or reject the call and explain what you want changed.
- Check the tool result against your expectations.
flowchart TD
    A["Agent requests a tool call"] --> B["Check mode and permissions"]
    B --> C["Human confirmation required"]
    C --> D["Approve: run the call"]
    C --> E["Reject: return the decision to the agent"]
Full access does not bypass Plan restrictions or answer user-input requests and workflow HumanGates for you. Claude Code supports a native tool-approval bridge. The current Codex and Pi integrations support Full access only. The permission menu always lists all three modes; modes the target does not support are disabled, with the reason shown below them.
With Only Stream Turn Result turned on in Conversation Settings, external agents and custom agents with Generate Turn Summary enabled automatically decline tool approvals and questions that need a person, and the UI does not show those requests. Full access and automatic approvals from existing grants still apply. Turn the switch off when you need to approve calls one by one.
Check external agent permissions · Learn about workflow approvals
2.9 - File browsing and Git change review
Last updated:
Review agent changes next to the conversation
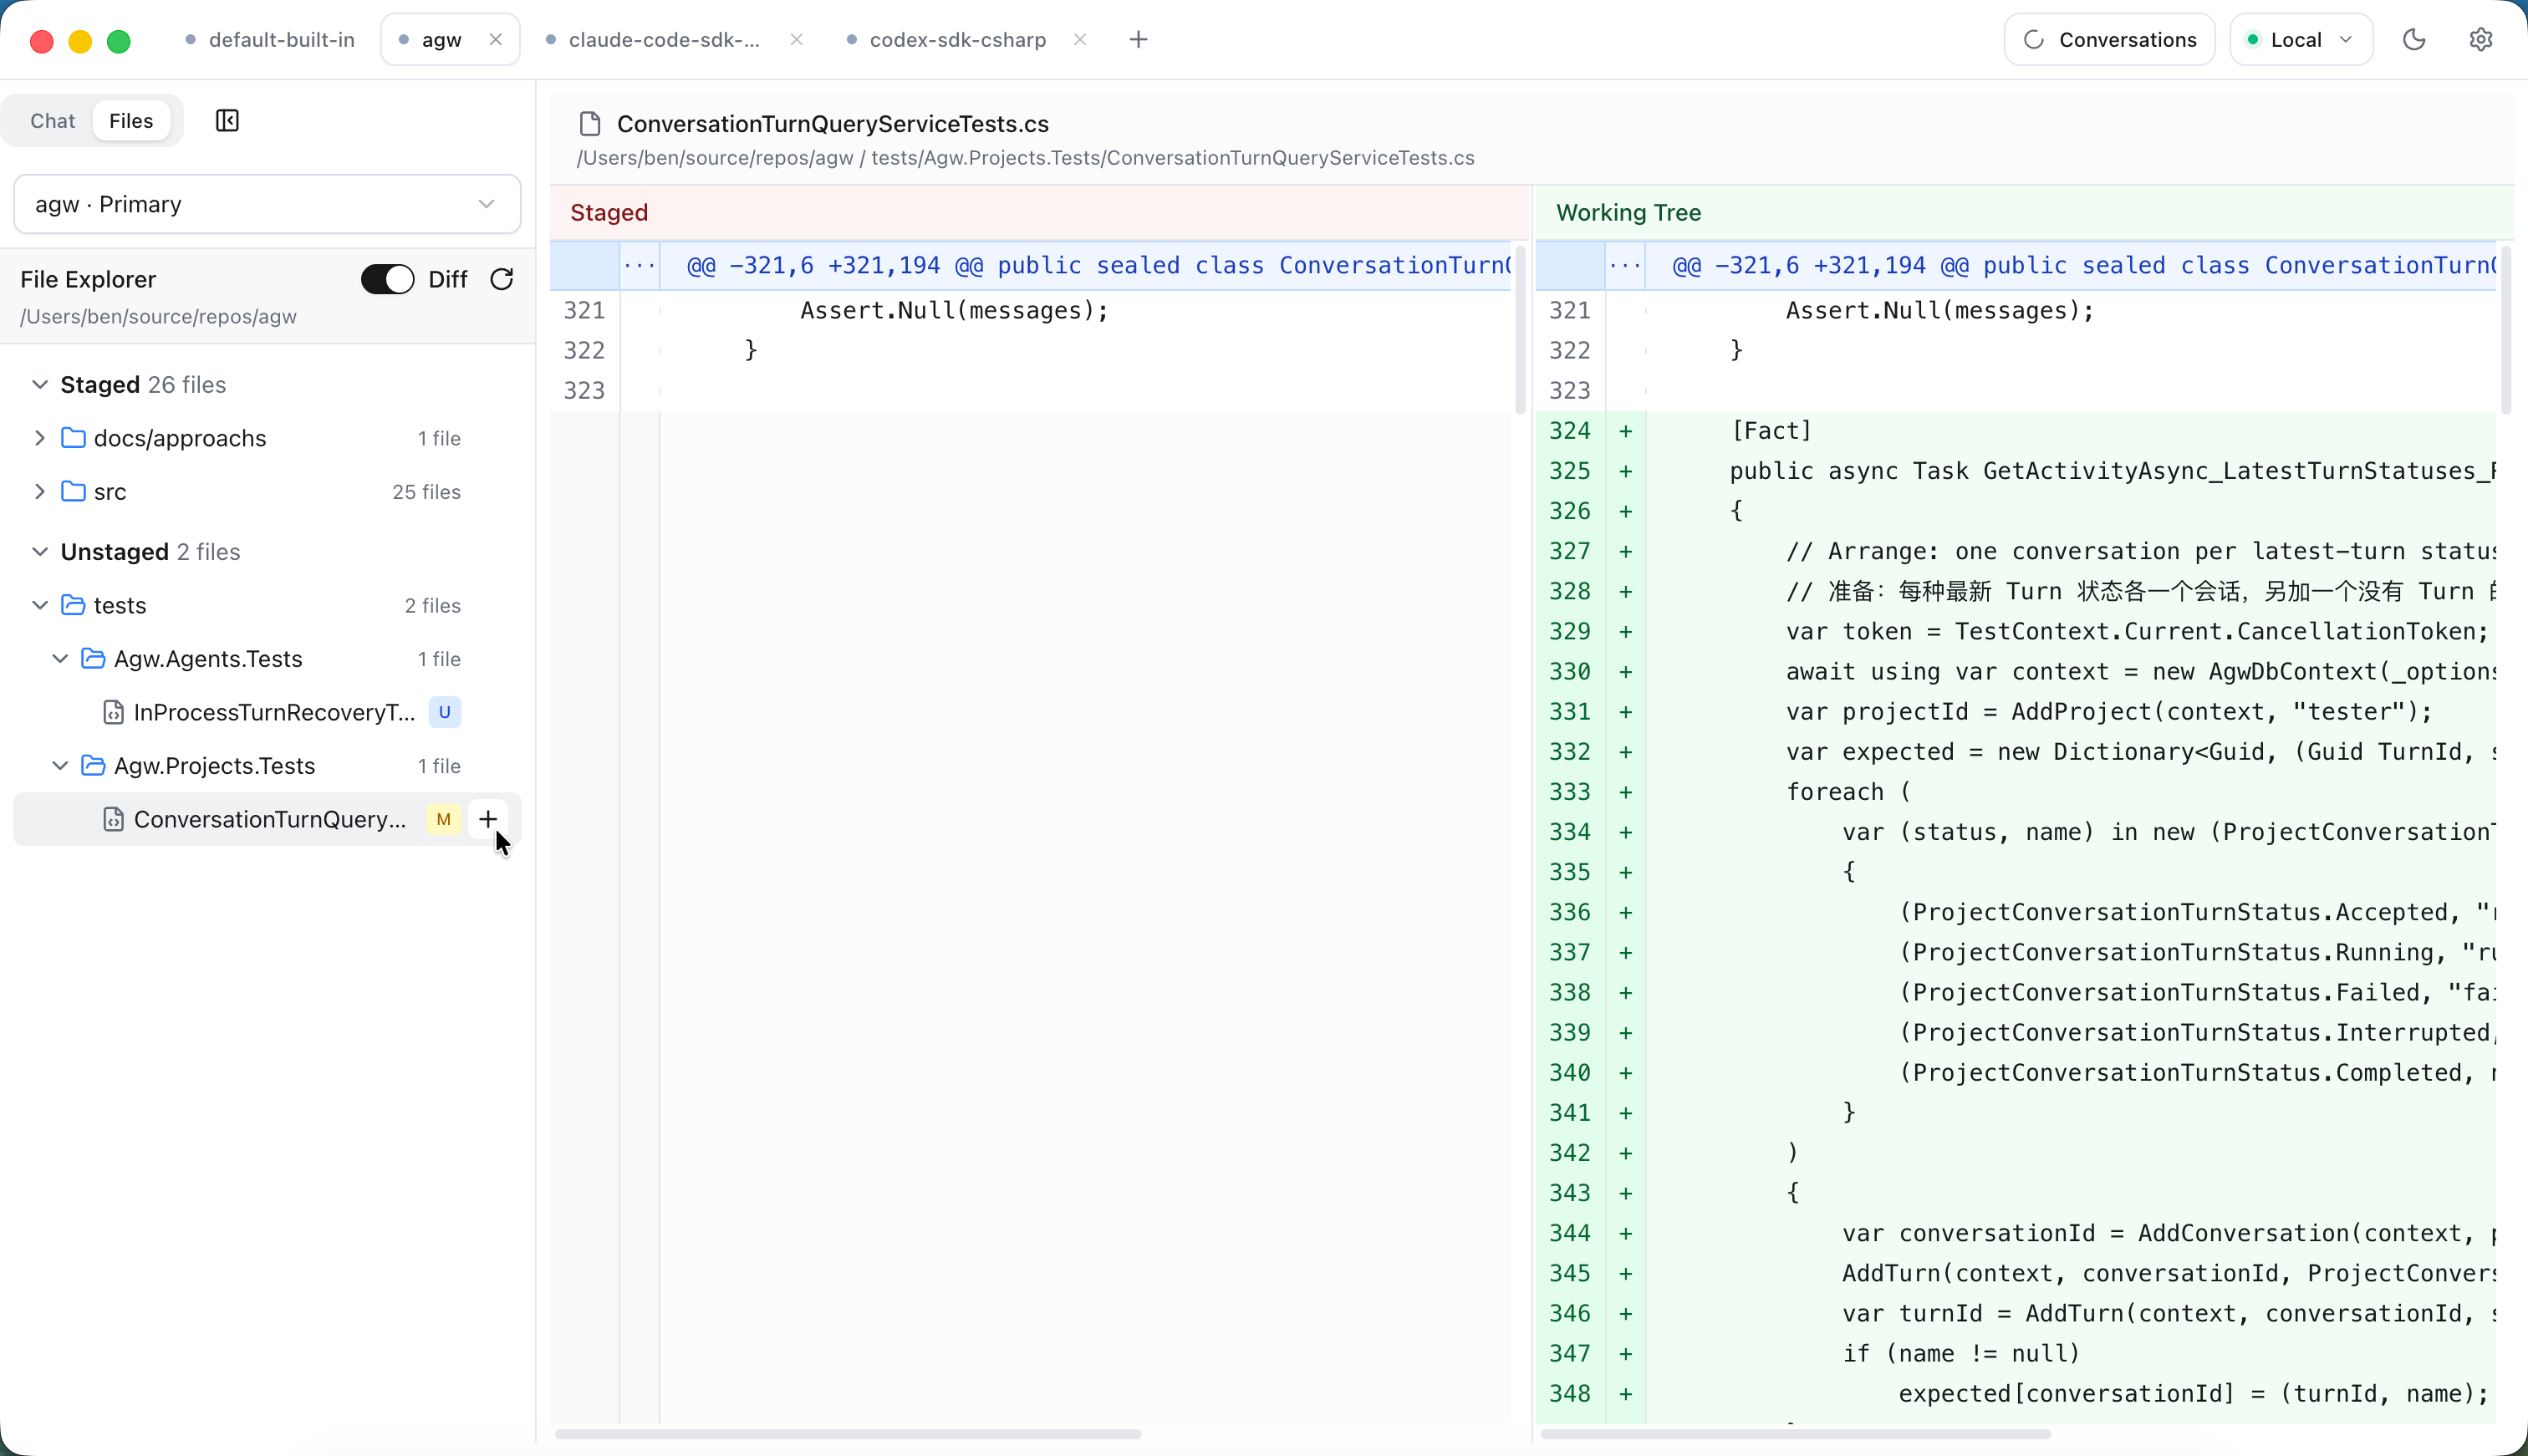
After an agent edits code, you need to see which files changed and whether each edit is what you expected. Switch to Files in the Chat workspace to browse the Project workspace, inspect Git changes, and turn the spots that need work into line comments for the agent, all without opening a separate editor or terminal.
Inspect changes
Turn on the Diff switch at the top of the file tree to show only files with Git changes, grouped into Staged and Unstaged. A file with both staged and unstaged edits appears once in each group. The letter next to a file name shows the change type: A added, M modified, D deleted, U untracked.
Select a file to see its old and new content side by side. The Staged group compares HEAD → Staged; the Unstaged group compares Staged → Working Tree. Turn off Diff to browse the full directory tree and view each file’s current content.
| Action | Where | Effect |
|---|---|---|
| Stage / Unstage | In Diff mode, hover over a file or directory and click + or - | Stage or unstage that file, or every change under that directory |
| Reset to HEAD | A file’s context menu | Restore both the index and working copy of that file to HEAD |
| Delete | A file or directory’s context menu, after confirmation | Delete the file, or delete the directory recursively |
Reset to HEAD and Delete change files on disk and cannot be undone from the UI. Make sure nothing you need will be lost before running them.
Send line comments to the agent
In file content or a diff, hover over a line and click the + button that appears to the right of its line number to write a comment. Press Ctrl/Shift+Enter to submit or Esc to cancel. A line that already has a comment hides the button; double-click the comment to edit it, or click its delete button to remove it. In a diff, you can comment on the old side and the new side separately.
Comments wait above the Chat input, which shows how many are pending, such as “2 code comments”. Switch back to Chat, describe what you want, and send the message. Each comment’s file path, line number, side (old or new), and group travel with that message to the agent. Once the Server accepts the execution, the sent comments leave the pending list. Click × next to the count to discard all pending comments.
For example, after an agent finishes a refactor, open Diff and check the Unstaged group. Comment “Read the retry count from configuration” on the new retry logic and “This branch is missing an error log” on another line, then send “Apply the comments and explain each change.” Stage files that pass review. When the agent edits them again, the new edits appear in the Unstaged group, which keeps reviewed and unreviewed changes apart.
flowchart LR
    A["Agent edits files"] --> B["Files: review in Diff"]
    B --> C["Comment on lines to change"]
    C --> D["Chat: send comments with a message"]
    D --> A
    B --> E["Files that pass review: Stage"]
Get started
- Choose a Project whose workspace is inside a Git repository. You can browse files in a directory outside Git, but change views and Git actions are unavailable there.
- Click Files in the Chat workspace. If the Project has additional directories, choose the one to browse from the dropdown above the file tree.
- Turn on Diff, select a file in the Staged or Unstaged group, and review the changes.
- Comment on lines that need work, switch back to Chat to send a message, then return to Files to review the agent’s new edits.
Scope
- The file tree, diffs, and Git actions apply only to the selected directory. Changing the browsing directory does not change the agent’s default working directory; the agent still starts in the primary workspace.
- Files does not create commits or switch branches. Ask the agent to do that, or use a terminal.
- Pending comments exist only in the current page. Switching Projects or reloading the page clears them.
- Mobile can browse files, view diffs, and reset or delete files. Staging, unstaging, and sending line comments to the agent are available in Web and Desktop.
2.10 - Multiple clients
Last updated:
Continue on the device that fits
AGW provides Web, Desktop, and Mobile clients. Connect to the same Server with the appropriate identity to access your authorized projects and saved conversation history, choosing the device that suits the task.
| Client | Useful for |
|---|---|
| Web | Management and chat in a browser without a desktop installation |
| Desktop | A daily workspace, multiple Server profiles, local or remote use |
| Mobile | Checking conversations, accessing projects, and continuing discussions on the go |
The same Server versus a different Server
To continue on another device, connect to the same Server and select the same Project and conversation. Saved history is available there; recent output may need time to persist or a state check after reconnecting.
Different Servers keep separate configuration and records. If a Project disappears after switching Servers, check the address and identity before recreating it.
Get started
- Initialize the Server and make sure the device can reach its address.
- Sign in to Web with the administrator password or a third-party account. Connect Desktop with an API Key, or, when the Server has identity providers, click Sign in with … to sign in with a third-party account and receive a Server-issued API Key. On Mobile, enter an API Key, or use Import Web configuration to paste the configuration copied with Copy config in Web Settings.
- Confirm the Server and Project, then open an existing conversation or create one.
- Check history and execution status to avoid starting the same task again after switching devices. The icons in the conversation list show Running, Last turn failed, or Last turn interrupted.
Tasks run on the execution host. Connecting from a phone or browser does not move execution to that device. Desktop Full includes a Server; Desktop Client connects to an existing one. Mobile currently offers a source-based setup. Layouts and management entry points vary across clients.
Read the client connection guide · Install and configure Server
2.11 - Third-party account sign-in
Last updated:
Use an existing account to reach your own workspace
Once an operator enables identity providers on Server, the sign-in page shows “Continue with …” buttons. Authenticate with an organization account such as Keycloak, Microsoft Entra ID, or Google, or with an OAuth2 service such as GitHub, and you reach AGW without a shared administrator password.
The first sign-in with an account creates an isolated local user and prepares its default Project. From then on, its agents, projects, conversations, integration connections, and API Keys belong to that user and stay invisible to others. The administrator account is unchanged.
Sign-in methods
| Method | Client | Resulting credential |
|---|---|---|
| Third-party account | Web | Browser session Cookie |
| Third-party account | Desktop | API Key issued by Server |
| Administrator password | Web | Browser session Cookie |
| API Key | Desktop, Mobile, automation | Manually configured API Key |
With no provider configured, the administrator password and API Keys remain available. Mobile connects with an API Key.
Get started
- Ask the operator to enable a provider on Server and register AGW’s callback URL at that provider.
- Web: open the Server URL, choose the account button on the sign-in page, and return to the page you requested.
- Desktop: choose “Sign in with …” in the Server profile, complete authentication in the system browser, and return to the Desktop window.
- Check that the Project list holds that account’s data. The Desktop Server profile then offers a “Sign out” button.
flowchart LR
    A["Choose an account on the sign-in page"] --> B["Identity provider authenticates"]
    B --> C["Server validates and resolves the local user"]
    C --> D["Web: session Cookie"]
    C --> E["Desktop: one-time code exchanged for an API Key"]
Desktop authenticates in the system browser. Server hands a one-time code back through agw-desktop://auth/complete, and Desktop exchanges it, together with its own verifier, for an API Key. The code is valid for two minutes and can be used once; the API Key is kept in the system credential store. Signing out in Desktop revokes that API Key.
Scope and limits
The same person signing in through two providers becomes two separate users: identity comes from the provider’s issuer and account identifier, never from a matching email address. There are no roles, administrator elevation, or per-key permission scopes; a third-party account receives ordinary user access.
Disabling a provider blocks new sign-ins and pending Desktop exchanges. Cookies and API Keys already issued are handled separately. Remote deployments require HTTPS URLs.
Configure identity providers · Connect Web, Desktop, and Mobile
3 - User guide
Last updated:
Each guide explains one part of AGW and can be read on its own. If you do not yet have a working agent, configure a model provider first.
- Conversations: start with model providers, agents, and Chat.
- Project material: set a workspace, then add tools and Skills.
- External capabilities: choose external agents, MCP, or integration accounts.
- Automation: verify the task, organize steps with an Agentflow, and set a schedule with a Job.
3.1 - Model providers
Last updated:
Before a custom agent can answer, AGW needs to know which model to use, where to send requests, and how to authenticate. Prepare the API endpoint, model ID, and API key supplied by your model service.
This page covers model configuration in AGW. To use an existing command-line setup, see External agents.
Three configuration objects
A Provider describes the endpoint and authentication. A Model describes a model and its limits. A Model Provider links the two for agent selection. Creating a Model alone does not establish a connection.
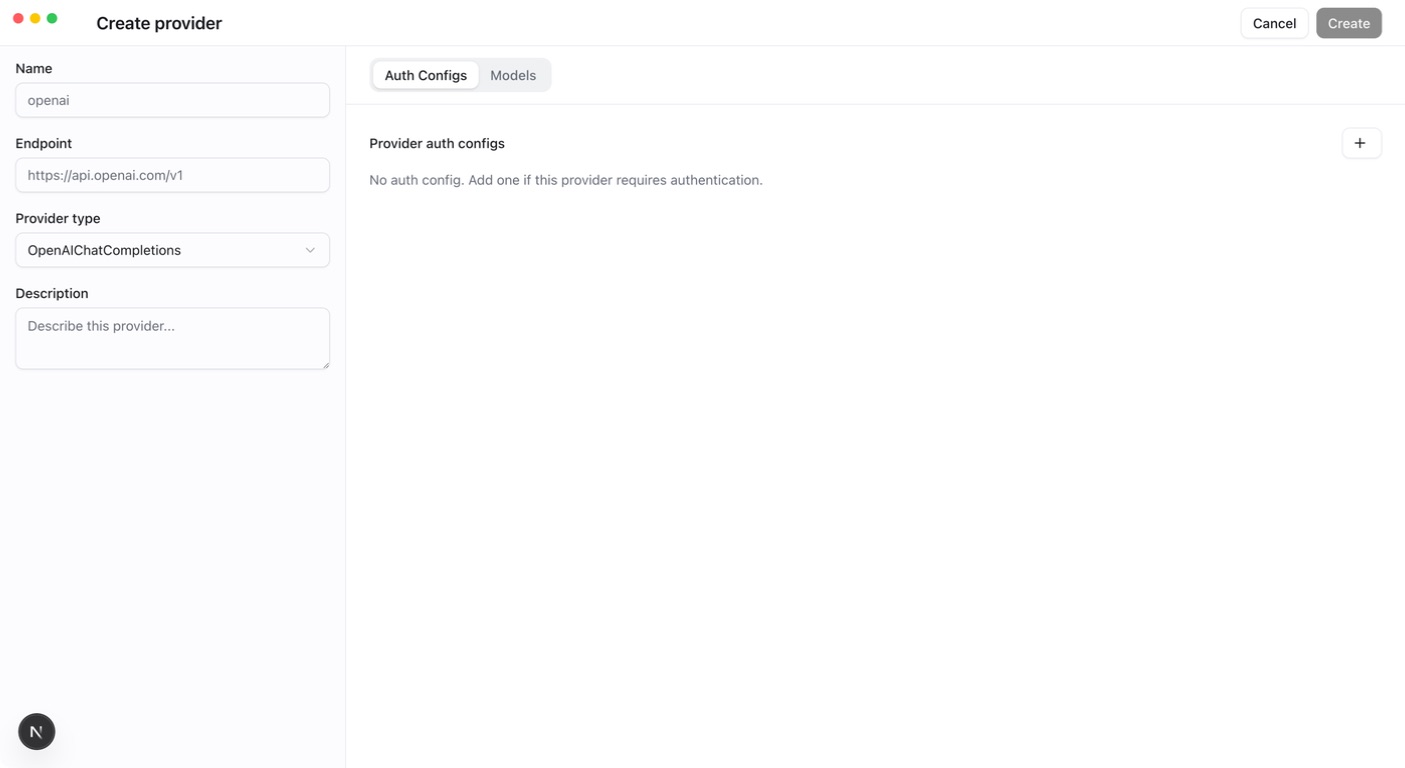
- In Providers, open Create provider, select the matching protocol, enter the endpoint, and add and enable a credential in Auth Configs.
- Switch to the Models tab and select the models this Provider serves. For OpenAI Chat Completions or OpenAI Responses with an enabled ApiKey in Auth Configs, click Fetch Models to load the service’s model list. For an Anthropic Provider, first create the models manually with Create model on the Models page, then return to the Provider and select them.
- Save the Provider. This links each selected model to the Provider as a Model Provider and creates any newly fetched models.
- On the Models page, use Edit model to verify each identifier and set Context window and Maximum output from the limits your service publishes.
- Select that link in an agent and test it with a short question.
Current protocols include OpenAI Chat Completions, OpenAI Responses, and Anthropic. Compatible services must match the actual protocol; “OpenAI” in a name is not sufficient.
Context limits
Each model has length limits. Configure these two values separately:
- Context window: the total content a single request can accommodate, including conversation history, the current question, tool results, and the model’s reply.
- Maximum output tokens: the maximum length of a single reply. Tokens are units used to measure content length; they are not the same as words or characters.
Both values must be positive integers, and maximum output must be smaller than the context window; the form shows their difference as the Effective input budget. Before each model call, a custom agent checks the content it will send against this budget: above 50%, result bodies of older tool calls are removed from the request; above 80%, older message groups are truncated. Both stages keep the 2 most recent message groups, and the conversation history stored in the database is unchanged. External agents manage their own context.
When discovering a model, AGW may fill in 256,000 for the context window and 64,000 for maximum output tokens as defaults. These values do not guarantee that the selected model supports those lengths. Use the limits published by your model service provider. Values that are too high can cause requests to be rejected. If short conversations work but longer ones fail, check these two settings first, then consult the Server logs for the specific error.
Success means an agent completes a conversation. Fix invalid credentials, endpoints, or unavailable models before adding tools. Keep real API keys out of shared prompts and Git files.
Implementation and references
3.2 - Create a custom agent
Last updated:
An agent is a reusable assistant configuration. Its model interprets requests, its instructions define the task, and its tools determine which operations it can perform. For example, create separate agents for explaining code and reviewing documentation, then select one in Chat.
Start with a working Model Provider. This page covers custom agents run by AGW; see External agents for Claude Code, Codex, and Pi.
Create an agent
- Open Agents and click Create. Keep Agent Type set to
System(a custom agent) and enter a Display Name that describes its responsibility. - Select a Model Provider. In Instructions, describe the task, input, and expected output. Create stays disabled until the Display Name and Model Provider are set.
- Configure capabilities as needed in the Tools, Skills, MCP Tool Server, Integrations, and Environment Variables tabs. File capabilities require a correct Project workspace.
- Save, confirm the agent is enabled, and run a small task in Chat.
For example, start with a “Code explainer” that answers questions, then add read-only file capabilities after verifying the model. Instructions cannot grant tool access beyond execution permissions.
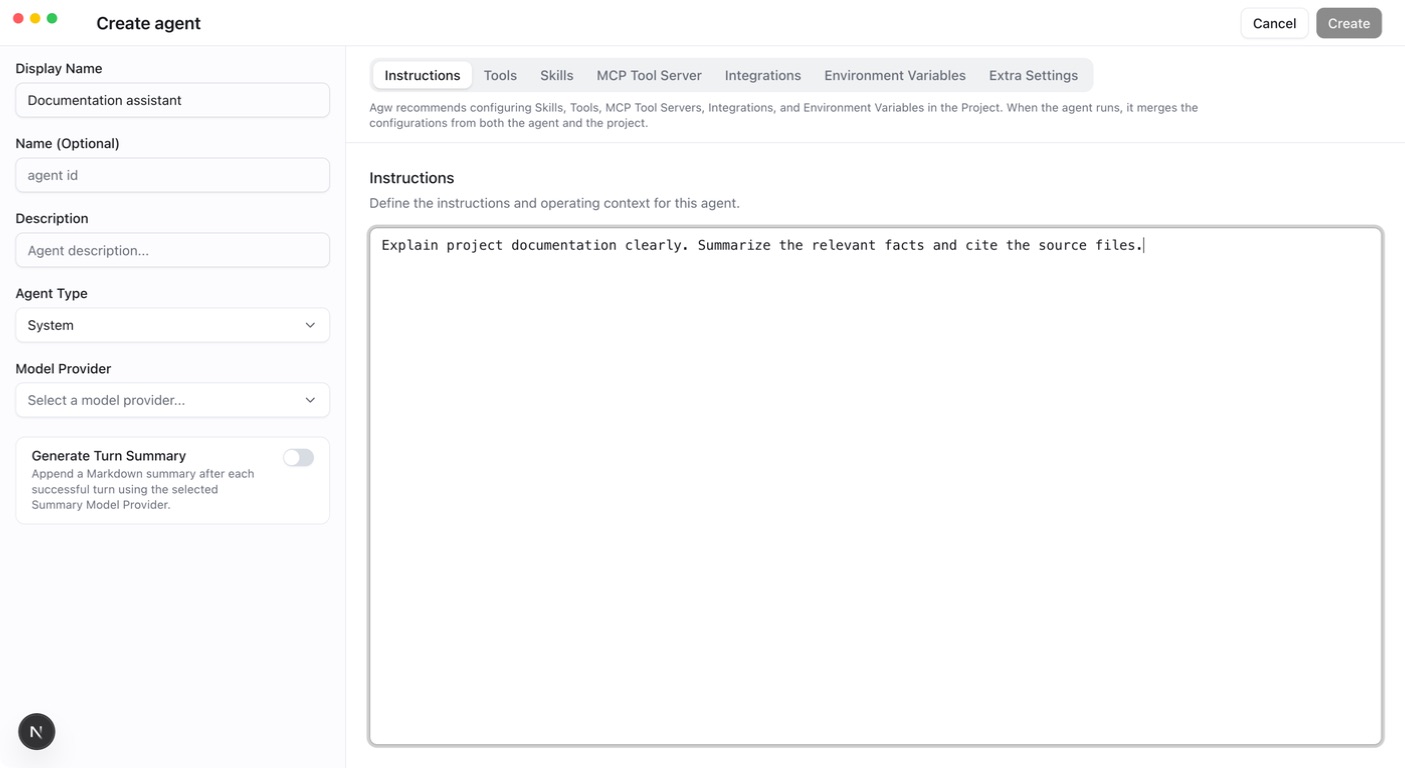
Give the agent a clear responsibility
Include the task scope and expected output in its instructions. For a documentation reviewer:
Test with a short pasted passage. To read project documents directly, add file-reading tools and run it in the correct Project. Instructions describe the task; actual tool configuration and permissions determine access.
Return replies as JSON
When a program reads the result, paste a JSON Schema object into the Response Schema tab of the create or edit dialog:
Saving requires valid JSON whose root is an object; an empty value turns structured output off. Anthropic models additionally require type set to object, properties as an object, and required as an array. The schema is passed to the model as the response format. When a custom agent also has “Generate Turn Summary” enabled, AGW requires exactly one JSON object or array in the last complete reply, or the turn fails; that JSON becomes the turn’s Result directly, without calling the Summary Model Provider.
Among external agents, Claude Code and Codex support this configuration. For Pi, the Response Schema tab is shown but disabled, and the Server rejects a schema. See Structured responses with JSON Schema for details.
Turn summaries
A custom agent can turn on Generate Turn Summary. After each successful turn, AGW uses the Summary Model Provider to append a Markdown summary as the turn’s Result; without a selection, it uses the agent’s own Model Provider. The summary input contains only this turn’s user text and the agent’s reply text, without history, tools, or Skills. External agents do not offer this switch.
With the switch on, the agent’s turns produce a Result, so Only Stream Turn Result in Conversation Settings also applies to it.
Edit and reuse
Definition changes take effect on the next turn while retaining the conversation identity. Active turns keep the configuration snapshot captured at their start, including permissions and directories.
Use Copy agent in the Agents list to copy any agent. Copying an External Agent keeps its engine kind, Model Provider, environment variables, Extra Settings, and Response Schema; Instructions, Tools, Skills, MCP Tool Server, and Integrations are not copied. Check the copied model, capabilities, and project environment before running it.
Verify
Ask a question matching the agent’s responsibility and inspect its tool activity. If tools are missing, check bindings, the tool catalog, and Connection readiness. Increasing permissions does not fix missing configuration.
Implementation and references
3.3 - Connect external agents
Last updated:
When you connect an external agent, tools such as Claude Code, Codex, or Pi perform the actual work. AGW provides a shared interface for configuration, conversations, and workflows, so you can keep using familiar tools while managing how you use them in AGW.
Prerequisites: the matching CLI is installed on the execution node and works under the Server’s account and environment. Installing it on a browser machine is insufficient; container execution needs the CLI inside the container.
One external agent type, separate configurations
You can create multiple AGW Agent definitions that use the same external agent type, each with its own model selection and settings. For example, both of these agents run Claude Code, but serve different purposes:
| Agent in AGW | External runtime | Model | Purpose |
|---|---|---|---|
| Coding | Claude Code | model1 | Write and modify code |
| Review | Claude Code | model2 | Review code and suggest improvements |
For both definitions, select External → Claude Code, then choose a Model Provider pointing to model1 or model2, respectively. These model names are examples; replace them with models available from your service provider and compatible with the Anthropic protocol.
Selecting Coding or Review in Chat uses that definition’s model configuration. You can also use them in different Agentflow nodes, without repeatedly editing a single Agent definition to switch purposes.
This separation applies to the settings stored in each AGW Agent definition. It does not automatically create separate operating-system accounts or file environments. If a definition has no Model Provider selected, the model comes from the agent’s Extra Settings or the external tool’s own model configuration.
Configure
- Verify the CLI on the execution node and complete its authentication or model configuration.
- In Agents, click Create, set Agent Type to
External, and choose the external agent kind. The kind cannot be changed after creation. - Select a Project and ensure its primary workspace is visible to the execution process.
- Optionally select a compatible Model Provider. Leave it empty to use Extra Settings or the external tool’s own configuration. Put other options for the external tool in the JSON object on the Extra Settings tab.
- Send a short task and verify the working directory, output, and permission mode.
Claude Code and Codex receive the Project’s additional directories through their SDK directory options; Pi receives the directory list in each turn’s context. All three start in the primary workspace.
| External agent | Optional Model Provider | Permissions |
|---|---|---|
| Claude Code | Anthropic | Uses the capabilities declared for this target |
| Codex | OpenAI Responses | Currently FullAccess only |
| Pi | All three provider protocols | Currently FullAccess only |
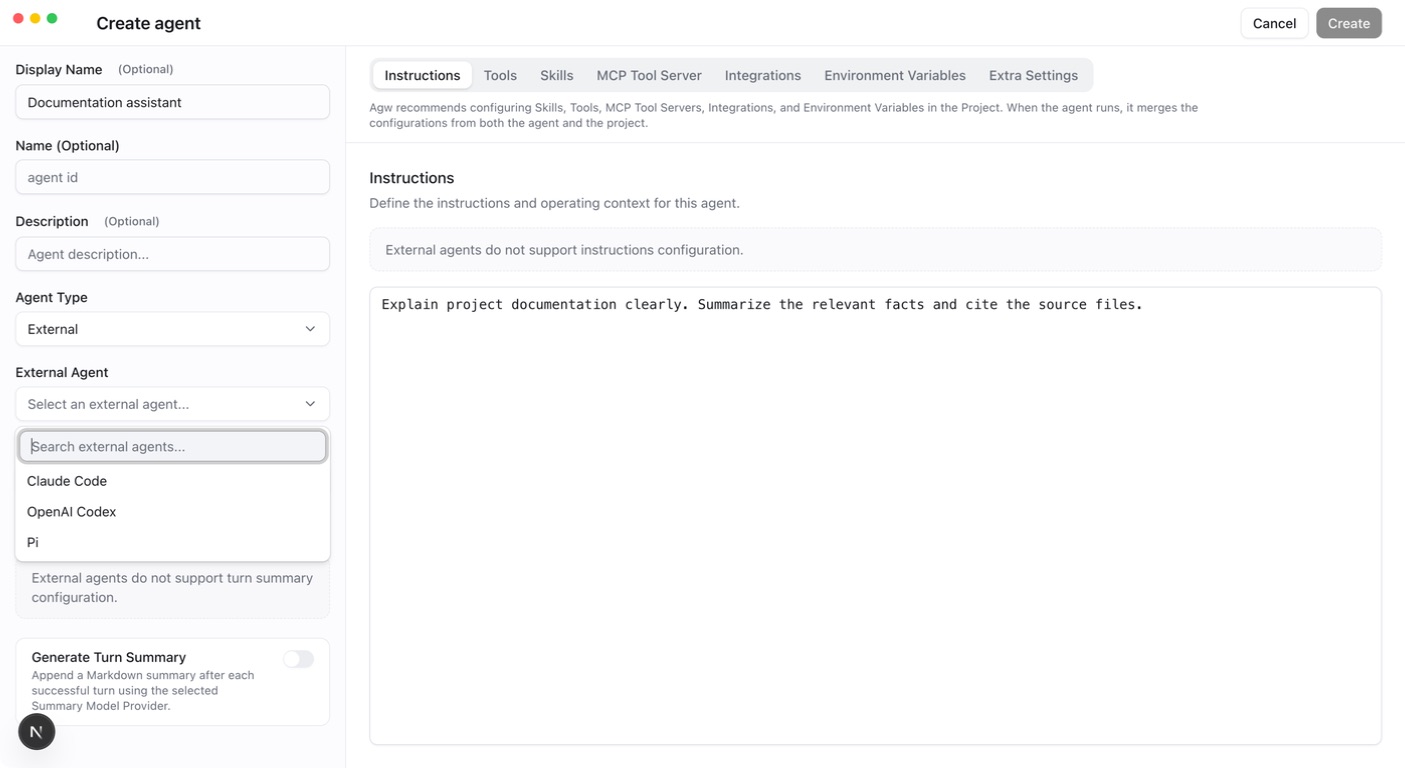
Changes and limitations
The Chat permission menu always lists all three modes and disables those the target does not support, with the reason shown; the server also validates them. Permission or definition edits affect the next turn. Active turns keep the configuration snapshot captured at their start.
Running an External Agent directly in Chat requires InProcess execution. In Distributed mode, including split Control/Data Plane deployments, such turns fail with “Distributed execution currently supports System Agents only.”
AGW’s Instructions, Tools, Skills, MCP Tool Server, and Integrations settings are not passed to any External Agent, including Pi, and those tabs cannot be edited in the form. External agents only receive existing User Memory as context. Configure and verify the external tool’s capabilities in its own environment.
If the CLI is unavailable, check its executable, account, environment variables, and Server logs. If a CLI works in your terminal but fails in AGW, check that the Server account’s PATH includes the executable.
Implementation and references
3.4 - Chat and execution history
Last updated:
Chat is where you send tasks to an agent or agentflow and inspect the results. Keep related questions in one conversation to retain the discussion and tool activity; start another conversation for a different topic.
Connect to the intended Server and prepare a working agent or agentflow. For an initial setup, follow Your first conversation.
An interaction
- Open Chat and select the Project: in Desktop, use the project tabs at the top of the window; in Web, use the dropdown at the top of the left sidebar. Then choose the execution target in the selector at the top-left of the message box.
- Enter the task, optionally attach images, and press Ctrl/Shift+Enter or click the send button. Enter alone inserts a new line.
- Read streamed output and tool activity. Handle approval or user input requests in the conversation.
- Review the conversation history and final execution state.
Web, Desktop, and Mobile accept text plus JPEG, PNG, GIF, or WebP images. Paste images in Web and Desktop; choose them from the photo library on Mobile. A message may contain up to five images, each at most 5 MB and at most 10 MB combined. Image understanding also depends on the model.
Message box helpers
| Action | Effect |
|---|---|
Type / at the start of a line or after a space | Shows command suggestions: available Skills and Tools for custom agents, or Claude Code’s slash commands |
Type @ | Searches files in the current Project, showing up to 8 matches |
| Arrow keys and Enter | Move through and select suggestions |
| + button | Turns on Plan mode (custom agents with the Mode ToolBlock) or inserts Skills and Tools |
| Lightning button | Opens Quick Text Insert to insert text maintained on the Quick prompts page |
| Permission menu | Chooses the tool permission mode; changes apply to the next turn |
| Go to latest message / Go to first message | Jump to the newest message, or load the full history and jump to the first message |
The Quick prompts page has My prompts (entries of the current user) and System prompts (visible to all users, editable only by the administrator). Web opens it from the navigation; Desktop opens it from Settings.
Understand progress
| What you see | What to do |
|---|---|
| Replies or tool activity keep arriving | Wait for completion and watch for errors |
| A tool approval request | Inspect the operation, arguments, and paths before deciding |
| A request for information | Answer in the current conversation so work can continue |
| Execution has finished | Check the reply and, for file work, the actual files or diff |
| An error or lost connection | Check execution state before retrying to avoid duplicate actions |
Icons in the conversation list show each conversation’s status: Running means it is still running, Last turn failed means the previous turn failed, and Last turn interrupted means the previous turn was interrupted.
After a turn ends with a Result, its tool activity and intermediate messages collapse into one “Worked for …” line that you can expand. Model reasoning starts collapsed; click Expand reasoning to read it. Hovering over a user message or Result shows its time and a Copy message button.
A successful execution still needs a result check. For a documentation edit, inspect the changes as well as the agent’s completion message.
Conversation list and settings
The top of the conversation list refreshes the list, deletes all history (Delete All History), and opens Conversation Settings through the Info button. Each conversation can be renamed or deleted.
Conversation Settings shows the conversation ID, message count, and creation and update times, plus two settings:
- Only Stream Turn Result: streams only each turn’s Result and automatically declines questions and tool approvals that need a person; the full history is still saved. It applies only to external agents and to custom agents with Generate Turn Summary enabled, starting with the next turn.
- Environment Variables: environment variables sent with each execution.
These settings are stored per Project in the current client, so another device or browser needs its own settings.
State and connections
Closing a page or losing a connection usually does not cancel execution. In InProcess mode, if the turn is waiting for an approval, user input, or a HumanGate when the connection drops, the Server interrupts it; in Distributed mode, a disconnect never interrupts execution. Use the explicit interrupt action to stop a task.
When the connection drops, the UI shows “Reconnecting to Server…” and retries automatically; click Retry now to retry immediately. After reconnecting, the client restores execution state; check whether the task is running, awaiting input, or finished.
Desktop gives each Server/Project/Conversation combination an independent execution connection. Switching Project tabs detaches the visible subscriber without automatically stopping background work. A status dot on each project tab shows background work, and closing a tab with a running task asks for confirmation first.
History
The server persists conversation and tool activity in batches. The Host template sets a 10-second flush interval; code falls back to five seconds when omitted. Live output that has not yet flushed is not confirmed durable history.
A conversation opens at its most recent messages, and scrolling up loads 50 older messages at a time. Desktop also offers user input navigation, which lists every user input in the conversation, including early inputs that are not loaded yet; selecting one jumps to it and loads older history as needed.
When a turn is interrupted or fails, unfinished messages and messages with fatal errors stay visible in the conversation but are excluded from later turns’ model context and from handoffs to another agent.
If the UI looks wrong, first check the selected Server and conversation, then pending input requests and Server logs. Workspace and permission changes take effect on the next turn.
Implementation and references
3.5 - Projects, files, and workspaces
Last updated:
A Project keeps a task’s directories, background information, and conversations together. For a code repository, you might create separate conversations for code exploration and troubleshooting while using the same workspace.
The account running AGW Server must be able to access these directories. Saving a Project creates a missing primary directory automatically; additional directories must already exist, use an absolute or ~ path, and not duplicate another directory. With a remote Server, enter a path on that host. With Docker, enter the path inside the container.
Configure the workspace
- Create a Project and set its Primary directory (required). In the Projects form in Settings, typing a name pre-fills
~/.agw/<project folder name>; when creating a Project from the Desktop title bar, leaving Workspace (optional) empty uses the same path. - Add Additional directories for other browsing roots. Each association has a stable ID; changing its path creates a new ID.
- In the Chat workspace’s Files view, switch roots with the directory dropdown and verify file and Git access; see File browsing and Git change review.
- Run an agent in the Project and verify that it uses the intended primary working directory.
The Project form also has Tools, Skills, MCP Tool Server, Integrations, and Environment Variables tabs. At run time these settings merge with a custom agent’s own configuration, which suits capabilities shared across the Project.
Switching the browsing root does not change the agent’s working directory. Removing an additional-directory association does not delete files. Mount network storage through the OS or container platform first, then configure the mounted path as the workspace.
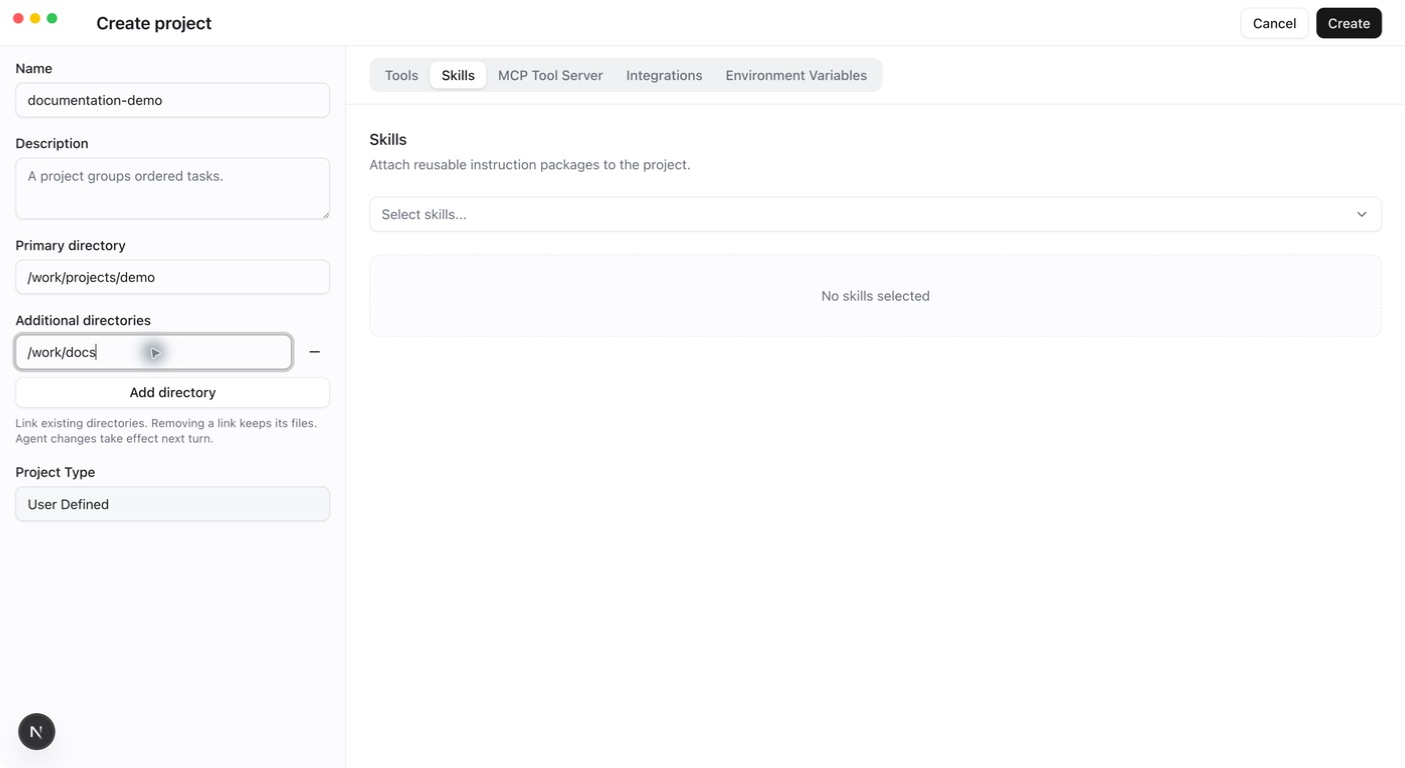
Example: code and reference directories
Suppose code is in /work/app and reference material is in /work/reference. Set the former as Workspace and add the latter as an additional directory. Browsing reference material in Files leaves the agent’s default working directory at /work/app. Tell the agent where the reference material is and give it the required reading capability.
For Docker, mount the directories first. If the host’s /home/me/app is mounted at /work/app in the container, enter /work/app as Workspace. Entering a path in the form does not create a container mount.
A custom agent’s instructions list the primary directory and each additional directory, using the folder name as an alias. In conversation, refer to a directory by its alias, or to the primary directory as default.
When a Project is created through the API without a workspace, the Server uses ~/.agw/projects/{projectId:N}, where {projectId:N} is the Project ID without hyphens.
When changes apply
Project updates invalidate the local filesystem cache and refresh file browsing immediately. Agents capture immutable directory snapshots at the start of each turn. Changes rebuild the runtime on the next turn while preserving conversation identity. Active turns, child execution, and durable recovery retain their captured paths.
Every distributed execution node must see the same captured host paths. An unavailable or foreign additional directory fails without falling back to the primary root.
Troubleshoot
For missing files, verify the selected browsing root, mount, execution account, and Server-side path. A different directory in your local terminal is not sufficient evidence. Non-built-in Projects can be copied. A copy keeps Tools, Skills, MCP Tool Server, Integrations, and environment variables, but its primary directory becomes ~/.agw/projects/{newId:N} and it has no additional directories; set the directories again after copying.
Implementation and references
3.6 - Agentflow
Last updated:
Agentflow means Agent Workflow: a workflow that connects several processing steps. One agent might prepare material, another review it, and a person approve the result. The canvas shows the steps, their inputs and outputs, and their order.
Verify each agent independently before connecting it. Start with one path from input to output, then add branches and approvals once it works.
Build the first flow
- Open the Agentflows editor and start with its single Input node.
- Add an Agent node, select a verified agent, and connect Input to Agent.
- Add and connect Output, save, then select the Agentflow in Chat and run it.
- After the basic path works, introduce HumanGate, branches, or parallel nodes.
The editor canvas has Undo and Redo buttons at its top right, also available as Cmd/Ctrl+Z, Cmd/Ctrl+Shift+Z, or Ctrl+Y. Drag the dividers to resize the node palette and Inspector. With unsaved edits, the dialog shows Unsaved changes and asks Discard unsaved changes? before closing; unsaved drafts are not kept after the dialog closes.
Each flow in the Agentflows list has an Enabled switch and Run, Edit, Copy, View Mermaid chart, and Delete actions. Run opens Chat in a side drawer using the built-in default Project, which suits a quick trial; to run it in another Project, select the Agentflow in Chat. Disabled agents and agentflows are not offered in the editor’s selectors.
flowchart LR
    I[Input] --> A[Agent]
    A --> H[HumanGate]
    H --> O[Output]
HumanGate pauses for a person. Input mode shows a Response box with Submit and Interrupt buttons, and the submitted reply can drive downstream predicates. Approval mode offers only Approve and Reject. Interrupt and Reject both stop the workflow.
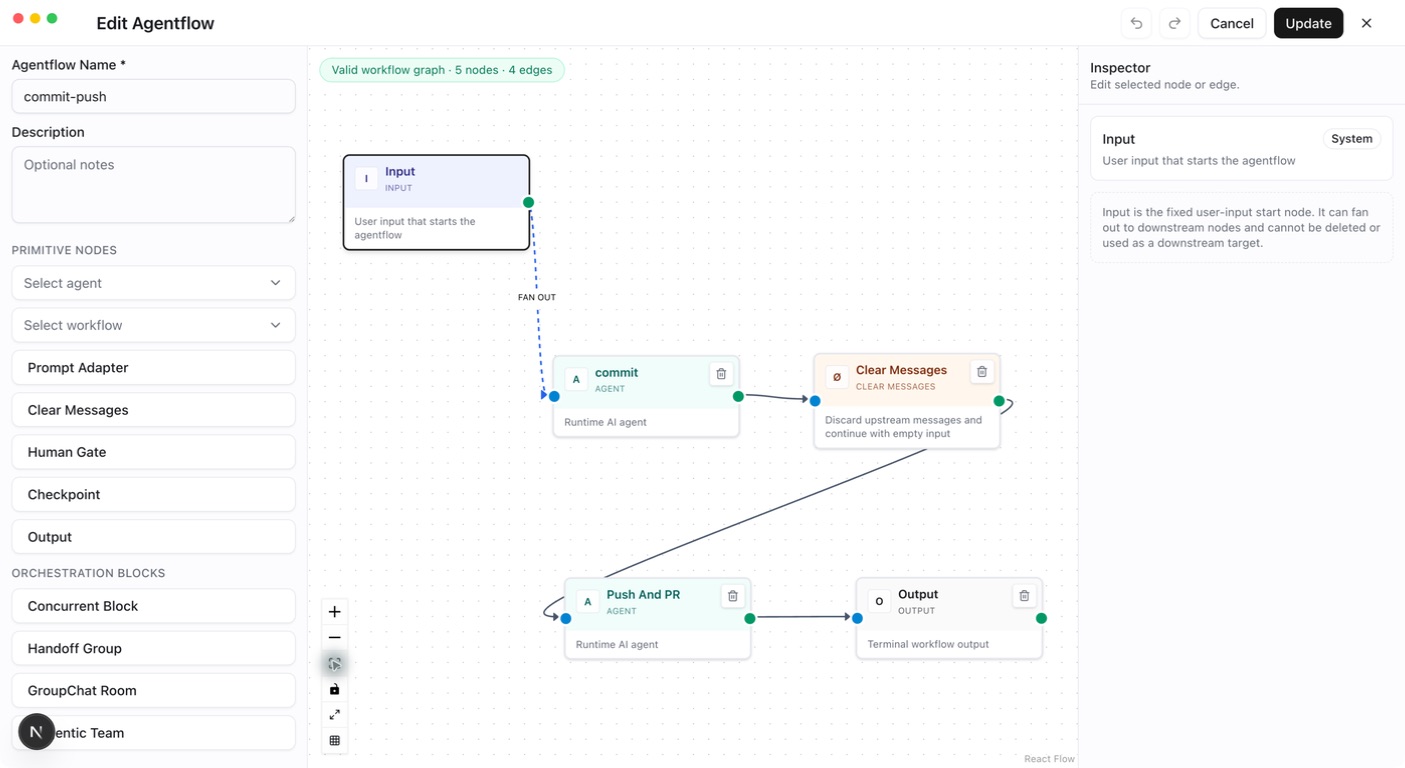
Primitive Nodes
Primitive nodes handle one step: receiving input, calling an Agent, adjusting messages, waiting for a person, or returning results. Select a node on the canvas, configure it in the Inspector, and connect it to its upstream and downstream steps.
Input: enter the flow
Input passes the current user request into the graph. For example, “Review these changes” enters here when sent from Chat.
Every flow has exactly one Input with the fixed ID input and no incoming edges. Connect it to one step or use Fan Out to send input to multiple branches.
Agent: perform a task
Select a configured Agent and optionally set the node name and instructions describing how to handle upstream results. For example, a code-review node can inspect incoming code and return problems and suggested fixes.
The node receives upstream content, runs the selected Agent, and passes its results downstream. The same Agent definition can appear in several nodes, each with its own model conversation history. Edges transfer task content rather than merging another node’s complete model session.
Verify the Agent’s model, tools, and workspace before adding it to a flow. Node instructions should also match the configuration supported by that Agent type.
Workflow as Agent: reuse a subflow
Use Select workflow to choose an existing Agentflow as a step. Upstream messages become its input, and its output returns to the parent flow. This suits reusable processes such as collecting material and producing a summary.
Verify the subflow independently before adding it to a parent flow or block. References between flows cannot be recursive: A cannot call B if B calls A. Separate branches may reuse the same subflow.
Prompt Adapter: add instructions
Use System Prompt / Instructions to describe how downstream content should be handled, such as “Respond with background, findings, and recommendations.” The node prepends these instructions to the current messages and forwards them.
Prompt Adapter does not call a model or perform translation, summarization, or data conversion itself. Connect an Agent after it to generate new content.
Clear Messages: discard upstream messages
Clear Messages discards arriving messages and continues downstream with an empty message payload. No model configuration is needed. For example, once an earlier step has written results to project files, the next step can read those files without carrying a large amount of upstream text.
It does not delete Chat records or clear a downstream Agent’s existing session history. The next step needs clear instructions or accessible source material and cannot rely on the discarded content.
Human Gate: request input or approval
Insert Human Gate where a person needs to confirm a result or provide information:
| Field | Usage |
|---|---|
| Human Step Mode | Choose Input to request information or Approval to request approval |
| Human Prompt | Explain what to supply or approve, such as “Confirm the release scope and list modules to exclude” |
Execution pauses until the request is handled through an interactive interface. In Input mode, a person writes a reply in Response and clicks Submit; the flow continues, and outgoing edge conditions can test that reply. In Approval mode, Approve continues the flow without any text. Interrupt and Reject both stop the flow. To return upstream for changes, use Input mode with a human reply and conditional routing.
For example, Agent → Human Gate → Output confirms a result. Conditions can also use agreed reply text to choose between revision and completion. Human nodes require a channel that can receive and answer interaction requests.
Checkpoint: save a recovery boundary
The Checkpoint node is called CheckpointMarker in code. Set a recognizable Checkpoint Name, such as “Research complete,” and place it where execution progress should be saved.
After this node, the system saves a complete workflow checkpoint at the end of the corresponding execution stage. Chat shows each saved checkpoint as a card marked Checkpoint; click Resume on the card to restore that save. The button is disabled with “This checkpoint is unavailable” when it cannot be resumed. Resuming selects one specific saved occurrence, creates a new execution branch from that state, and removes conversation records after the saved boundary.
Resume requires the same user, Project, conversation, and Agentflow, an unchanged flow definition, and no conflicting execution. InProcess checkpoints remain resumable only while the original runtime still holds the occurrence. Distributed mode persists checkpoints in PostgreSQL and supports recovery across disconnects or Server restarts. A checkpoint is neither a database backup nor a button to rerun any arbitrary node.
Output: return results and optionally summarize
Output emits arriving messages as flow results. A simple flow can connect Agent → Output directly.
A new Output node starts with Generate Summary on, and the flow cannot be saved until a Summary Model Provider is selected; turn the switch off when no summary is needed. With it on, an additional model call turns the results entering Output into a conclusion appended after them. Without it, the received messages pass through unchanged.
Orchestration Blocks
Blocks organize multiple participants into one step. Participants can be Agents or nested Agentflows. The node palette lists the four blocks as Concurrent Block, Handoff Group, GroupChat Room, and Magentic Team. Add a block, use its member controls to add participants, then click Open to inspect members and configure their names and responsibilities. Parent-flow edges connect to the block, which schedules its members internally.
| Block | Collaboration | Suitable tasks |
|---|---|---|
| Concurrent | Process the same input in parallel and wait for all results | Independent analysis or reviews from different perspectives |
| Handoff | Start with the first participant and transfer work as needed | Triage and specialist routing |
| Group Chat | Participants speak in order | Bounded discussion and iterative improvement |
| Magentic | A Manager plans and coordinates the team | Tasks requiring dynamic planning and delegation |
Concurrent: work in parallel
Add participants that can work independently, such as security and performance reviewers. The block sends the same input to every member concurrently, waits for all of them to finish, and combines their response messages for the next step.
Combining messages does not deduplicate opinions or generate a unified conclusion. Add a summarizing Agent afterward or enable Output summarization if needed. Use sequential edges for dependent steps, and avoid conflicting writes when members work on the same files.
flowchart LR
    I[Input] --> C
    subgraph C[Concurrent]
        A[Security review]
        B[Performance review]
    end
    C --> S[Summary Agent] --> O[Output]
Both reviewers receive the same input. The summary Agent processes their results after both finish.
Handoff: transfer work as needed
The first participant receives the task and can transfer it to another member according to their responsibilities. For example, a triage Agent routes a question to a billing or technical specialist. When the block finishes, its results continue downstream in the parent flow.
| Field | Purpose |
|---|---|
| Handoff Instructions | Explain when to transfer work and which participant should receive it |
| Return To Previous | Allow a transfer back to the previous participant |
| Autonomous Mode | Enable automatic continuation |
| Autonomous Turn Limit | Bound continuation turns in autonomous mode |
| Continuation Prompt | Prompt used for automatic continuation |
Define clear responsibilities and transfer conditions, and set a reasonable autonomous limit. Handoff does not guarantee that every participant runs. If every step must execute, sequential parent-flow edges are more direct.
Group Chat: take turns
Add participants and check their order. The current implementation schedules them in Round Robin order to contribute to the incoming task, stopping at Max Rounds.
For example, an author proposes a solution, a reviewer identifies problems, and the author revises it. Max Rounds bounds scheduling iterations; it does not mean that every member speaks that many times. The current default is 10 when unset.
Group Chat suits bounded collaboration with clear discussion rules. It does not automatically wait for consensus. Add a summary Agent afterward when a single conclusion is needed.
Magentic: coordinate through a Manager
Add participants and select a Manager. If none is specified, the first participant is the Manager and the others form the team. The Manager plans and assigns work based on the task. This suits work where initial research determines which follow-up analyses are needed.
| Field | Purpose |
|---|---|
| Manager | Participant responsible for planning and coordination |
| Max Rounds | Overall scheduling-round limit |
| Max Stalls | Limit tolerance for lack of progress |
| Max Resets | Bound replanning or resets |
| Require Plan Signoff | Require confirmation of the plan |
Give the Manager clear goals, completion criteria, and member responsibilities. Set round, stall, and reset limits appropriate to the task. Plan signoff requires an interactive execution entry point. After coordination completes, block output continues downstream. Execution does not guarantee a fixed participant order or a call to every member.
Planning and coordination usually require additional model calls compared with fixed sequential or parallel execution. When the steps are already clear, ordinary node connections or Concurrent are easier to verify.
Advanced Config JSON
Advanced Config JSON is the JSON representation of a node’s additional settings. It edits the same configuration as the Inspector controls. Start with the form, then use JSON to inspect or adjust the complete settings.
Use double quotes, literal true or false for switches, and unquoted numbers. Do not include comments or trailing commas. Enter one object, such as {}, rather than an entire workflow. Names, Agent or workflow selections, and System Prompt / Instructions have separate fields and do not belong here.
Primitive node fields
| Node | JSON fields | How to configure |
|---|---|---|
| Input | None | Fixed entry; no advanced configuration field |
| Agent | No dedicated fields currently | Leave empty or use {}; use the Agent selector and instructions |
| Workflow as Agent | No dedicated fields currently | Leave empty or use {}; select the subflow separately |
| Prompt Adapter | No dedicated fields currently | Leave empty or use {}; enter instructions separately |
| Clear Messages | None | No advanced configuration field |
| Human Gate | humanMode, humanPrompt | Interaction mode and user-facing prompt |
| Checkpoint | checkpointName | Use Checkpoint Name; no advanced configuration field |
| Output | None (configured through the Generate Summary UI) | Use Generate Summary and Summary Model Provider; no advanced JSON editor is shown |
Human Gate example:
Use input to request information or approval for approval. When unset, both the editor and the runtime treat the mode as approval. humanPrompt is the text shown to the user.
Checkpoint Name is stored as:
The Output runtime configuration currently has one field, enableSummary, but Output does not show an Advanced Config JSON editor. Configure it directly through the Generate Summary controls in the Inspector:
true(the value for a new Output node): after the main flow succeeds, use the selected Model Provider to append a Markdown summary to the final output.false: pass through the messages entering the Output without an extra model call. The Server also treats a missing field asfalse.
When summary generation is enabled, both conditions below must hold, or the editor’s save button stays disabled:
- The Output Inspector has a valid Summary Model Provider selected.
- The workflow has exactly one Output node; otherwise the editor shows “Summary requires exactly one Output node”.
The summary model receives the messages entering that Output. The editor provides no Instructions field for Output. The Model Provider is workflow configuration; adding modelProviderId or summaryModelProviderId to node JSON does not replace it, and arbitrary additional keys do not add Output capabilities.
Block members
All four blocks use participantNodeIds: canvas node IDs, not Agent definition IDs or display names. The editor provides Members, Max Rounds, Manager, and the other block-specific controls, so orchestration blocks do not show an Advanced Config JSON editor. The JSON below documents the shape those controls save; users do not need to enter it manually.
Replace the example IDs node-a and node-b with real Agent or Workflow as Agent node IDs in the current graph. Concurrent requires at least one member; Handoff, Group Chat, and Magentic require at least two.
Concurrent
Specify parallel members. There are no round-limit or Manager settings:
Handoff
The first member receives the task. handoffInstructions describes transfer rules; enableReturnToPrevious allows returning to the previous member; autonomous enables automatic continuation. The last two fields apply only when autonomous is true and specify its turn limit and continuation prompt. Both switches remain off when omitted. The example number is not a default.
Group Chat
Members take turns in array order. Set maxRounds to a positive integer limiting scheduling iterations; AGW uses 10 when omitted. It is not a separate speaking allowance for each member.
Magentic
managerNodeId must identify a listed member; the first member is used when omitted. maxRounds limits scheduling rounds, maxStalls controls tolerance for lack of progress, and maxResets bounds replanning or resets. Enter positive integers in the editor. requirePlanSignoff requests plan confirmation. These are illustrative values; omitted optional limits and signoff settings use the underlying workflow framework’s defaults.
Before saving
Check that member IDs exist, value types are correct, and each setting belongs to the current node. Advanced Config JSON is not a script entry point; arbitrary keys do not add capabilities. After editing JSON, check that the Inspector form shows what you expect, then save and verify with a small task.
Branch predicates go in an edge’s Predicate JSON. If / Else If edges do not show Advanced Config JSON; set branch order with Move branch up and Move branch down. Neither belongs in node Advanced Config JSON.
Routing and constraints
Exactly one Input must have ID input and no incoming edges. Runtime-visible nodes must be reachable from it. Node and edge IDs must be unique, with valid references.
Connections determine which steps run after a node finishes. Choose one in the edge’s Edge Type:
| Routing | Meaning | Design consideration |
|---|---|---|
| Direct | Continue to the next step | Use for a fixed sequence |
| Fan Out | Send input to several branches; every branch whose predicate matches runs | Branches should process the input independently |
| If / Else If | Check conditions in order and send the message only to the first match | Add an Else edge to handle unmatched conditions |
| Fan-in Barrier | Wait for every source in the group before continuing | Every required branch must be able to arrive |
Do not mix Direct, Fan Out, and If / Else If from one source. For example, If / Else If selects only one branch; a later barrier waiting for all branches may never receive everything it needs.
Controlled cycles are supported when graph safety rules are met. Verify exit conditions before adding nested workflows, orchestration blocks, and checkpoints so failures remain easy to locate.
Verify and inspect history
Test success, unmatched conditions, human rejection, and waiting paths separately. While the flow runs, Chat shows the input each node receives as its own input bubble in the current turn, keeping the upstream node attribution, so you can check execution order. CheckpointMarker identifies a full MAF checkpoint boundary; recovery is not an arbitrary restart at a chosen node. Keep a working flow before editing, and inspect execution records for node attribution.
Implementation and references
3.7 - Scheduled jobs
Last updated:
A Job runs an agent or agentflow at a scheduled time, such as for a routine check or recurring summary. Save its instructions, Project, and schedule; Server starts the task when due and records each outcome.
First verify the same task manually in Chat, including its model, tools, and directories. Server must stay running. In split deployments, Control Plane schedules the work and Data Plane executes it.
Configure a job
- Create a Job, choose its Project in Project ID, and choose the Agent or Agentflow to run in Agent ID. A job without a target still saves, but fails at run time and enters retries.
- Write its prompt, choose a Trigger Type, and enter the run time or trigger value.
- To change the name, failure retries, or enabled state, click Advanced at the bottom of the dialog and use Job Name, Max Retry Count, and Enabled. Max Retry Count defaults to 3 and new jobs are enabled; a blank Job Name is generated automatically.
- Test a future one-time job first. After Job logs and project execution records look right, create a separate recurring job. A successful one-time job pauses and disables itself; switching it to a recurring trigger or enabling it again does not make it run.
| Trigger | Example | Time semantics |
|---|---|---|
| Once | A future RFC 3339 timestamp, such as a UTC value ending in Z | Must be in the future |
| Interval | 00:15:00 | A positive duration in hours:minutes:seconds. The first run is 15 minutes after creation; each later run is 15 minutes after the previous successful run ends |
| Cron | 0 1 * * * | Standard five fields, evaluated in UTC; daily at 01:00 UTC |
Clients display local time, but Cron uses UTC. A past Once timestamp does not mean “run immediately.” If an Interval is not a positive hours:minutes:seconds duration, or a Cron value does not have five fields, an error appears below the field and the save button stays disabled. A five-field Cron with invalid field values is rejected by the Server on save with “Invalid cron trigger value”. After saving, check the next execution time in Next Run in the job list.
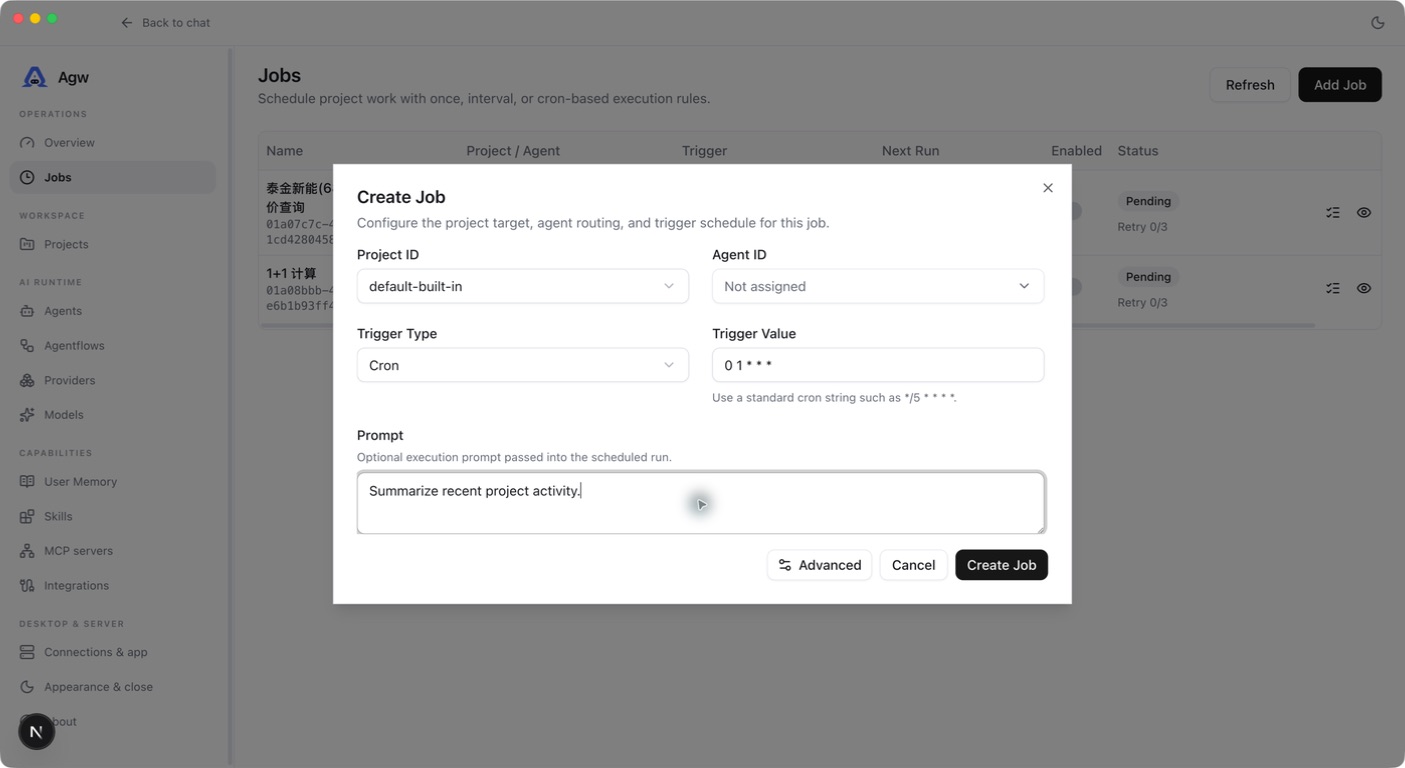
Write instructions that stand on their own
A scheduled task may run without anyone available to clarify it. Specify the source, time range, and output. For example: “Read this week’s project progress notes. List completed work, unresolved issues, and next steps. Say when records are missing instead of guessing.” Configure the target agent’s reading capability before use.
0 1 * * * runs daily at 01:00 UTC, which is 09:00 in Singapore or China Standard Time. After saving, check the next execution time in Next Run in the job list or details. A maximum retry count of 2 allows up to 3 attempts: the initial attempt and two retries.
Execution, retries, and pausing
Scheduled tasks in one Project run serially; different Projects can run concurrently. Each run starts a new conversation in the Project, runs with Full access, and automatically declines questions and approvals that need a person. Successful one-time jobs pause and disable themselves. Recurring jobs schedule their next run. A failed attempt is retried after 30 seconds, and MaxRetryCount excludes the first attempt. Exhausted retries pause and disable the job, and a recurring job schedules no further runs; fix the problem and create a new job to continue.
Each attempt records its time, result, and errors. Disabling a Job prevents later scheduling but does not interrupt an active run. Edits or deletion may be rejected until it finishes. The scheduler reads upcoming tasks in advance, so check the task state and execution records after rescheduling.
For missing runs, check initialization, enablement, next-run time, and target validity. Make external writes repeatable; a project lock is not an exactly-once guarantee.
Job Logs: inspect execution results
Job Logs records each execution attempt for a Job. Use it to check success, retries, and failure reasons. It contains execution outcomes; open Chat for full model replies and tool activity.
Open execution logs
- Find the task in Jobs and open its row’s logs action to enter Job Logs.
- Locate the relevant record by execution time and inspect its status, attempt number, and error.
- Select Go to Chat to open the conversation for that run and inspect its conversation and execution content. If the run has no conversation record yet, it opens the Job’s Project instead.
The task details view also exposes attempts and errors under Execution Logs. Back to Jobs returns to the task list.
Read the fields
| Field | Meaning |
|---|---|
| Status | Succeeded means the attempt completed successfully; Failed means it failed |
| Attempt | Attempt number within the current run: #1 is the initial attempt and #2 is its first retry, not the Job’s lifetime run count |
| Job ID | Identifier of the task owning these records; multiple records for the same Job share this ID |
| Time | Attempt start time and, when present, end time, displayed in the client’s local time |
| Error | Failure reason, or - when no error is provided |
| Actions | Open conversation content with Go to Chat |
For example, Failed / #1 followed by Succeeded / #2 for the same run means the first attempt failed and its retry succeeded. A recurring Job resets its retry count after success, so later records can show #1 again. Use timestamps to distinguish runs.
Troubleshoot with logs
- No records: check whether the task is enabled, its scheduled time has arrived, and it is still running. Records are written when an attempt ends and its outcome is recorded; an empty list does not necessarily mean scheduling never started.
- Failed execution: read Error, then use Go to Chat to inspect model replies and tool activity. Consult Server logs for model connection failures, tool errors, or unavailable workspaces.
- Success but an unexpected result: Succeeded means execution completed successfully. Still verify the output, generated files, or external actions against the task requirements.
- Failures remain after recovery: a successful retry does not remove earlier failure records. Check later attempts by time and inspect the Job’s current state.
Scheduled and background execution
Jobs run an Agent or Agentflow at a specified time, interval, or Cron schedule, for tasks such as periodic summaries and routine checks. Background Agents can delegate subtasks to other agents and retrieve their results later.
- Verify that the Project, target, and required tools work.
- Create a Job with instructions and a schedule for recurring work; configure Background Agents for delegated subtasks.
- Inspect status, results, and errors in task records and adjust the schedule as needed.
Closing Chat does not automatically cancel execution, but the Server and execution nodes must keep running. Background Agents cannot wait for new human approval. Unattended Jobs cannot automatically complete requests that need a real human answer or HumanGate decision. Ongoing execution does not guarantee seamless recovery after every restart; recovery depends on the deployment and execution mode.
Configure tools and Skills · Learn about memory · Check execution status
Implementation and references
3.8 - Tools and Skills
Last updated:
A Tool performs an operation, such as reading a file. A Skill supplies instructions, resources, and optional tools for a type of task. Decide what the agent needs to read or change, then select the relevant tools and guidance.
The steps below assume an existing custom agent and Project. External agents configure capabilities through their own supported mechanisms.
Add capabilities
- Review the selectable tools in the Tools tab of an Agent or Project. ToolBlock cards show a description and member tools, plus an Approval badge when a call may need approval; individual tools appear in a dropdown with name, description, and category.
- Manage available Skills and read their instructions and prerequisites.
- Bind the tools and Skills needed for this task to the agent.
- Start a new turn in the correct Project. Verify read operations before testing necessary writes.
Every tool explicitly declares AgwToolPermission. The execution pipeline checks permissions; saying “allowed” in a prompt does not bypass permission or ownership checks.
Built-in ToolBlocks
| ToolBlock | Purpose | Configurable on |
|---|---|---|
| Todo | Tracks multi-step work with a persistent todo list | Agent, Project |
| Mode | Switches between Plan and Execute; see Plan and Execute modes | Agent, Project |
| File Access | Reads and modifies files in the Project workspace | Agent, Project |
| User Memory | Memory for the current user across Projects | Agent, Project |
| Project Memory | Memory shared across the current Project, stored in the database or the primary directory; see Memory | Agent, Project |
| Background Agents | Delegates work to explicitly allowed agents chosen in Allowed delegation targets | Agent only |
In File Access, file_access_read, file_access_read_lines, file_access_ls, and file_access_grep are read-only and allowed in Plan mode; file_access_write, file_access_delete, file_access_replace, and file_access_replace_lines require write permission.
Local and Remote Skills
Choose a mode according to how you maintain the content:
| Mode | Content source | How to update |
|---|---|---|
| Local | Upload a ZIP containing SKILL.md; files are stored on the AGW server | Edit the Skill and upload a new ZIP |
| Remote | Provide an HTTP or HTTPS URL that downloads a Skill ZIP | Update the remote content and let AGW refresh its cache; editing and saving the Remote Skill also fetches it again |
“Local” means the AGW server, not the computer running the browser. Remote refers to where the instructions come from; the Agent still performs the task.
- Create a Skill in Skills and select Local or Remote.
- For Local, enter a name and description and upload a ZIP containing
SKILL.md. For Remote, enter the ZIP download URL without uploading a file. AGW downloads it with an unauthenticated GET, so URLs that require sign-in or a token cannot be used. - A Remote package must contain exactly one
SKILL.md, withnameanddescriptionin its YAML frontmatter and instructions in its body. The remote file supplies the name and description. - After saving, select the Skill in an Agent or Project and use a small relevant task to verify that its instructions are available.
Remote Skills currently read the instructions from the package. They do not download and run its scripts or expose its other resource files. If those files are needed, use Local mode and prepare the execution environment.
Remote Skill cache
AGW fetches content when a Remote Skill is created or saved and caches it in the database for one hour.
- Reads reuse a valid cache to avoid repeated downloads.
- After expiration, the next read fetches fresh content. This is not an hourly background download.
- After updating remote content, wait for the cache to expire or edit and save the Remote Skill to fetch it again.
- A failed refresh returns an error. It does not extend the old cache’s lifetime or serve expired content. Check that the server can reach the download URL and that the ZIP and
SKILL.mdformats are valid.
During automatic refresh, the remote name must match the saved Skill name. If the remote name changes, edit and save the Skill to update its definition. Refreshing the cache does not rewrite content already loaded into a conversation; have the Agent read the Skill again when verifying updated instructions.
Skill-owned tools
Skill-owned tools are registered through the Skill and bound to the Project at runtime. They are not global catalog entries, so absence from the global list does not imply unavailability.
For example, agw-job supplies agw_job_list, agw_job_get, agw_job_create, agw_job_update, and agw_job_delete. Reads work in Plan mode; writes are prohibited there.
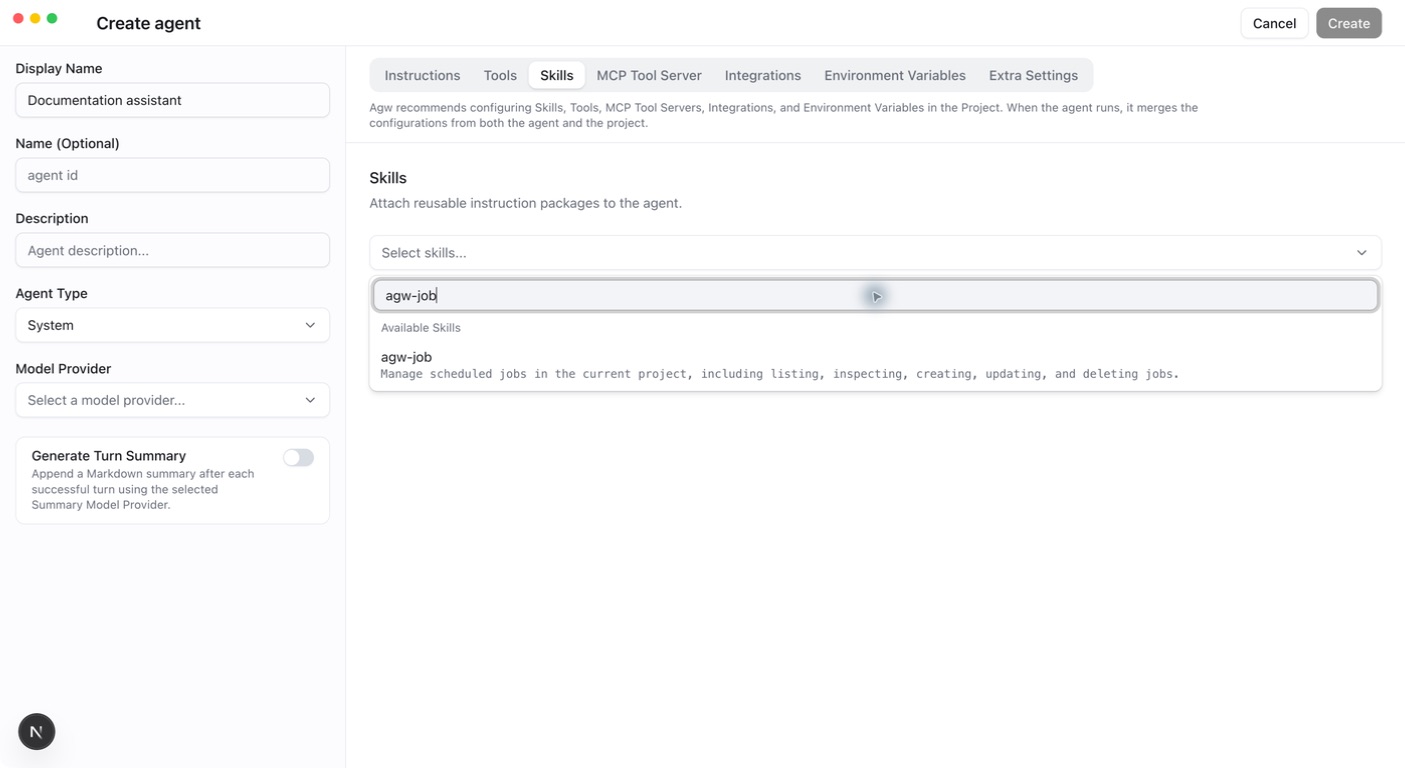
Verify
Inspect tool names, arguments, and results to confirm the intended Project was used. For missing capabilities, check Skill bindings and execution mode. For external services, configure MCP or Integrations.
Implementation and references
3.9 - MCP servers
Last updated:
MCP (Model Context Protocol) lets agents use tools from another service. An MCP server describes the operations it offers; AGW connects to it and makes those tools available to a custom agent. The available operations depend on the service.
Prepare the service’s launch command or URL, transport, and required credentials. The model itself is configured separately through a Model Provider.
Connect
- On the MCP Tool Servers page, click Add Server, choose
stdioorhttpin Transport Type, and enter the command or endpoint and credentials the service requires. - Local-process servers must be launchable on the execution node; remote services must be reachable from that node.
- Click Connect and list tools in the list to check connectivity; success shows “N tools available”. Make sure Enabled is on, because disabled servers are not used.
- Bind the service in the MCP Tool Server tab of a custom agent or Project, then start a new turn. A run uses every server bound to the Agent and the Project.
- Inspect discovered tools and validate a read-only operation.
Directories, commands, and network access belong to the actual Server/execution node. Connecting a remote Desktop does not automatically expose locally installed MCP services to the Server.
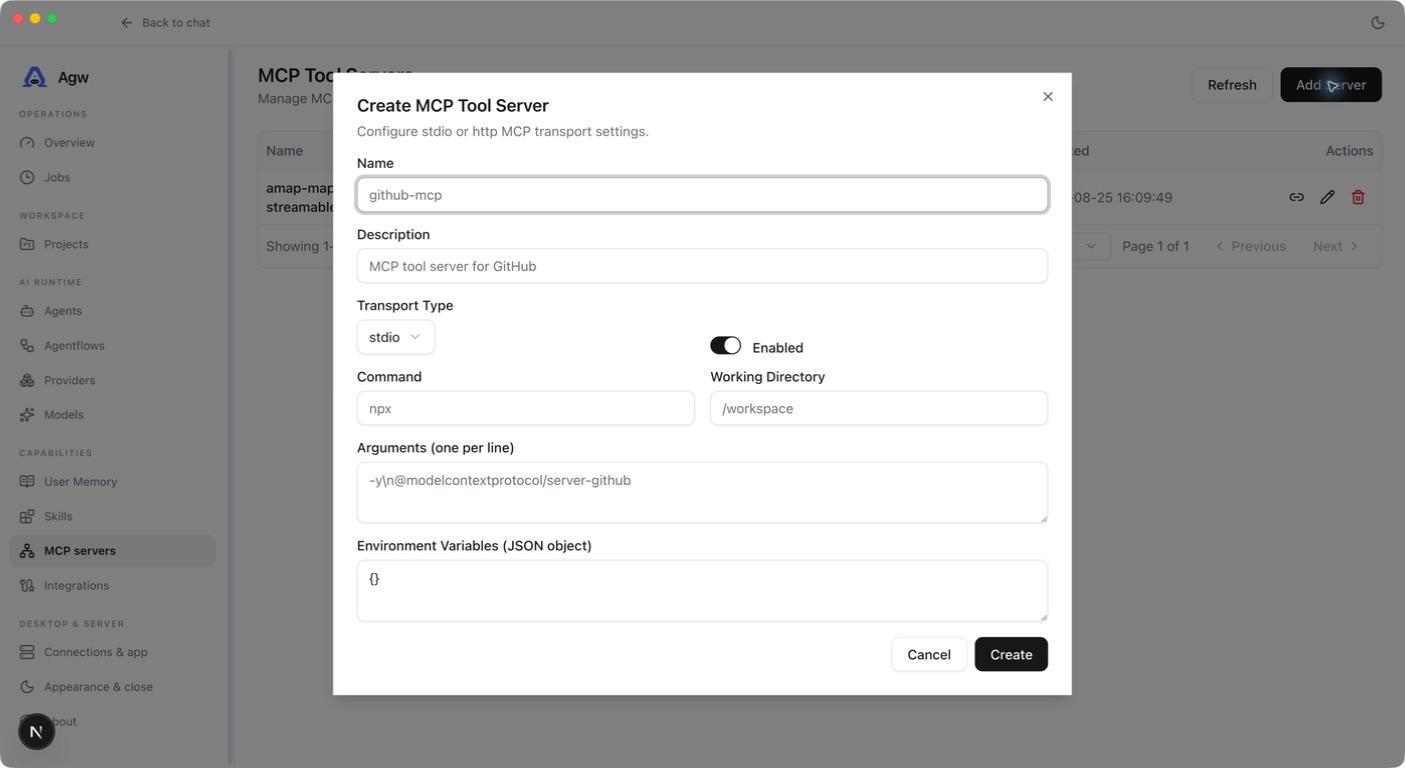
Choose a transport
| Transport | How it connects | What to check |
|---|---|---|
| stdio | AGW starts a process and communicates through its input and output | The executable, arguments, and working directory exist on the execution host |
| http | AGW connects to an already running tool service. Choose http for SSE services too; AGW detects the HTTP transport the service uses | The URL and authentication are correct and reachable from the execution host |
A stdio command may work in your personal terminal but be unavailable to a Server running under another account or in a container. Check commands and environment variables in that environment. Test remote URLs from the execution host as well.
Relationship to Integrations
MCP is a tool protocol. An Integration provides catalog definitions, user configuration, credentials, and a Connection lifecycle. Integrations can themselves expose tools through MCP.
Plugin MCP supports stdio, HTTP, and SSE sources. Plugin HTTP/SSE sources that inject credentials must use HTTPS. Credentials are resolved within the invocation scope; keep them out of public URLs and prompts.
Troubleshoot
A server that cannot be reached at run time is skipped with a warning in the Server log, and the turn continues; an invalid or conflicting tool name fails the turn. When a stdio server starts, environment variables supplied by the execution override same-name values in the server configuration.
For missing tools, check bindings, launch commands, executables, network reachability, and credentials. Verify the service in the same execution environment before retrying a new agent turn. External CLI MCP configuration follows that tool’s mechanism and is not AGW Connection injection.
Implementation and references
3.10 - Configure integrations
Last updated:
Integrations let custom agents use authorized external accounts, for example to read information from GitHub. Configure several accounts for one service and choose which one an agent uses. The built-in catalog currently provides GitHub.
Prepare the required authentication details and check that the account can access the resources needed for your task.
From definition to connection
- Available integrations: global catalog definitions available for configuration.
- Configured integrations: accounts or service endpoints configured by the current user.
- Connection: the concrete instance selected and bound; one integration can have several accounts.
- On the GitHub card in Available integrations, click Configure and complete the setup required by the chosen authentication method. GitHub OAuth needs the Client ID and Client Secret of an OAuth App; register the OAuth callback URL shown in the dialog with that OAuth App.
- On the catalog card, click New integration in the row for the authentication method you want, and enter a Display name and a clear Alias. After a new OAuth Connection is saved, AGW opens the authorization page automatically.
- Confirm it is Ready, then bind the specific connection to an Agent or Project. Use Authorize on the connection card to authorize again and Validate to recheck the connection.
- Run a read operation in a new custom-agent turn and verify the intended account is used.
Aliases are immutable after creation and unique per user. They allow only lowercase letters, digits, and single hyphens, up to 128 characters; uppercase input is converted to lowercase. Tool names follow {alias}__{operation} to distinguish accounts. A GitHub connection provides {alias}__current_user, {alias}__list_repositories, and {alias}__clone_repository, which read the current account, list visible repositories, and clone a repository into the current Project workspace.
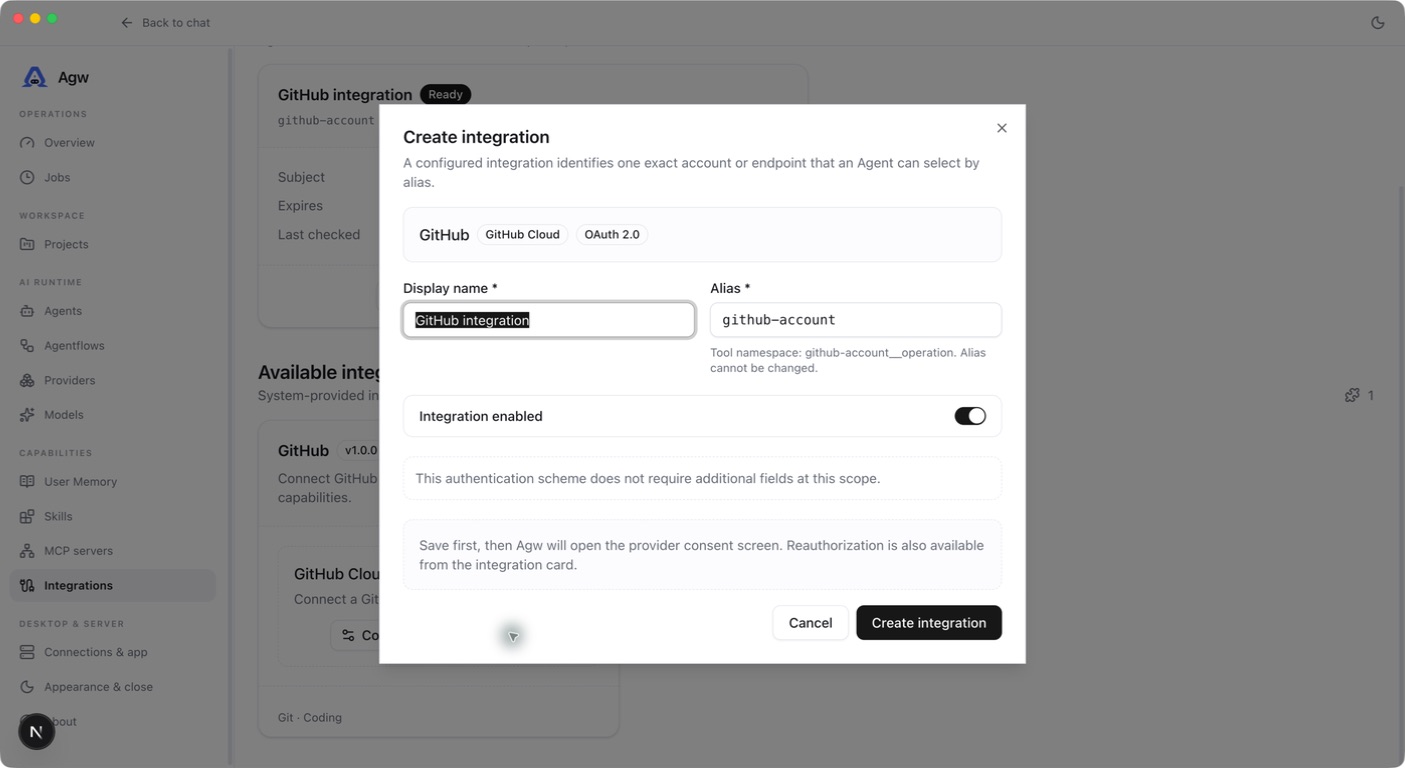
Ownership and credentials
Installation setup and Connections belong to the current user. Setup changes invalidate only that user’s connections. Only owner-matched Ready connections contribute runtime capabilities. Credential access, OAuth, and tool invocation all check ownership.
Current limits
Remote Plugin Marketplace download, signing, and upgrades are unavailable. Third-party Plugin Skill scripts are not executed. Connections are not injected into any external agent (Claude Code, Codex, or Pi). Connection changes do not imply live mutation of an existing tool list; verify changes in a new turn.
Implementation and references
3.11 - Web, Desktop, and Mobile
Last updated:
Prerequisite: an initialized Server. Clients do not replace the Server-side model, file, or execution environment.
| Client | Connection | Use case |
|---|---|---|
| Web | Session Cookie from the administrator password or a third-party account; same-origin APIs | Browser management and chat |
| Desktop | API Key, entered manually or issued by third-party sign-in; multiple Server profiles | Local or remote daily workspace |
| Mobile | API Key, entered manually or imported from a configuration generated in Web; multiple Server profiles | Conversations and project access on mobile |
Connect
- For Web, open the Server URL, or port
3001during source development. - Desktop Full can use its bundled Server. In Client, open Settings → Connections & app, click + (Add remote Server), and enter Name, Server URL, and API token. A remote
http://URL requires ticking a consent box acknowledging that the API token and traffic cross the network unencrypted. - Configure Mobile with a Server URL reachable from the device and an API Key. Device localhost usually is not your development computer. Alternatively, create an API Key in Web under Settings → Server access, click Copy config, and paste it into Import Web configuration on Mobile. Deleting a Mobile profile does not revoke its API Key on the Server; revoke it in Web.
- Start a short conversation and verify the target Server, Project, and history.
Desktop centers on Chat; Projects and other administration routes live in Settings. Each Server profile uses an isolated cache. Changing its URL or API Key discards the old connection’s cache so data from different Servers does not get mixed.
Third-party account sign-in
When Server has identity providers enabled, the Web sign-in page shows account buttons and returns you to the page you requested. Desktop shows “Sign in with …” in the Server profile; the system browser completes authentication and Desktop receives its API Key without any manual paste. The same place offers “Sign out” to revoke that API Key. When the built-in local Server profile is in third-party sign-in mode without a usable API Key, such as after signing out or expiry, it also shows “Use local administrator”.
Mobile has no third-party sign-in and uses an API Key entered manually or imported. Each third-party account is a separate user whose data stays apart from the administrator account. See Configuration and authentication for setup and Third-party account sign-in for behavior.
Runtime differences
Desktop renderer uses its own port 3000 and does not require the Web development server. Full’s Server daemon continues after the desktop window closes; closing minimizes to the tray by default.
Mobile uses Expo with native projects generated through CNG. These docs provide the source-development path, without assuming an app-store package exists. Use HTTPS for remote access and ensure the proxy supports execution WebSockets.
Implementation and references
4 - Operations
Last updated:
This chapter is for people installing and maintaining Server. Start with Standalone; read split deployment when management and execution need separate services.
- Standalone and Docker: start Server, persist data, and mount workspaces.
- Split deployment: prepare shared services and route requests to each role.
- Configuration and authentication: find settings, defaults, and when changes apply.
- Backups and upgrades: preserve databases, keys, and files, then verify restoration.
- Troubleshooting: narrow down a failure by its symptoms.
4.1 - Standalone and Docker
Last updated:
Standalone provides management pages, conversations, and scheduled jobs in one Server. It suits a local trial or a single host. Defaults use SQLite for storage and run tasks in the Server process, without a separate database service.
Use the Docker image, or build a Portable Server for your operating system and processor. Both include Web. Start with local access, then configure directory mounts and remote access as needed.
Local Docker trial
Open http://localhost:30816/setup and initialize. Through a Docker port mapping, the container does not see a loopback source address, so Setup asks for the one-time Setup Code; find “Agw remote setup code” in the startup log with docker logs agw. The image includes static Web assets, so the browser connects directly to Server. latest is convenient for evaluation; use a fixed release tag for a maintained deployment.
To access host projects, add an explicit bind mount and configure its container-side path as Project Workspace. Do not confuse a host path with the path visible inside the container.
Portable Server
Portable Server is not attached to Releases. Build it from the repository root, for example:
The output lands in artifacts/publish/portable/agw-server-<version>-<RID>/, along with a matching archive. Start it from that directory:
On Windows, use agw-server.exe serve. The default listener is http://127.0.0.1:30816; override it with ASPNETCORE_URLS when needed. Without ASPNETCORE_URLS, if port 30816 is busy, Server picks a random free local port and records the actual address in <AgwDataDir>/runtime/server.json. Verify local Setup, Web, and a conversation before configuring remote access.
Storage and networking
Docker uses /data for data. Logs default independently to logs under the working directory; persistent file logs need a separate mount for the configured log path. Project workspaces are also independent of the data volume.
Remote hosting requires correct AllowedHosts, trusted proxies, HTTPS, and WebSocket forwarding. The repository Compose example includes domain and proxy settings; replace them with actual environment values. See Backup and upgrades for the complete persistence set.
Implementation and references
4.2 - Split Control/Data Plane deployment
Last updated:
Split deployment runs management and scheduling in Control Plane and task execution in Data Plane. Use it when execution environments need separate maintenance or additional nodes. For a trial on one host, Standalone is simpler to configure.
This page assumes familiarity with containers, databases, and reverse proxies. Prepare shared PostgreSQL, Data Protection keys for decrypting credentials, and workspaces accessible to every execution node. The entry proxy must support WebSocket for conversation events.
Roles
| Host | Responsibility |
|---|---|
| Control Plane | Setup, Web, management APIs, Job scheduling |
| Data Plane | SignalR Execution, A2A, durable execution workers |
| Standalone | Both roles combined for a single-server setup |
Split deployment uses Distributed execution. In this mode, turns that run an External Agent (Claude Code, Codex, or Pi) directly in Chat fail with “Distributed execution currently supports System Agents only.” To use those external agents directly, choose Standalone with InProcess execution.
Split deployments require PostgreSQL for the database and locks, plus Distributed execution on both roles. SQLite or in-memory locks cannot replace cross-node coordination.
This is an environment configuration fragment for both roles. An empty lock connection string reuses the database connection. Supply the real database connection string through Secrets.
Startup and routing
- Configure the database, both Hosts, shared keys, and directories using the cluster Compose reference.
- Start Control Plane first, initialize it, and confirm readiness:
GET /api/health/readyreturns 503 until the Host is initialized and can reach its database, then 200;GET /api/health/liveonly shows that the process is running. Neither requires sign-in. - Start Data Plane, then add replicas as needed.
- Route
/api/hubs/exec,/a2a/*, and/.well-known/agents.jsonto Data Plane; route other application paths to Control Plane.
Preserve Host, authentication headers/Cookies, and WebSocket Upgrade. Exclude execution Hub query strings from proxy access logs. Control Plane does not serve A2A.
Reading the examples
For Docker Compose, start with the cluster Compose file linked below and follow the startup order and routes above. For Kubernetes, the next section uses kind, which runs a local Kubernetes cluster in containers. Pods run applications, Services provide access addresses, and PVs/PVCs declare and request storage.
Both approaches need a shared client entry point. The Nginx section shows which requests go to each role. Verify the services and database first, then routing, to distinguish service failures from proxy failures.
Kubernetes YAML examples
The repository’s deploy/k8s directory provides a local, single-node kind example. It uses separate Control Plane and Data Plane Deployments, an external PostgreSQL database, and NodePorts that can connect to the Nginx configuration below. These files do not create PostgreSQL or an Ingress Controller.
| File | Purpose |
|---|---|
| kind-agw-cluster.yaml | Create the local kind cluster with port and directory mappings |
| agw-data-pv-pvc.yaml | Provide a data volume shared by Pods on the same node |
| agw-control-plane-deployment.yaml | One Control Plane replica and a NodePort Service |
| agw-data-plane-deployment.yaml | Two Data Plane replicas and a NodePort Service |
Cluster entry points and shared directory
kind-agw-cluster.yaml maps both NodePorts to the host loopback address and mounts /opt/agw into the kind node:
Prepare /opt/agw/agw-data on the container runtime host before creating the cluster. With a Docker/Podman VM, configure file sharing so the directory is available inside the VM. The control-plane node role here belongs to Kubernetes; it is distinct from AGW’s Control Plane service.
The storage path is:
The corresponding PV/PVC follows. Retain preserves reclaimed volume data but does not replace backups. The PVC requests 1Gi, while the PV declares 5Gi capacity.
ReadWriteOnce permits multiple Pods on the same node to mount the volume, covering both roles and Data Plane replicas in this example. hostPath is not shared storage across nodes. For multiple nodes, use shared storage supported by your cluster and keep keys, credentials, and Project workspace paths consistent across execution nodes. Add mounts for workspaces located outside /data.
Data Plane Deployment and Service
This is the repository’s complete Data Plane example. It runs two replicas on container port 8080, reads the agw-database Secret, and exposes Service port 30820. The Control Plane file uses the same volume and database settings, with one replica and NodePort 30816. It also reads password from agw-admin as Setup__AdminPassword.
Before using it, check:
- Images:
localhost/agw-…:localwithimagePullPolicy: Neverrequires images to be built and loaded into kind first. For registry images, use reachable image addresses and versions, with an appropriate pull policy and credentials. - Database: both roles must use the same PostgreSQL database reachable from the Pods.
localhostin a connection string refers to the Pod itself, usually not the host database. - Permissions: the local example runs as root to accommodate its directory permissions. Set an appropriate UID/GID for your storage in other environments instead of copying this local setting unchanged.
- Connection affinity: the Service uses
ClientIPaffinity to help SignalR requests reach the same Pod. With Nginx outside the cluster, multiple clients may appear as one proxy IP, so this does not guarantee even load distribution.
Deployment order
Prepare the local images, data directory, and files containing the two Secret values, then run from the repository root. Secret files should contain only the relevant values; keep real credentials out of Git. These commands use the default namespace of the current kubectl context. If you choose another namespace, keep Deployments, Services, PVCs, and Secrets together.
rollout status confirms the Deployment rollout, not application initialization. In this example, Control Plane’s Setup__AdminPassword triggers first-run initialization. Check logs and the sign-in page before starting Data Plane. Existing database authentication settings are not overwritten by this initial password.
With the kind mappings above, the upstreams in the Nginx example below can use 127.0.0.1:30816 and 127.0.0.1:30820. Nginx inside the cluster can instead use agw-control-plane:30816 and agw-data-plane:30820 in the same namespace. After checking that the PVC is Bound and Pods are running, verify login, execution connections, and which nodes receive requests.
Do not run kubectl apply -f deploy/k8s/: the kind Cluster file is input to kind, not a Kubernetes API resource. Changing kind port or mount mappings requires recreating the cluster; back up data first. See the local kind deployment guide for the complete source instructions.
Nginx configuration example
In this example, Nginx provides one entry point, Control Plane listens on 30816, and Data Plane on 30820, matching the kind example above; the repository’s deploy/nginx.split.conf.example and cluster Compose example use 30817 for Data Plane. Replace these example ports with the actual Host listeners. For separate hosts or containers, replace 127.0.0.1 with addresses reachable from Nginx.
Web hosted by Control Plane
Save this as a site configuration included from the http {} block in nginx.conf. map, log_format, and upstream must not be nested inside server {}. Log paths are relative to the Nginx prefix; create the directories or use writable absolute paths.
The example uses HTTP for local verification. For external access, configure listen 443 ssl;, ssl_certificate, and ssl_certificate_key in this server, using your domain and valid certificate, and redirect HTTP to HTTPS.
| Request | Destination | Purpose |
|---|---|---|
/api/hubs/exec and child paths | Data Plane | SignalR negotiation and execution connections |
/a2a/* | Data Plane | A2A requests and streaming responses |
/.well-known/agents.json | Data Plane | Agent discovery |
| Other paths | Control Plane | Setup, management APIs, OpenAPI, Web pages, and static assets |
The proxy_pass directives have no URI suffix, preserving the original path and query parameters. Authentication headers and Cookies are forwarded by default. Upgrade headers and HTTP/1.1 support WebSockets. Disabling response buffering on execution and A2A routes lets streaming output reach clients promptly. The 3600s values are proxy read/write timeouts, not a guarantee of uninterrupted tasks of any duration.
With multiple Data Plane instances, ip_hash aims to keep requests from one IP on the same instance so SignalR negotiation and subsequent connections reach the same node. It does not replace shared database, execution-state, and recovery configuration. If another proxy sits in front of Nginx, configure trusted proxies and client-IP handling for your network rather than trusting arbitrary X-Forwarded-For headers.
The access log uses $uri without query parameters. Its upstream field helps identify the receiving node. client_max_body_size controls only Nginx’s request limit; it does not increase AGW’s attachment limits.
A separate Web service
If Web runs separately on 3001, retain the Data Plane routes and common proxy settings above. Add the agw_web upstream and the management routes below, replacing the original location /. Port 3001 is the repository’s Web development port; use your Web service’s actual port in deployment.
Both /setup and /setup/ reach Control Plane, as do ordinary /api/ requests. The longer /api/hubs/exec match still reaches Data Plane. Configure the separate Web service’s own backend address to point to Control Plane. Clients should use the shared Nginx entry point.
Check and load the configuration
After saving your deployment configuration, validate it before reloading:
Run the reload in your own deployment environment. Verify login and page assets. In browser network tools, check for a successful WebSocket upgrade (101) on the execution connection and confirm its upstream is Data Plane in the access log. Management APIs should reach Control Plane. For login failures, check Cookies, forwarded scheme, and application proxy-trust settings. For execution connection failures, check Upgrade headers, routing, and the Data Plane port.
Verify
Test login, a Chat run, and a Job in order, inspecting the actual execution node. All Hosts read initialization and authentication from the same database. Recovery also requires consistent directories, keys, and runtime credentials; running containers alone do not prove readiness.
Implementation and references
4.3 - Configuration and authentication
Last updated:
This page covers deployment settings consumed by AGW Server and logging settings in the Host template. Configure models, Agents, Projects, and integration accounts through the management UI as described in their guides. Choose your deployment mode first, then apply changes and restart the relevant Hosts.
Start with the settings relevant to your task
For an initial local setup, keep defaults and complete initialization. Before relying on the service, locate its database and data directory and follow the backup guide.
For remote access, check listening addresses, allowed origins, proxy trust, and authentication first. For split deployment, begin with the required shared configuration. Polling and batch settings are tuning references; they do not all need changes during initial setup.
Configuration and precedence
General precedence, from low to high: built-in defaults → appsettings.json → environment-specific JSON → Development Secrets → environment variables → command line. Files reside in the Server executable directory, and overrides apply per key. Serilog has a separate configuration reader described below.
Colons denote hierarchy: Database:Provider becomes nested JSON, Database__Provider in the environment, or --Database:Provider postgres on the command line. Use true and false for booleans and the listed names for enums.
“Template” means the repository Host’s appsettings.json. “Omitted” means the key is absent from all configuration sources. Differences are marked explicitly.
Choose settings for your deployment
Deployment topology determines which Server programs you start. Execution mode determines how tasks run. Choose both explicitly.
| Group | When to use it |
|---|---|
| Common settings | Every deployment: endpoints, directories, database, authentication, and logs |
| Standalone deployment | One Server manages, schedules, and executes; defaults to SQLite and InProcess |
| Split Control/Data Plane deployment | Separate management and execution; requires PostgreSQL and Distributed |
| Distributed execution tuning | Any deployment using Distributed, including Standalone when explicitly enabled |
Standalone deployment
For local use or a single Server, start with this default combination. These keys can usually be left unset:
| Full key | Default | Meaning |
|---|---|---|
Database:Provider | sqlite | Use a local database file |
Database:ConnectionString | Data Source=agw.db | SQLite file location; relative paths start from <AgwDataDir>/database/, so the default file is <AgwDataDir>/database/agw.db |
Execution:Provider | InProcess | Run tasks directly in the current Server |
DistributedLock:Provider | Unset | Automatically use an in-process lock with SQLite |
DistributedLock:ConnectionString | Empty | In-process locks need no database connection |
Standalone can also use PostgreSQL while retaining InProcess execution. If you choose Distributed, satisfy the PostgreSQL database and lock requirements below and configure distributed execution accordingly. See Standalone and Docker.
Split Control/Data Plane deployment
Both planes must use the same application database and the combination below. Initialize Control Plane before starting Data Plane.
| Full key | Required setting | Where to configure |
|---|---|---|
Database:Provider | postgres | Both planes |
Database:ConnectionString | The same PostgreSQL database | Both planes |
Execution:Provider | Distributed | Both planes |
DistributedLock:Provider | postgres, or omit to follow the database | Both planes |
DistributedLock:ConnectionString | Empty to reuse the database connection, or the same lock service | Consistent across both planes |
Apply common settings according to each Server’s responsibilities:
- Control Plane: configure initial setup, management URLs, and public integration OAuth URLs.
- Data Plane: prepare Agent CLIs, Shell, workspaces, and files. Worker concurrency and polling settings affect execution here.
- Both planes: check listening URLs, client origins, proxies, logs, and monitoring. Nodes decrypting shared data need matching encryption keys. All execution nodes must be able to access the captured task directories.
Execution mode
All fields below use the prefix Execution:.
| Setting | Default | Purpose and accepted values |
|---|---|---|
Provider | InProcess | InProcess: execute in the current process. Distributed: coordinate durable execution through PostgreSQL, with workers claiming work. Distributed requires PostgreSQL for both the database and locks. |
TurnBroadcastRetentionSeconds | 300 | Seconds this Server keeps a finished turn’s replay buffer in memory. Clients that reconnect, or retry the same accepted turn, within this window receive the full replay. |
In InProcess mode, turns exist only inside the current Server process. When the Server restarts, running turns left by the previous process end as Interrupted and do not resume; use Distributed for recovery across restarts.
The executable determines the Host role: Standalone combines both planes, Control Plane manages and schedules, and Data Plane executes. Both split Hosts require PostgreSQL, Distributed execution, and PostgreSQL locks. This setting does not change one Host executable into another role.
Distributed locks
All fields below use the prefix DistributedLock:.
| Setting | Default | Purpose and accepted values |
|---|---|---|
Provider | Unspecified; follows the database | inmemory: coordinate within one process, for single-node use. postgres: coordinate multiple nodes through PostgreSQL. When omitted or null, SQLite selects inmemory and PostgreSQL selects postgres. |
ConnectionString | Empty | Connection string for PostgreSQL locks. An empty value reuses Database:ConnectionString. In-memory locks do not use a connection string. |
Distributed execution tuning
These settings apply to Distributed execution, including split deployments and Standalone with Distributed enabled. Start with the defaults and adjust individual values only to address an observed performance issue.
Distributed workers
All fields below use the prefix Execution:Distributed:.
| Setting | Default | Purpose and accepted values |
|---|---|---|
WorkerPollingMilliseconds | 250 | Polling interval for pending work in milliseconds. Lower values reduce claiming latency but increase database queries. |
MaxConcurrentExecutions | 4 | Maximum concurrent executions per execution Server, not a cluster-wide total. |
LeaseSeconds | 30 | Execution lease duration in seconds. The Server that claims a run holds the lease; if it expires without renewal, another Server may take over the run. Long runs keep renewing, so they are not taken over merely for exceeding 30 seconds. |
LeaseRenewSeconds | 10 | How often the lease holder renews, in seconds; must be shorter than LeaseSeconds. |
All of these fields must be positive integers, and LeaseSeconds must exceed LeaseRenewSeconds, or the Server fails at startup. They are used for worker coordination in Distributed mode.
Execution events and replay
All fields below use the prefix Execution:Distributed:EventStream:.
| Setting | Default | Purpose and accepted values |
|---|---|---|
Provider | Postgres | Events always commit to PostgreSQL first. Postgres: read them from PostgreSQL only, without Redis. Redis: also project committed events to a Redis Stream; reads prefer Redis and fill any missing part from PostgreSQL, including expired entries or times when Redis is unavailable. Task records and locks always need PostgreSQL. |
ReadPollingMilliseconds | 250 | Delay between reads when no new events exist, in milliseconds; must be positive. |
ReadBatchSize | 100 | Maximum events per read; must be positive. |
WriteIntervalMilliseconds | 250 | Batch-write delay measured from the first pending event, in milliseconds. 0 writes immediately; negative values are invalid. |
WriteBatchSize | 100 | Event-count threshold for a write batch; must be positive. |
Redis:ConnectionString | Empty | Required when Redis is selected. Related Servers must use the same Redis service, for example redis:6379,password=.... |
Redis:StreamTtlMinutes | 1440 | Redis Stream retention in minutes, defaulting to 24 hours; must be positive when Redis is selected. Expired entries are read from PostgreSQL instead. |
Common settings
These settings apply to either topology. In split deployments, configure them according to each Server’s role.
Server endpoints and directories
| Setting | Default | Purpose and accepted values |
|---|---|---|
ASPNETCORE_URLS / --urls | Local default port 30816; container runtime supplies its binding | Listening URLs. Use --urls http://127.0.0.1:30816 for local access or bind another address as required. Separate multiple URLs with semicolons. |
ASPNETCORE_ENVIRONMENT | Production | Selects environment-specific JSON, such as appsettings.Production.json. Common names are Development, Staging, and Production; custom names are allowed. |
AgwDataDir | ~/agw | AGW data root for runtime data, Skills, encryption keys, and related files. Supports ~; other relative paths resolve from the process working directory. |
AgwLogDir | ./logs | Separate log directory; moving the data root does not move it. Supports ~, with other relative paths relative to the working directory. |
AllowedHosts | * | HTTP Host filtering. * allows any hostname; use semicolon-separated hostnames such as agw.example.com;localhost to restrict it. This is not the client-origin list. |
Database
All fields below use the prefix Database:.
| Setting | Default | Purpose and accepted values |
|---|---|---|
Provider | sqlite | sqlite: a local SQLite file for standalone use. postgres: a PostgreSQL service supporting split and distributed deployment. These are the two supported values. |
ConnectionString | Data Source=agw.db | Connection string for the selected database. SQLite uses Data Source=..., with relative paths starting from <AgwDataDir>/database/; PostgreSQL uses Host=...;Port=5432;Database=...;Username=...;Password=... with a nonempty Host. Change it together with Provider. |
Setup, origins, and reverse proxies
| Setting | Default | Purpose and accepted values |
|---|---|---|
Setup:AdminPassword | Unset | Initial administrator password, 8–256 characters. Inject through the environment or Secrets for unattended setup; it does not overwrite existing authentication. Initialize on Control Plane in a split deployment. |
Auth:AllowedOrigins | agw://app, http://localhost:3000, http://127.0.0.1:3000 | Allowed client Origin array for CORS and origin checks. Match the actual client scheme and port. The array is empty if omitted. |
ReverseProxy:TrustedProxies | Template contains 127.0.0.1, 172.16.0.0/12, 10.0.0.0/8 | Trusted proxies. The current implementation adds only individual IP addresses; CIDR entries are not applied. Configure actual proxy IPs. It processes forwarded For, Host, and Proto headers with a forward limit of 1. |
Configure arrays with numeric indices, such as Auth__AllowedOrigins__0=agw://app. Overrides merge by index; overriding index 0 does not remove template entries 1 and 2. Check the complete resulting list.
Integration OAuth URLs
All fields below use the prefix Integrations:OAuth:.
| Setting | Default | Purpose and accepted values |
|---|---|---|
PublicBaseUrl | http://localhost:30816 | Public Server base URL used to construct the OAuth callback at api/integrations/oauth/callback. For remote deployments, use the public URL reachable by the browser. |
WebBaseUrl | http://localhost:3001 | Web base URL used after OAuth completes. Set the actual Web URL when using bundled Web or a reverse proxy. |
Both accept absolute HTTP(S) base URLs without user information, query strings, or fragments. Omitted or blank values fall back to the current request base URL.
Conversation history writes
All fields below use the prefix ConversationHistory:.
| Setting | Default | Purpose and accepted values |
|---|---|---|
Mode | Interval | Immediate: write pending data immediately. Interval: buffer and flush periodically. TurnEnd: primarily flush when a turn ends. Reaching the buffer limit also triggers a flush. |
FlushIntervalSeconds | Template: 10; omitted: 5 | Flush interval in seconds for Interval mode; must be positive and within the supported timer range. |
MaxBufferedBytes | 16777216 (16 MiB) | Buffer limit in bytes; must be positive. Reaching it triggers an early flush. |
These settings control persistence timing, not whether live output is visible. Buffering reduces writes, but abnormal termination can lose unflushed data. Choose Immediate when prompt persistence matters.
Shell tool
All fields below use the prefix Agents:Shell:.
| Setting | Default | Purpose and accepted values |
|---|---|---|
Backend | local | local: run commands in the project workspace on the execution host. docker: use the Docker Shell executor, mounting the primary workspace at /workspace and additional directories at /project-directories/{id}. It requires Docker; networking is currently disabled and timeout is 30 seconds. |
This selects only the AGW Shell tool backend. It does not change Server deployment mode or install external Agent CLIs.
OpenTelemetry
All fields below use the prefix OpenTelemetry:.
| Setting | Default | Purpose and accepted values |
|---|---|---|
ServiceName | Template: Agw | Telemetry service name. Split Hosts replace the template value Agw with Agw.ControlPlane or Agw.DataPlane; when omitted, the fallback is Agw.{HostProfile}. |
ServiceVersion | 1.0.0 | Service-version label in telemetry. |
OtlpEndpoint | Template: empty | OTLP receiver URL. Empty or omitted values disable OpenTelemetry tracing, metrics, and log export. |
Logging configuration
| Setting | Default | Purpose and accepted values |
|---|---|---|
Logging:LogLevel:Default | Information | Default Microsoft logging level; override a category with Logging:LogLevel:{category}. |
Logging:LogLevel:Microsoft.AspNetCore | Warning | ASP.NET Core category level. |
Logging:LogLevel:Microsoft.EntityFrameworkCore | Warning | EF Core category level. |
Serilog:Using | Console, File, Async sinks | Assemblies providing Serilog configuration extensions. |
Serilog:MinimumLevel:Default | Information; Development: Debug | Default minimum level for the current Serilog pipeline. |
Serilog:MinimumLevel:Override:Microsoft.AspNetCore | Warning | Override the ASP.NET Core category. |
Serilog:MinimumLevel:Override:Microsoft.EntityFrameworkCore | Warning | Override the EF Core category. |
Serilog:MinimumLevel:Override:System | Warning | Override System; additional categories use the same structure. |
Serilog:WriteTo:0:Name | Async | Name of the template’s asynchronous sink wrapper. |
Serilog:WriteTo:0:Args:configure:0:Name | Console | Console sink inside the asynchronous wrapper. |
Serilog:WriteTo:0:Args:configure:0:Args:outputTemplate | See below | Console format containing timestamp, level, source, TraceId, SpanId, thread, message, and exception. |
Serilog:Enrich | FromLogContext, WithMachineName, WithThreadId, WithOpenTelemetryTraceId, WithOpenTelemetrySpanId | Add context, machine, thread, and tracing identifiers. |
The Host reads Serilog separately from appsettings.json and appsettings.{ASPNETCORE_ENVIRONMENT}.json. Do not assume Serilog__... environment variables override this pipeline. Edit the relevant JSON and restart to change its output or levels. Logging and Serilog are separate level configurations; the main output currently uses Serilog.
All Microsoft logging levels are Trace (finest tracing), Debug (diagnostics), Information (normal activity), Warning (potential trouble), Error (failed operations), Critical (severe failures), and None (disabled). Serilog supports Verbose, Debug, Information, Warning, Error, and Fatal. Verbose is its finest tracing level and Fatal denotes severe failures; its minimum levels do not include None.
WriteTo Name, Using, and Enrich values are plugin names, not fixed enums. The table lists the current template. The Host additionally writes AgwLogDir/application-{profile}-.log, rolling hourly, retaining 30 files, and flushing every second. These values are fixed in code rather than configurable keys.
Authentication and API Keys
Remote Web signs in with the administrator password and receives a Cookie. Desktop, Mobile, and automation use API Keys, sent as Bearer credentials:
A request made directly on the Server host is authenticated automatically as administrator 1001, without a password or API Key, when all of these hold: it comes from a loopback address, carries no forwarding headers, targets localhost or a loopback IP as the host name, and carries no authentication header or sign-in Cookie. Requests through a reverse proxy or from another host do not qualify.
API Key plaintext is returned only on creation. Store and supply it through the environment or Secrets, and revoke unused keys. Authentication uses the key creator’s stable ID. Each Server caches a successfully validated API Key for 30 seconds. Revoking a key clears the cache of the Server that handles the revocation at once; in a split deployment without a shared distributed cache, other replicas stop accepting the key within 30 seconds. Multiple login accounts come from the third-party sign-in configuration below; there are currently no configuration keys for roles, API Key scopes, or JWT.
Administrator password hashes, initialization state, and session versions are stored in the database’s global auth group in setting; API Key hashes are in api_token. Management features maintain these values; they are not appsettings entries. Password changes update the session version. Hosts refresh every second and discard cached credentials if refresh fails. To recover a forgotten password, stop Server and run agw-server auth reset-password; split deployments use agw-control-plane auth reset-password. The new password needs 12–256 characters, and resetting it invalidates all existing Web sessions.
Third-party sign-in
Third-party sign-in lets people reach Web and Desktop with an organization account. The first sign-in with an account creates an isolated local user numbered from 10000; the administrator remains 1001. With no provider configured, the administrator password and API Keys continue to work. See Third-party account sign-in for the resulting behavior.
Register AGW at the provider as a web application (confidential client). The callback URL is built from the provider ID. Desktop users go through the same URL: the provider returns the browser to Server, not to the desktop application:
The following keys are all prefixed with Auth:Oidc:, where {id} is the ID you choose for a provider.
| Setting | Default | Purpose and values |
|---|---|---|
PublicBaseUrl | Empty | The browser-visible Server origin the provider returns to. api/auth/oidc/callback/{id} is appended to it. Use a full origin without a path: HTTPS in production, loopback HTTP allowed in development. Required once any provider is enabled. |
WebBaseUrl | Empty | Where the browser lands after sign-in. Leave empty when Web shares the Server origin; set it during source development, where Web runs on 3001 and the backend on 30816. |
Providers:{id}:Enabled | false | Whether this provider is available. |
Providers:{id}:Type | Oidc | Oidc discovers endpoints from Authority and requests openid profile email. OAuth2 uses explicit endpoints and claim names. |
Providers:{id}:DisplayName | Provider ID | The name shown on the sign-in button. |
Providers:{id}:ClientId | Empty | Client ID issued when registering AGW at the provider. Required. |
Providers:{id}:ClientSecret | Empty | Matching client secret. Required; inject it through the environment or Secrets. |
Providers:{id}:Authority | Empty | Required for Oidc, such as https://sso.example.com/realms/company. |
Providers:{id}:AuthorizationEndpoint | Empty | Required for OAuth2: where the user authorizes AGW. |
Providers:{id}:TokenEndpoint | Empty | Required for OAuth2: where Server exchanges the authorization code. |
Providers:{id}:Issuer | Empty | Required for OAuth2: identifies the account source and, with the account ID, determines the user. |
Providers:{id}:IdentitySource | UserInfo | OAuth2 only. UserInfo reads the account from the user information endpoint. AccessToken reads it from a signed JWT access token. |
Providers:{id}:UserInfoEndpoint | Empty | Required when IdentitySource is UserInfo. |
Providers:{id}:AccessTokenIssuer | Empty | Required when IdentitySource is AccessToken: validates who issued the token. |
Providers:{id}:AccessTokenAudience | Empty | Required when IdentitySource is AccessToken: validates the intended recipient. |
Providers:{id}:AccessTokenJwksUri | Empty | Required when IdentitySource is AccessToken: where signing keys are published. |
Providers:{id}:ClientAuthMethod | Post | How OAuth2 client credentials are sent: Post in the request body, Basic in the header. |
Providers:{id}:UsePkce | false | Enables S256 for OAuth2. Oidc always uses it. |
Providers:{id}:Scopes | Empty | OAuth2 scopes, configured by index, such as Scopes__0=read:user. |
Providers:{id}:SubjectClaim | sub | OAuth2 only: field holding the account ID; GitHub uses id. Oidc always uses sub. |
Providers:{id}:DisplayNameClaim | name | OAuth2 only: field holding the display name; GitHub uses login. Oidc always uses name. |
Providers:{id}:EmailClaim | OAuth2 only: field holding the email address; Oidc always uses email. A missing display name or email does not block sign-in. |
Provider IDs use lowercase letters, digits, and hyphens, up to 64 characters, such as company or entra-id. Each ID owns its callback URL; keep it stable after registration.
Example configuration without secrets:
Inject the matching secret as Auth__Oidc__Providers__company__ClientSecret. Keep it out of appsettings, frontend environment files, and screenshots. Services that offer OAuth2 only, such as GitHub, use explicit endpoints:
Authority values for common platforms:
| Platform | Authority |
|---|---|
https://accounts.google.com | |
| Microsoft Entra ID | https://login.microsoftonline.com/<tenant-id>/v2.0 |
| Keycloak | https://sso.example.com/realms/<realm> |
| Authentik | https://sso.example.com/application/o/<application-slug>/ |
Restart the relevant Server after changing these values. In a split deployment, route sign-in requests to Control Plane; Data Plane runs executions with the resulting local credentials. All replicas share one database and Data Protection keys, so a Desktop one-time code can be exchanged on a different replica. Disabling a provider blocks new sign-ins and pending Desktop exchanges; Cookies and API Keys already issued are revoked separately.
Example and verification
This example illustrates configuration syntax. Supply real connection values through the environment or Secrets:
For split deployment, supply matching database and execution settings to each Host, initialize Control Plane first, then start Data Plane. The example’s agw-server is Standalone; split deployment uses the corresponding Host executables.
After restarting, inspect startup logs, the listening URL, database connectivity, and client sign-in. Validate execution tuning with a small task while observing latency and load. For startup errors, check enum names, numeric ranges, connection strings, and Distributed dependencies. Do not expose passwords or API Keys when sharing logs.
Implementation and references
4.4 - Data, backups, and upgrades
Last updated:
A complete backup includes AGW configuration and records, encryption keys, and project files. Copying only the installation directory or code repository can leave out data needed to restore the service.
Locate the actual database, data directory, and Project workspaces first. Use the defaults below as a guide and confirm them against the running configuration.
What to preserve
AgwDataDir defaults to ~/agw; Docker uses /data. Paths expand ~; other relative paths resolve from the process working directory. The default SQLite database file is <AgwDataDir>/database/agw.db, or /data/database/agw.db in Docker.
Preserve together:
- The database, including
setting,api_token, conversations, and execution records. keys/andskills/under the data directory.- Deployment configuration and secret references, with actual secrets backed up in secure storage.
- Business files in each primary and additional Project directory, using a separate file-backup strategy.
Logs are independent of the data directory. Logs and temporary files are not required for authentication recovery. Losing Data Protection keys can make protected credentials unreadable.
Make a backup inventory
Record the database location, resolved AgwDataDir, all Project directories, and current application version. Include the hidden .agw/memory/ directory for workspace-based Memory; database-based Memory is included in the database backup. The form’s default primary directory ~/.agw/<project folder name> and the Server default ~/.agw/projects/{projectId:N} both live under the home directory of the account running Server, outside AgwDataDir. In Docker they are also outside the /data volume, so mount and back them up separately.
Wait for tasks to finish or interrupt them before backing up, so they do not keep changing files. For a simple SQLite deployment, stop Server before copying the database and related files. Use PostgreSQL’s backup tools for PostgreSQL. Data and workspaces may be in different locations; check each rather than assuming everything is under /data.
Upgrade sequence
- Read the target Release notes and record the current image or package version.
- Stop every old Standalone, Control Plane, and Data Plane process, then take a consistent backup: copy a simple SQLite installation after stopping, or use PostgreSQL’s database backup mechanism.
- Apply the new version’s migrations for your database (the SQLite or the PostgreSQL set, never both). An initialized Server does not run migrations during a normal start; only first-run Setup does. Source deployments can use the provider-specific commands in the Development Guide.
- Update Server and clients while retaining data, Data Protection keys, and directory mounts, then start the new version. Before accepting requests and starting workers, the new Host checks and upgrades in-flight execution records; if a record cannot be decrypted or validated, startup fails until the data is corrected.
- Verify initialization state, login, Project files, and a small task. For split deployments, also verify workers and a Job.
Pre-1.0 upgrades may include schema changes. Rollback requires a mutually compatible application version, database backup, and key backup.
Verify recovery
Test restoration in an isolated environment first, including credential decryption and file visibility. Data or log root changes require restarting and moving existing files yourself; AGW does not relocate them automatically.
Implementation and references
4.5 - Logs and troubleshooting
Last updated:
First locate the failing step: opening the page, signing in, calling a model, or using files and tools. Reproduce the problem with a small task so that each check narrows the cause.
Record the Server, Project, conversation, and time, then inspect the matching logs. In a split deployment, check Control Plane for management problems and Data Plane for execution problems.
Diagnostic order
| Symptom | Check first |
|---|---|
| UI unavailable | Listener, port, container mapping, proxy target |
| Setup fails | Database connection, writable directories, remote Setup Code |
| Login or API Key fails | Actual Server, revoked API Key, database auth state |
| Third-party sign-in fails | Auth:Oidc:PublicBaseUrl, the callback URL registered at the provider, client credentials, Server-to-provider network |
| No agent response | Model Provider, model ID, credentials, pending approval/input |
| CLI cannot start | Execution-node executable, account, environment |
| Files missing | Selected root, Server path, mounts, permissions |
| Job does not run | Enablement, future timestamp, UTC Cron, valid target, logs |
| Wrong state after disconnect | Conversation selection, WebSocket proxy, background execution; in InProcess mode, running conversations show Interrupted after a Server restart and do not continue |
Example: the page opens but the agent does not reply
- Check whether Chat is waiting for approval or information, and respond if needed.
- Send a plain text question through the same model connection. If it fails, check the API endpoint, model ID, and credentials.
- If text works but a tool task fails, check tool bindings, directories, and host permissions.
- In split deployments, a working management page with a failed chat connection suggests checking that
/api/hubs/execroutes to Data Plane and supports WebSocket. - Find the specific error in Server logs at the recorded time. Repeat the same small task after the fix.
This sequence separates model, tool, and connection failures without changing several settings at once.
Third-party sign-in failures
A failed sign-in returns the browser to the sign-in page with error=oidc-<category> in the URL; Desktop shows a message in the Server profile. Pair that category with the Agw.Auth.Oidc log, which records the provider, client, failing stage, failure category, and TraceId.
| Category | Usual cause |
|---|---|
provider-unavailable, provider-timeout | Server cannot reach the provider: network, outbound proxy, or firewall |
provider-rejected | The provider was reached, but its OAuth2 user information endpoint returned an error status: check UserInfoEndpoint, Scopes, and token permissions |
protocol-rejected | The OIDC provider returned a protocol error: client ID, secret, or registered callback URL does not match |
invalid-state, invalid-nonce | Callback validation failed: the browser origin differs from PublicBaseUrl, or validation Cookies were blocked |
invalid-token | Token validation failed: Authority, issuer, audience, or signing-key URL does not match |
protocol-validation-failed | Any other protocol failure, including a rejected OAuth2 token exchange: check the client ID, secret, and callback URL first |
provisioning-failed, grant-creation-failed, session-creation-failed | Local completion failed: check the database connection and applied migrations first |
authorization-denied | The user cancelled authorization at the provider |
Do not work around a failure by disabling issuer, audience, signature, state, nonce, or PKCE validation. A reverse proxy must preserve the original scheme and host; otherwise the callback arrives on a different origin. When reporting a problem, exclude authentication query strings and complete provider responses.
Logs and telemetry
AgwLogDir defaults to ./logs and does not follow AgwDataDir. Inspect the relevant role’s logs in split deployments. Configure OpenTelemetry:OtlpEndpoint for centralized telemetry. Blank or missing values disable OpenTelemetry tracing, metrics, and log export.
History uses Interval batch writes. The Host template sets ConversationHistory:FlushIntervalSeconds to 10 seconds; omitted configuration falls back to five seconds. Live output and committed history can differ temporarily.
Web development proxy
Web development runs on 3001, with backend default 30816. Proxy target precedence is BACKEND_API_BASE_URL, then NEXT_PUBLIC_API_BASE_URL, then the local default. Static export does not use the Next.js proxy; Server or ingress must supply same-origin routing.
After a fix, repeat the small failing task and verify both UI state and logs. When reporting an issue, include version, deployment method, reproduction steps, and sanitized errors, without real API Keys or complete OAuth responses.
Implementation and references
5 - Development
Last updated:
This chapter is for developers changing AGW or integrating with its APIs. For installation and everyday use, start with Getting started.
Complete Development setup, then use Architecture to locate the right module. Read APIs and execution protocols for client integrations and Extensions for new capabilities. Before submitting changes, follow the relevant testing and contribution checks.
5.1 - Development setup
Last updated:
Prerequisites: .NET 10 SDK, Node.js 24, pnpm 12.5.1 (pinned by packageManager in src/clients/package.json), and Git. Docker Buildx is needed only for container images. These application commands run in the AGW repository; the documentation site does not depend on this toolchain.
Backend
Initialize at http://localhost:30816/setup. Replace dotnet run with dotnet watch for hot reload.
Clients
Open another terminal and enter the workspace from the repository root:
Open http://localhost:3001. Desktop uses pnpm dev:desktop; its independent renderer runs on 3000 without Web. Mobile uses pnpm dev:mobile, or pnpm android:mobile / pnpm ios:mobile. Expo CNG generates native projects.
What to expect after startup
Keep the backend terminal running, then start the client you need. Once Web opens, confirm Server initialization and login, then configure a model using Your first conversation. A loaded frontend alone does not verify its backend connection.
The backend defaults to 30816, Web development to 3001, and the Desktop renderer to 3000. If a port is occupied, check for an existing development process. On a physical phone, localhost means the phone itself; use a computer address reachable from the phone.
Verify
Confirm backend initialization, client connectivity, and a simple message. Physical mobile devices need a reachable backend address. External CLIs must work in the execution process environment.
The site needs Hugo Extended and Go, plus Python 3 for the scripts/check-site.py verifier; see site/README.md for commands. Do not add it to the client Turborepo or make Web/Desktop consume its artifacts.
Implementation and references
5.2 - Architecture and module boundaries
Last updated:
Prerequisite: a working source setup. Identify the business owner of a use case before tracing cross-module capabilities through Contracts.
Backend organization
AGW is a modular monolith. Agw.Host supplies shared hosting; Control Plane, Data Plane, and Standalone compose the modules they need. Business modules follow Api → Application → Domain ← Infrastructure, creating only necessary layers.
flowchart LR
    API[Api] --> APP[Application]
    APP --> DOMAIN[Domain]
INFRA[Infrastructure] --> DOMAIN| Layer | Responsibility | What to inspect |
|---|---|---|
| Api | Receive requests and return responses | Routes, inputs, and outputs |
| Application | Complete a business operation | Authorization, queries, transactions, and call order |
| Domain | Hold business data and express rules | Entities, Behaviors, and DomainServices |
| Infrastructure | Connect databases and external systems | Persistence and concrete adapters |
Domain entities hold state. A Behavior handles rules within one Aggregate, while a DomainService handles rules that need facts beyond it. Application loads data, coordinates these calls, and persists changes. Ordinary CRUD stays in Application without creating a Behavior for every entity.
Data ownership
Each table has one owning module. Sharing entity types and a database does not permit direct access to another module’s tables; use that module’s published interfaces.
Each module that owns tables declares its persistence interface I<Module>DbContext in Application/Persistence. There are nine: Agents, Auth, Integrations, Jobs, Projects, Providers, Settings, Skills, and Tools. Files, Setup, and A2A own no tables and have no such interface. Within a request, one AgwDbContext instance implements these interfaces. Modules share database resources while limiting the data each can access. Cross-module calls use Contracts; approved Infrastructure adapters handle cross-module transactions.
Agw.Agents.Execution → Agw.Agents is one-way; both assemblies belong to the Agents module. Selective DDD for Agentflows does not extend to ordinary CRUD modules.
Example: updating an Agentflow
Api receives the request. Application checks access and loads the flow with all nodes and edges. Policy validates the proposed graph and returns a Decision. Behavior applies valid changes to the loaded objects, then Application saves them.
For edge rules, inspect the Agentflow Policy and Topology. For authorization or loading and saving order, inspect Application. For database implementation, inspect Infrastructure. This separates business rules from network and storage details and makes them easier to test independently.
Clients
Web and Desktop own independent route shells and builds. Business packages live in src/clients/packages. chat-core owns message semantics, chat-runtime owns execution connections and state, and chat owns DOM rendering. Mobile uses chat-native and RN-safe packages rather than DOM packages.
Identify the owning module and public entry point before adding a feature. Run pnpm test:boundaries and the backend architecture tests, dotnet test tests/Agw.Architecture.Tests, after boundary changes.
Implementation and references
5.3 - APIs and execution protocols
Last updated:
Prerequisites: access to a development Server and a valid authenticated identity, such as an API Key or a browser session. Use current OpenAPI and owning-module Contracts for exact fields; this site does not duplicate the complete schema.
Protocol boundaries
| Interface | Purpose and contract |
|---|---|
| Management JSON APIs | Bens.Results ApiResult envelopes, unwrapped by typed client helpers |
/api/hubs/exec | SignalR execution commands, state, and events; mapped by Data Plane and Standalone only and accepts only the WebSocket transport. The official client connects with skipNegotiation: true |
/api/agents/permission-capabilities | Query supported permissions for a target |
/api/auth/oidc/providers | Enabled sign-in providers, used to render the sign-in buttons |
/api/auth/oidc/login | Redirects to the provider; client is web or desktop |
/api/auth/desktop/exchange | Desktop exchanges a one-time code plus its verifier for an API Key |
| A2A | Protocol-specific responses, mapped by Data Plane and Standalone only |
/openapi/* | Contract entry point; served, together with the Scalar API reference, only in the Development environment by Control Plane or Standalone |
Sign-in routes are served by Control Plane and Standalone. An API Key obtained by Desktop behaves like a manually created one and accesses resources as its creator.
Integration sequence
- Use an API Key in the
Authorization: Bearerheader for automation. Browser requests using Cookies to make changes, such as POST, PUT, and DELETE, also need the existing CSRF protection flow to prevent another site from acting through the signed-in session. - Read resources accessible to the current user through management APIs and retain their stable identifiers.
- Query target permission capabilities, then use the existing execution protocol to send commands and subscribe to events.
- Restore conversation/execution state after reconnecting; disconnection is not completion.
New endpoints default to query/body identifiers under repository rules. Consult current OpenAPI and Contracts for each endpoint’s routes and parameters.
Handle results in the client
Management JSON APIs use Bens.Results response envelopes. Reuse the typed helpers in @agw/api to extract business data, and handle request failures and application errors separately.
An execution connection returns a stream of events. Retain conversation and execution IDs, show tool activity and input requests, and recover actual progress after reconnecting. Partial text is not completion, and disconnection is not cancellation. See the execution protocol for message shapes and order.
Agent structured-response fields
responseSchema holds the JSON Schema text configured on an agent. It appears in the full agent response: GET /api/agents/{id}, GET /api/agents/paged, POST /api/agents, PUT /api/agents/{id}, and PUT /api/agents/enabled. The selector endpoint GET /api/agents omits it.
Both response shapes include resultFormat, either markdown or json, derived from whether a schema is configured. Clients use it to decide how to render the final result without parsing the schema themselves.
On update, an absent field keeps the current value, null or a whitespace-only string clears it, and any other string replaces it. The server requires valid JSON whose root is an object and otherwise returns an invalid-parameter error. Pi agents reject any schema with an invalid-parameter error. The schema is stored and forwarded as text only.
Contract changes
Keep DTOs in the owning module’s Contracts. Expected application failures use AgwException and stable seven-digit ErrorCodes, mapped at boundaries. WebSocket, OAuth redirects, A2A, and static files retain their protocols.
After backend contract changes, export the Development OpenAPI document to src/clients/packages/api/openapi.json, run pnpm gen:api from src/clients, and validate callers. gen:api converts only that local file; it does not fetch the latest document from Server. Do not hand-edit generated openapi.d.ts or log actual API Keys.
Implementation and references
5.4 - Extend tools and integrations
Last updated:
Prerequisites: understand module boundaries and decide whether the capability is general-purpose or business-owned. Begin with one small, verifiable capability.
Tool extension path
- Put hand-written
IAgwTool,IContextualTool, andIToolBlockimplementations inAgw.Tools; the global catalog scans only that assembly for hand-written tools. Business tools belong in their module’sApplication/Tools, declared as attributed containers or supplied through a Skill, with DTOs inContracts/Tools. - Reference
Agw.Tools.Abstractions; addAgw.Tools.Generatorsas an Analyzer for attributed declarations. - Explicitly declare permissions, argument descriptions, and return types. Standalone tools and attributed containers stay stateless; session state belongs in a Provider, session, or owned storage.
- Register services and generated declarations in the owning module. Choose Skill exposure or explicit global catalog inclusion.
- Verify discovery, arguments, permissions, project binding, and error mapping.
The generator emits metadata, JSON Schema, and direct invocation delegates. Do not add runtime reflection scanning as a fallback. Skill tools come from two members: IAgentSkillRegistration.Tools supplies hand-written IProjectScopedAgwTool instances, and ToolTypes supplies attributed container types generated through IAgwToolSet<T>. They bind to a Project during execution. Registering a generated module does not automatically expose every tool globally.
Integration extension path
IPluginCatalog owns Plugin, Connector, authentication, and capability-source definitions. Definitions are code/content assets. User setup is PluginInstallation; selectable accounts or endpoints are Connection. Do not collapse these into global configuration.
Add the catalog definition and required capability source, then verify per-user setup, Ready state, binding, and invocation. Infrastructure protects and resolves credentials. Reads and execution retain owner checks. Credential injection over HTTP/SSE requires HTTPS.
Choose global or Skill-owned tools
Expose independently selectable general-purpose operations explicitly in the global catalog. Register tools used only by a Skill through that Skill, so instructions and tools reach the agent together. For example, agw-job supplies job-management tools owned by the Jobs module.
After compilation, verify that the agent can discover the tool. If it is missing, check generated declarations and registration. If invocation fails, check Project binding, permissions, and arguments. Compilation alone does not verify runtime integration.
Option 1: define a Tool with an interface
Use IAgwTool for one independently callable operation per class. Declare a stable name, category, Plan availability, and permission, and implement the one required member, ToAITool(). Repository tools put the operation in an Execute method and wrap it in ToAITool() with AgwAIFunctionFactory.CreateParameterObjectFunction. That factory is internal to Agw.Tools, so the example lives in Agw.Tools. This minimal example performs no external I/O:
IAgwTool extends the metadata interface IAgwToolMeta; ToAITool() wraps the execution method as a model-callable function. Describe the method and input DTO so the model knows when and how to call it. Use asynchronous methods and propagate CancellationToken for real I/O. Business DTOs belong in the owner module’s Contracts/Tools.
Register and use it
- Put the implementation in
Agw.Tools/Impl/Tools. The global catalog scans only theAgw.Toolsassembly for hand-written tools, so anIAgwToolplaced in a business module is never discovered. Business modules use Option 2’s attributed containers instead, or placeIProjectScopedAgwToolinstances in a Skill’sIAgentSkillRegistration.Tools. Keep declarations stateless; do not store the current user, Project, or conversation in fields. - In
src/server/Agw.Shared/Tooling/ToolValueObject.cs, add the tool name toToolDefinitionNamesand itsAlllist, plus a concreteToolDefinition, a[JsonDerivedType]name mapping, and an empty or real Options type. Definitions and implementations must match one to one. An unregistered name fails registration with “does not have a registered ToolDefinition”. - Register dependencies through the owner module’s DI entry point. Verify /api/tools and bind the tool to an Agent or Project before using it.
- Ask the agent to invoke it and inspect arguments and output. Direct C# calls test the operation but do not verify runtime permission or Project binding.
For standalone tools requiring a Project or runtime directory, use IContextualTool.MaterializeAsync (defined in Agw.Tools/Contracts/Abstractions and, like other hand-written tools, discovered only in the Agw.Tools assembly) and bind authorized context into contributed functions. Do not let a model-supplied Project ID determine resource ownership.
Option 2: define Tools with attributes
Attributes work well for multiple operations in a service or business capabilities supplied by a Skill. Add these project references, adjusting relative paths:
This implements the same echo operation as the interface example. Choose one implementation; registering both creates a name collision.
The example container is an ordinary sealed class whose methods are all static. IAgwToolSet<TextTools>, used later, requires a non-static class as its type argument, so the container cannot be a static class. AgwToolContainer selects public ordinary methods declared directly on the type. AgwTool supplies a name and permission; AgwToolIgnore excludes helpers. Default names use the method name minus a terminal Async. Permissions must be explicitly declared or inherited from the container; AllowInPlanMode is independent.
Instance containers use explicit constructor injection and must be registered in DI. Static methods can use parameters marked AgwToolService. Service and CancellationToken parameters are excluded from model-facing schemas. Each invocation gets an independent asynchronous DI scope.
Generate, register, and select
Compilation generates metadata, input/output schemas, and direct invocation delegates. For an assembly named My.Module, register its generated module, then explicitly select container types if they belong in the global catalog:
Import the generated contracts and relevant registration extensions. Containers with only static methods need no instance registration; containers with instance methods also need AddScoped
For Skill-only tools, make the registration partial and implement IAgwToolSetservices.AddSingleton<IAgentSkillRegistration, YourSkillRegistration>(), along with its generated module and instance containers; see JobManagementSkillRegistration in the Jobs module. Bind the Skill to an Agent/Project to contribute its tools. Hand-written Skill tools implement IProjectScopedAgwTool and go in IAgentSkillRegistration.Tools; they do not need global catalog entries.
Fix generator diagnostics rather than adding reflection fallbacks: AGWTOOL001 identifies unsupported signatures; AGWTOOL002 identifies invalid declarations. See the tool abstraction guide for complete instance-container and Skill examples.
ToolBlocks: tools with shared state
Use a ToolBlock when operations such as adding, completing, and listing todos must maintain one coherent state. Members are selected as a group. An attribute container is a declaration mechanism, not session-state isolation.
Here is the complete repository TodoToolBlock:
Todo state and lifetime
- Descriptor.Members declares all five members, permissions, and Plan availability. Members cannot be separately registered as global tools.
- MaterializeAsync creates an AgwTodoProvider in ToolContribution.ContextProviders and adds a loop evaluator.
- AgwTodoProvider keeps AgwTodoState in the current AgentSession.StateBag and declares its key through StateKeys. Operations read, modify, and save the current session’s state; a static list or singleton must not hold everyone’s todos.
- Later calls in the same session reuse state; different sessions are isolated. Durable recovery depends on the surrounding session save/restore pipeline, not merely storing data in a Provider field.
- TodoCompletionLoopEvaluator checks outstanding items. When Mode is enabled, it evaluates in Execute mode. Custom ToolBlocks only need an evaluator if their behavior requires one.
Implement your own stateful ToolBlock
- Define the data and its lifetime: turn, session, or persistent project storage. Use AgwTodoState for session state and Project Memory for project storage as references.
- In
Agw.Shared/Tooling/ToolValueObject.cs, add the name toToolBlockDefinitionNamesand itsAlllist, plus a concrete ToolBlockDefinition, Options, and[JsonDerivedType]mapping. Then add a runtime name in ToolBlockNames that references that constant. The startup coverage check rejects ToolBlocks missing a definition or an implementation. - Implement IToolBlock and declare every member’s permission and allowInPlanMode.
- Create Providers in MaterializeAsync, bind functions to the current context, and transfer lifetime ownership to ToolContribution. Do not cache Providers or scoped services across users.
- Wire group selection into catalog and definition resolution. Test adding, completing, removing, session isolation, save/restore, Plan restrictions, and approvals.
Read the Todo Provider and Todo state; copying the descriptor alone omits state loading and saving.
Plugins: from catalog definition to invocation
A Plugin here is code and content in AGW’s integration catalog. GitHub is the built-in example. Adding a Plugin requires changing and building the server; arbitrary uploaded packages are not executed. Available integrations shows catalog definitions; Configured integrations shows user accounts or endpoints.
| Developer object | Responsibility |
|---|---|
| PluginDefinition | Stable ID, version, display name, connectors, optional Skill content |
| ConnectorDefinition | Service or protocol variant, such as GitHub Cloud |
| AuthSchemeDefinition | Authentication method, configuration fields, OAuth settings |
| CapabilitySourceDefinition | Internal C# tools or tools obtained from MCP |
| PluginInstallation | Per-user setup, such as OAuth client ID/secret |
| Connection | User account, credentials, Ready state; bindings use ConnectionId |
Define the catalog and authentication
Use this existing GitHub catalog as a complete structural reference. Replace OAuth endpoints, scopes, and fields with those required by your target service:
Keep Plugin, Connector, authentication, and source IDs stable. Validate the full catalog with PluginCatalogValidator. InstallationFields describe per-user setup; account fields belong in the authentication scheme’s connection fields. Use Secret field types and never embed real credentials in definitions.
Implement capability sources
Native: the definition’s Provider = “github” matches IConnectionNativeCapabilityProvider.Provider. Implement CreateTools(ConnectionNativeCapabilityContext), binding resolved ConnectionId, Alias, and ProjectId. Use names such as {alias}__{operation} to distinguish accounts.
Follow GitHubConnectionNativeCapabilityProvider: functions bind the account and Project, then create a scope and resolve IGitHubConnectionInvoker when invoked. The Invoker checks ownership, Ready state, and credentials. Do not accept arbitrary model-supplied ConnectionIds or cache account secrets in a singleton. Wire new operations into the source’s permission metadata and approval pipeline.
MCP: use McpCapabilitySourceDefinition with stdio, HTTP, or SSE transport. CredentialBindings map installation fields, connection fields, or OAuth tokens to environment variables or HTTP headers. Use HTTPS when sending credentials over the network and keep field references consistent with authentication definitions. This path retains connection authorization and runtime validation rather than passing unchecked URLs to agents.
Register, package content, and test
- Maintain catalog registration in the Integrations DI entry point. Register Native providers as IConnectionNativeCapabilityProvider and invocation services with suitable lifetimes, such as the scoped GitHub Invoker.
- Place optional Skill content in the Plugin content directory and point PluginSkillDefinition.ContentPath to SKILL.md. It provides instructions, not automatic execution of third-party scripts. Ensure published artifacts include these files.
- Find the definition in Available integrations, configure setup and an account for a test user, complete authentication, verify Ready, and bind it to an Agent or Project.
- Test a read and a controlled write, including tool names, arguments, permissions, and errors. Tests use real implementations, never mocks or fake implementations; tests that need real accounts or OAuth authorization stay out of the default suite.
- Cover foreign ConnectionIds, unready accounts, expired credentials, invalid catalog fields, duplicate tool names, and configuration changes. Updating one user’s installation settings must affect only that user’s connections.
There is currently no remote Marketplace download, signature, or automatic upgrade mechanism. Follow the GitHub Native Provider, GitHub Invoker, and capability-source definitions.
Verify
Cover successful invocation, invalid arguments, insufficient permissions, foreign Connections, and non-Ready Connections. Keep compile-time diagnostics effective. Tests use real implementations, never mocks or fake implementations; tests that depend on real accounts or external CLIs are opt-in and stay out of the default suite.
Implementation and references
5.5 - Testing and contribution
Last updated:
Prerequisite: dependencies are installed. Read root AGENTS.md and the relevant rules under docs/human/ before changes, and preserve unrelated local work.
Backend checks
From the repository root:
Test projects use xUnit v3 and run on Microsoft.Testing.Platform, selected by the root global.json. Start with relevant tests when investigating a failure, such as dotnet test tests/Agw.Files.Tests. Unit and composition tests use real implementations and pure option helpers, never mocks or fake implementations. Constructing CodexAIAgent or ClaudeCodeAIAgent probes the CLI, so those tests run as real CLI tests: they are opt-in, require the executable, and stay out of the default suite.
After changing error codes or exception rules, run dotnet test tests/Agw.Shared.Tests. After changing module dependencies, run the backend architecture tests with dotnet test tests/Agw.Architecture.Tests.
PostgreSQL tests for durable execution (lease protection, event order, active execution upgrades, and scheduler capacity) connect to an isolated test instance through AGW_TEST_POSTGRES_CONNECTION_STRING; the test role needs permission to create databases. Redis event-projection tests use AGW_TEST_REDIS_CONNECTION_STRING. Without these variables, the corresponding tests are skipped. CI runs the PostgreSQL tests on PostgreSQL 18 and checks the TRX results to confirm every required test ran and passed; see the Development guide for the full commands.
For sign-in changes, run dotnet test tests/Agw.Auth.Tests. These tests use a controlled provider and per-test SQLite databases by default. To verify against PostgreSQL, set AGW_TEST_OIDC_POSTGRES to an isolated test server’s admin connection string with a role that can create databases; never point it at a production server. Desktop main-process sign-in and credential-storage tests run with pnpm --filter @agw/desktop test.
Client checks
From src/clients:
Use oxlint/oxfmt, not ESLint/Prettier. Package-boundary changes must pass pnpm test:boundaries. After API changes, export the Development OpenAPI document to src/clients/packages/api/openapi.json, run pnpm gen:api to regenerate the typed client, and validate callers.
Component rendering tests use the shared @agw/test-harness package to set up a DOM environment. When a test needs API responses, its startApiServer starts a real local HTTP server so components exercise their own request path. For Web browser tests, run pnpm --filter @agw/web exec playwright install chromium, then pnpm --filter @agw/web test:e2e. Playwright starts an isolated Web server on 127.0.0.1:3101 and needs no backend.
Data and commits
Model changes need matching SQLite and PostgreSQL migrations, but generate or apply them only with explicit authorization. Use src/server/Agw.Migrations.Sqlite or src/server/Agw.Migrations.Postgres as the migrations project and src/server/Agw.Standalone.Host as the startup project, ending the command with -- --provider sqlite or -- --provider postgres; see the Development guide for the full commands. dotnet tool restore installs only CSharpier, so install dotnet ef separately. NoForeignKeyModelDiffer prohibits database foreign keys; Application/Infrastructure own reference validation and cleanup.
Use explicit C# constructors, not primary constructors, and DateTimeOffset for dates. Follow root AGENTS.md. Commits need explicit authorization and use Conventional Commits.
Match checks to the change
| Change | Minimum verification |
|---|---|
| Backend behavior fix | Build the affected project and verify a reproduction of the original problem |
| API or DTO change | Export the OpenAPI document, regenerate API types, and verify callers and error handling |
| Module or package dependencies | Run backend architecture tests or client boundary checks |
| Error code change | Pass tests/Agw.Shared.Tests |
| UI change | Inspect real interactions, screen widths, and relevant tests; run test:e2e for Web browser behavior |
| Site documentation | Pass strict Hugo, link, and translation checks and inspect rendered pages |
Keep failure details, fix the cause, and rerun affected checks. Describe the change, validation, and any database or deployment impact when submitting it.
Completion criteria
Bug fixes need reproducible verification. Behavior changes cover relevant success and failure paths. Changes limited to site use its Hugo, link, and browser checks; documentation-only work does not need model services or database initialization.